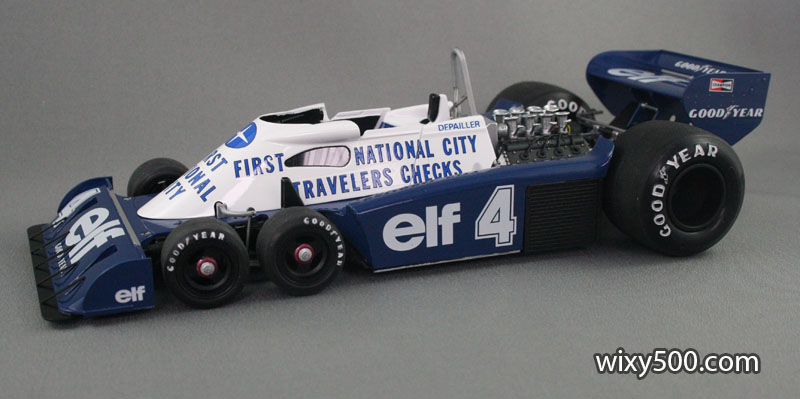
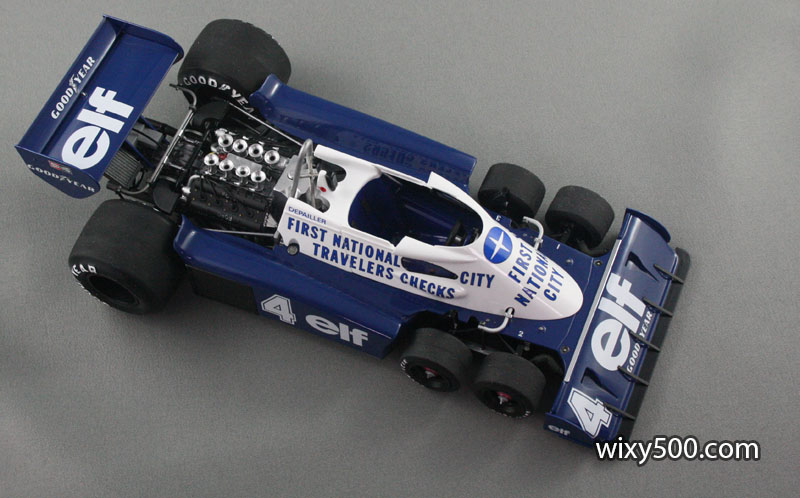
Many years ago, I built the very first model in Tamiya’s 1:20 scale Grand Prix Collection series, the navy blue Tyrrell P34 six-wheeler from 1976.
For 1977, Team Tyrrell used the P34/2, a heavily modified version of the original that featured a wider front track and very different bodywork. However, for the ’77 Monaco and Belgian Grands Prix, the team reverted to the 1976-spec bodywork. And that’s what this kit from Tamiya depicts.
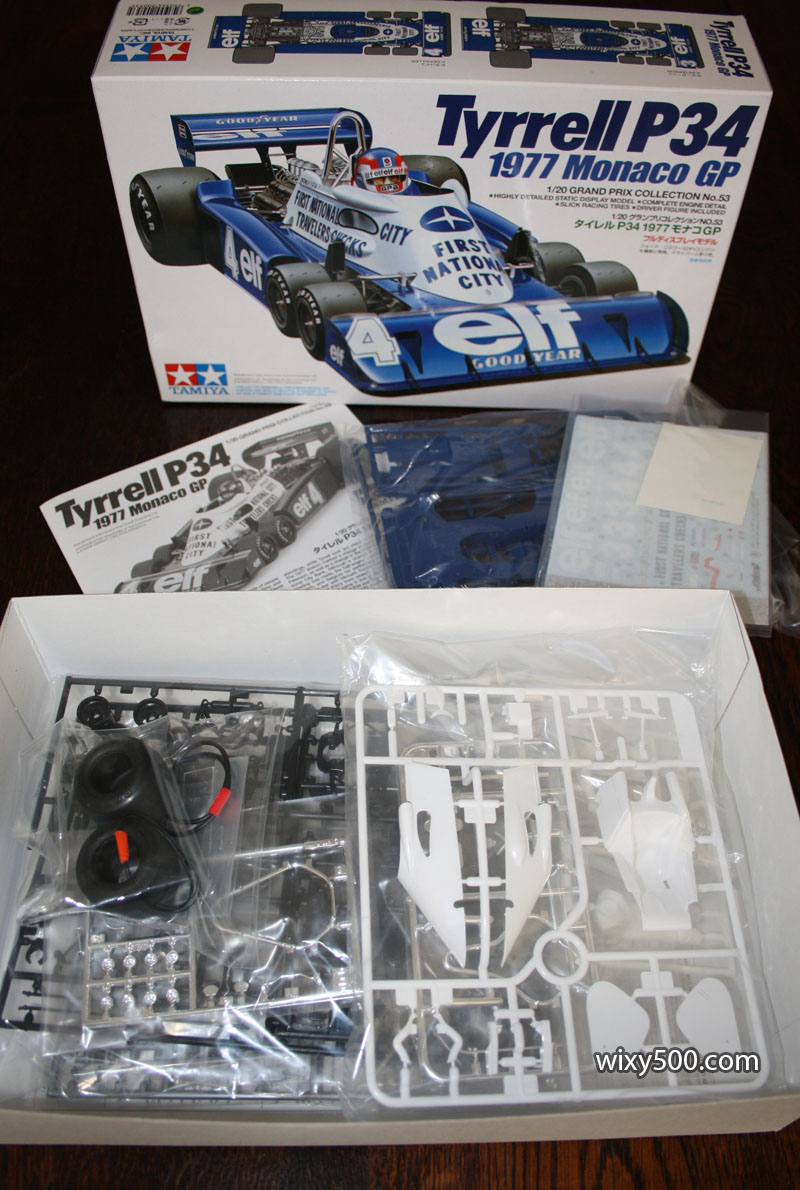
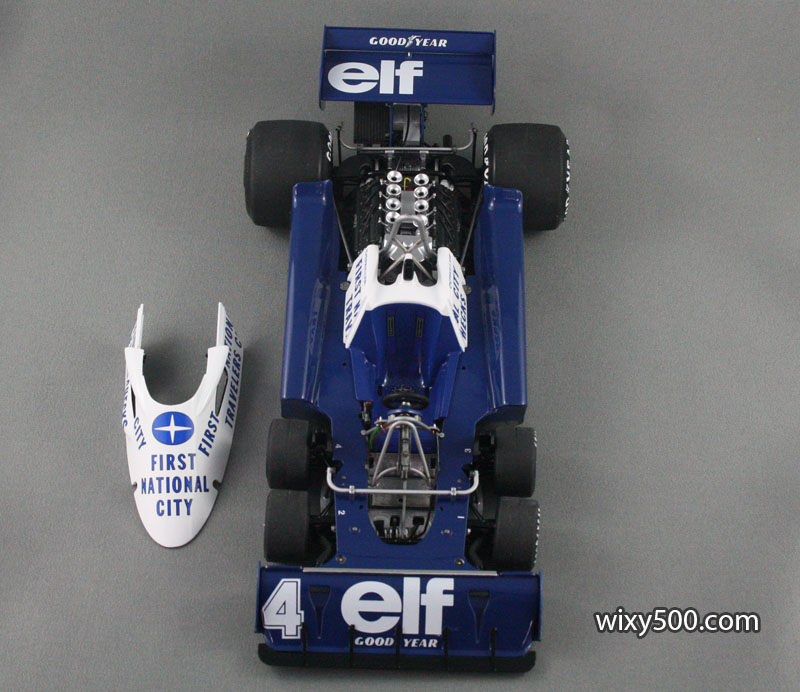
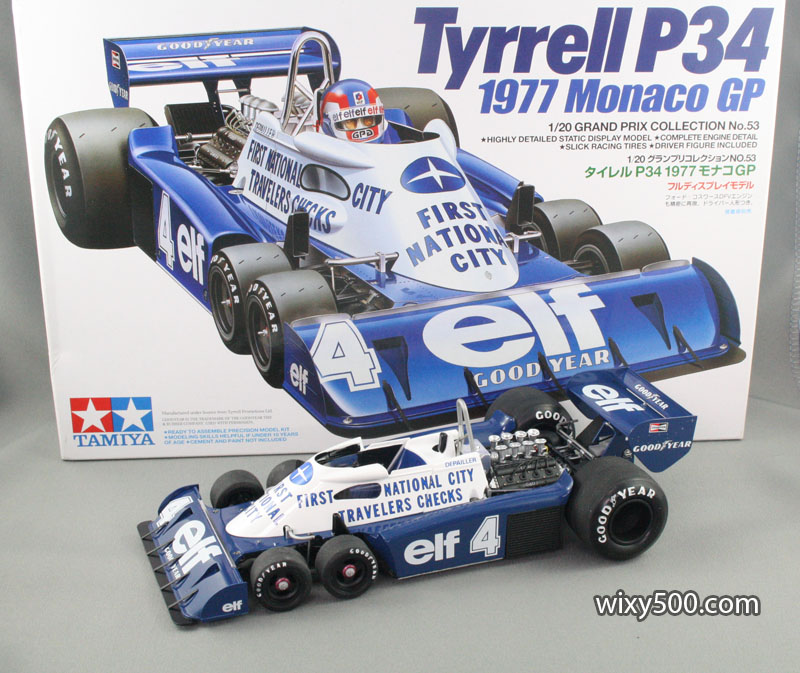
Kit number 53 in the 1:20 Grand Prix Collection, this later version has all the same parts as the old kit, but includes extra pieces specific for this race.
Box content. There are a couple of additional sprues for the extra parts compared to the original ’76 release.
Overall, the kit is good, but I seemed to struggle with this one more than I recall when I built the first version. Maybe that’s because I’m more fussy and add extra detail these days. Or maybe it’s just my eyesight’s not as good as it was 30-odd years ago!
The build took over a year and was finished just days before it was required for display at the annual Model Expo at Sandown Park.
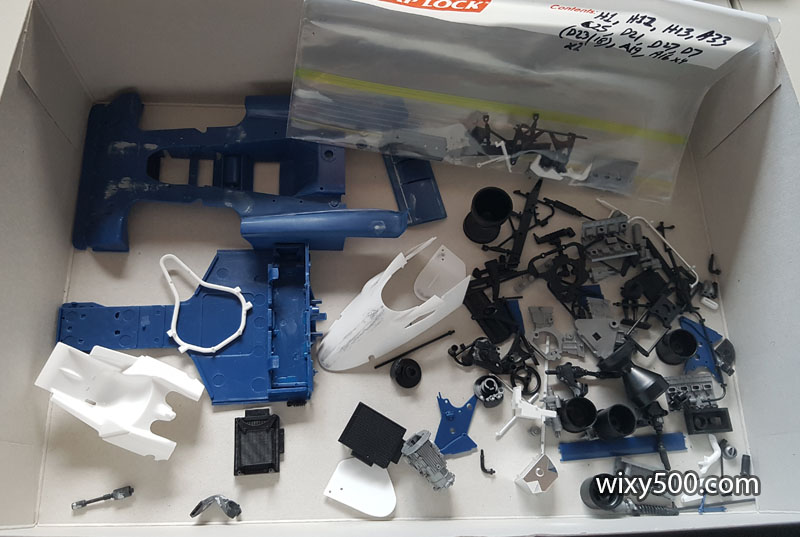
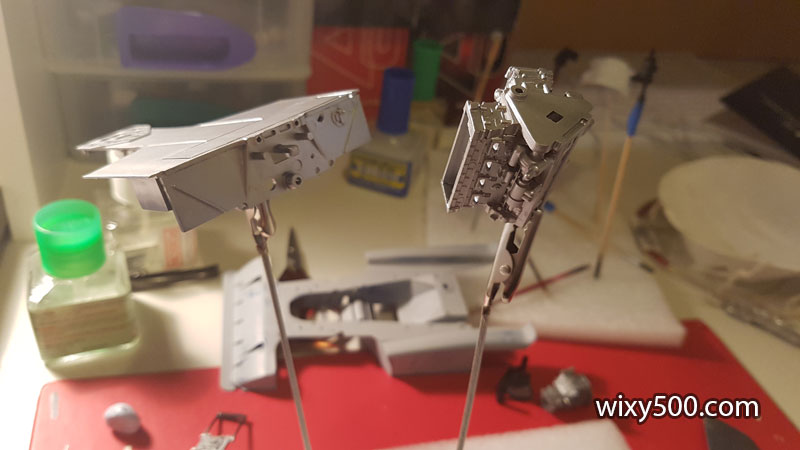
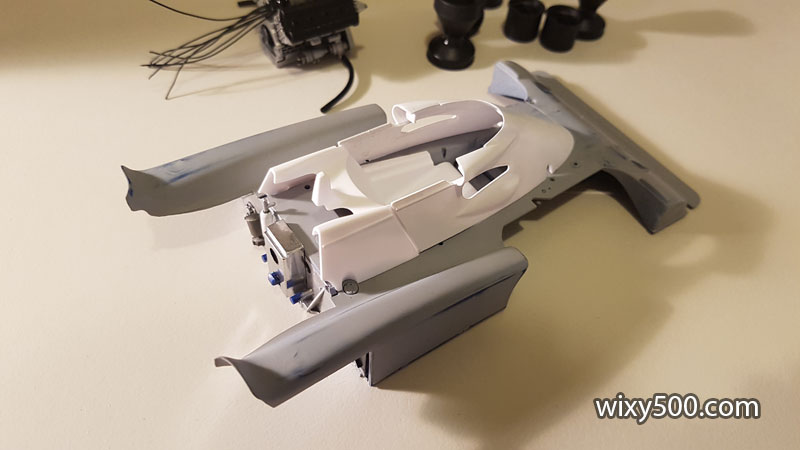
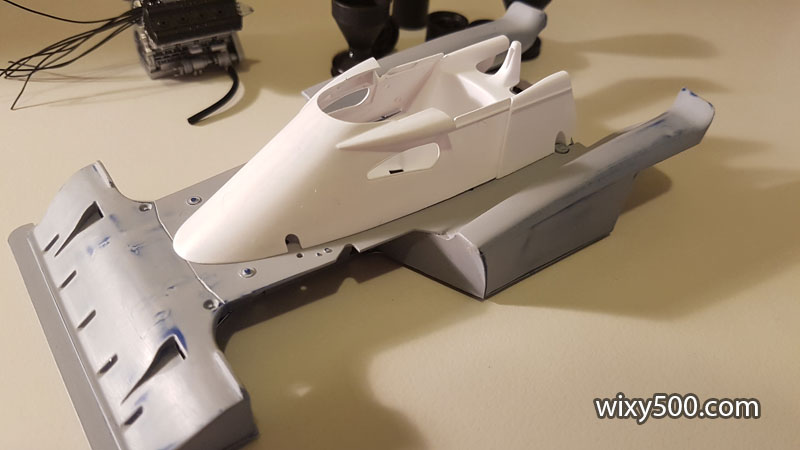
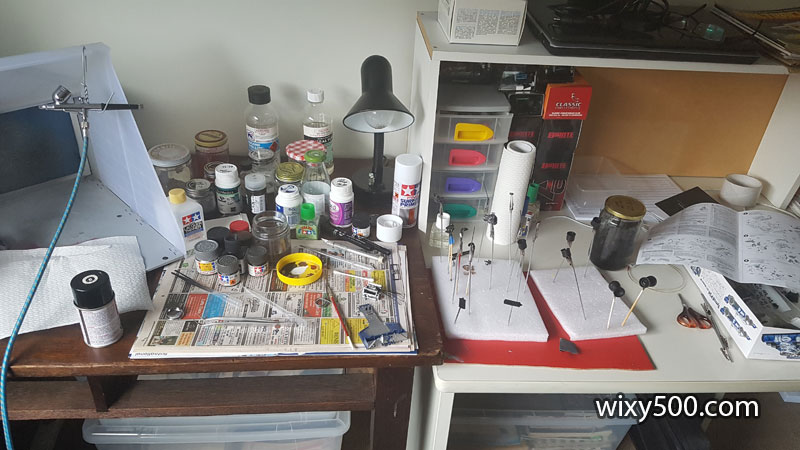
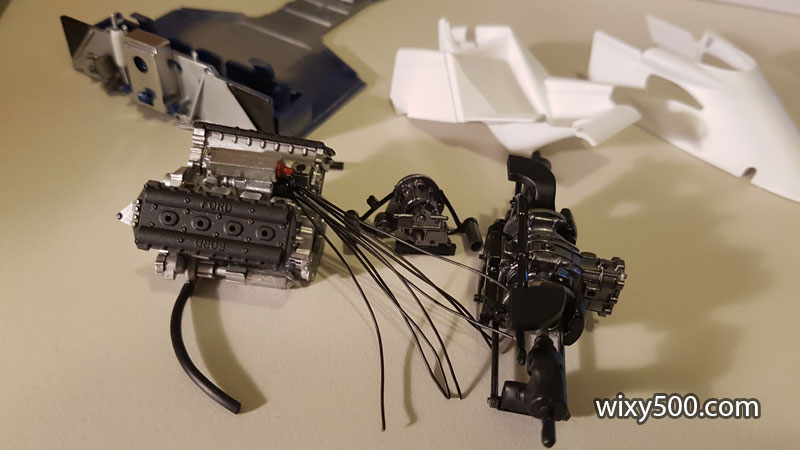
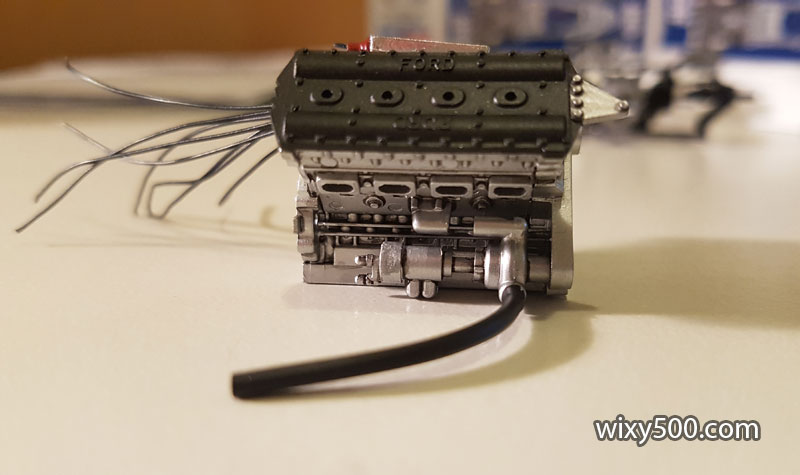
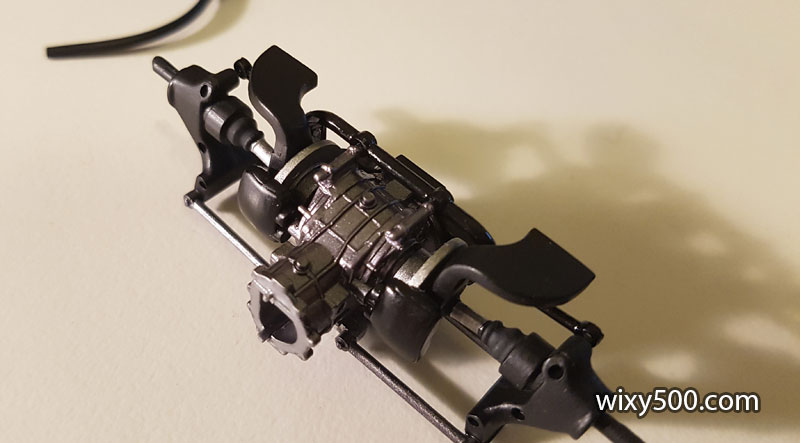
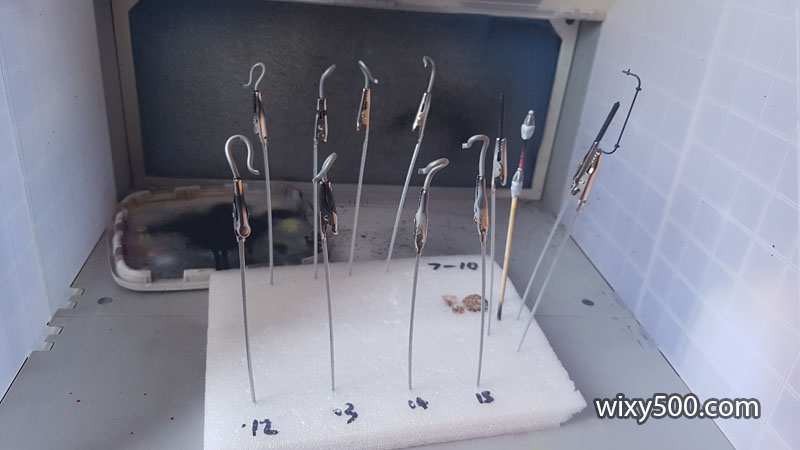
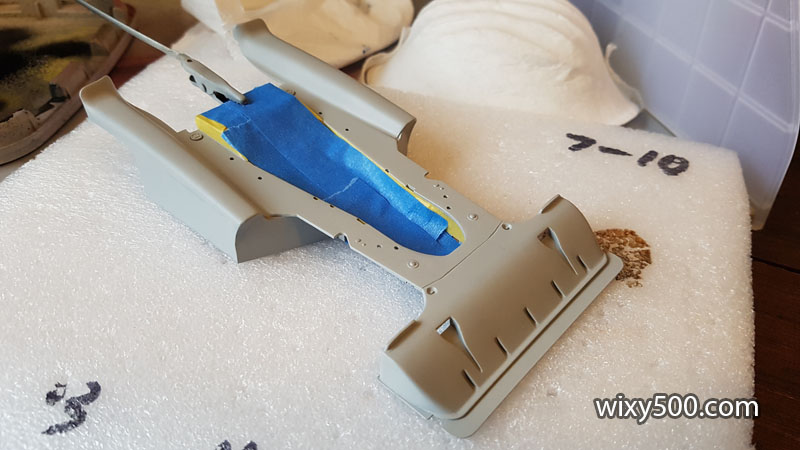
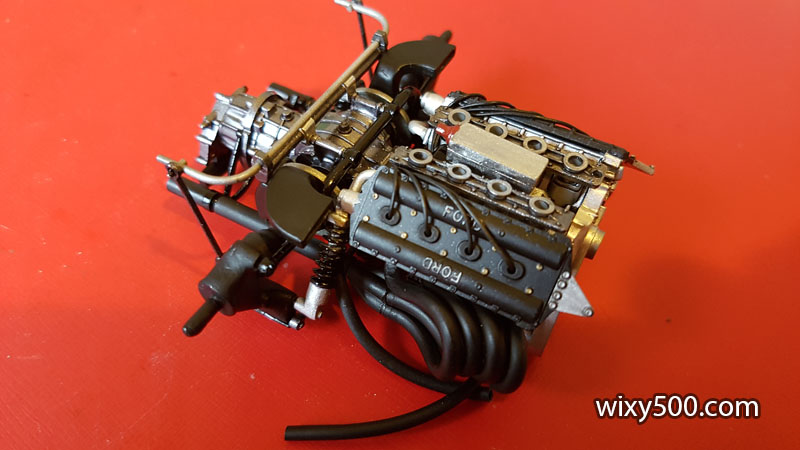
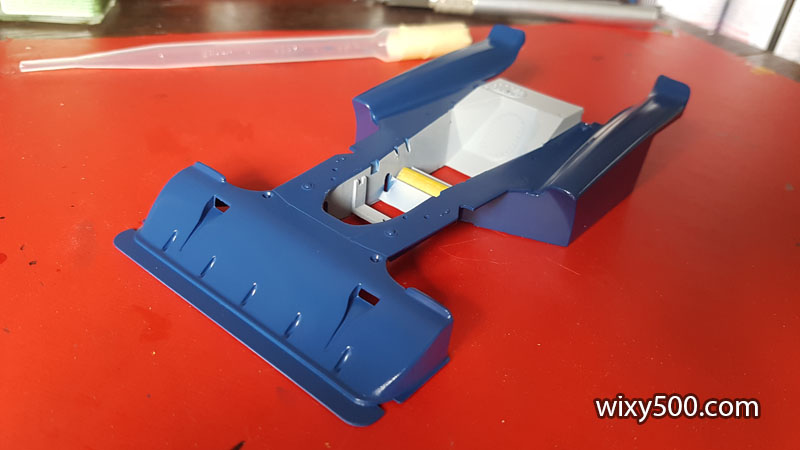
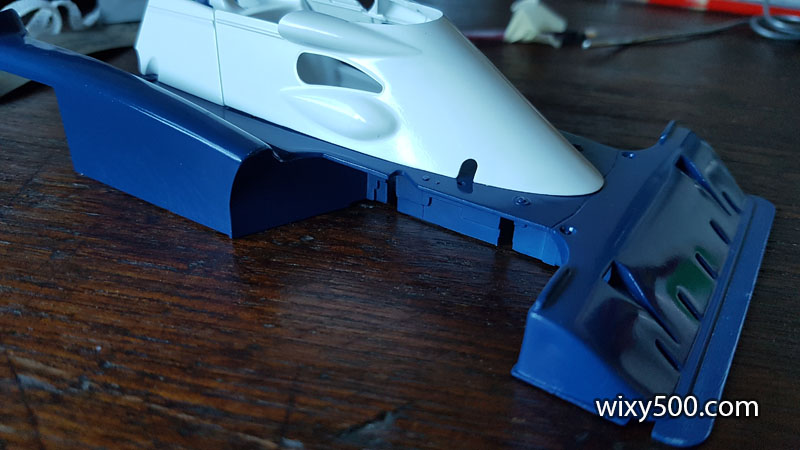
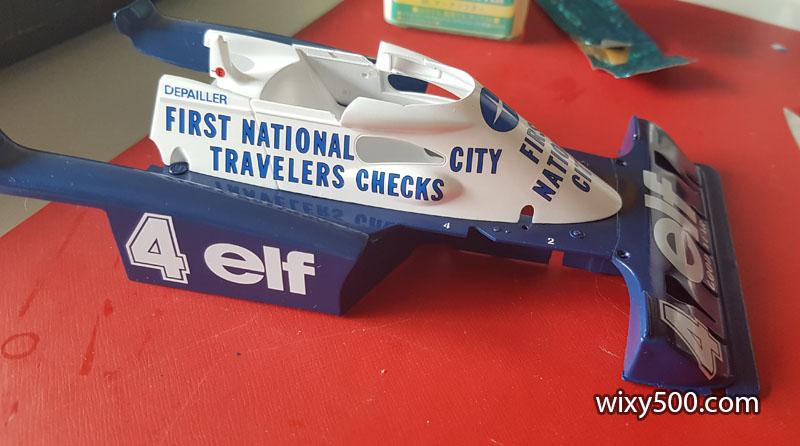
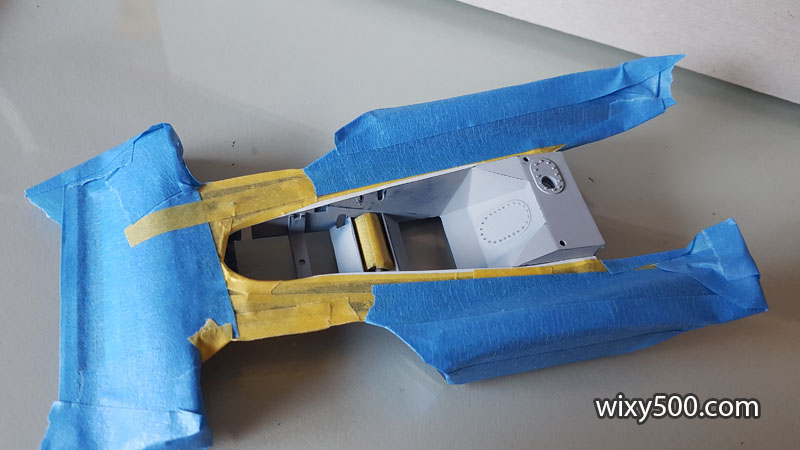
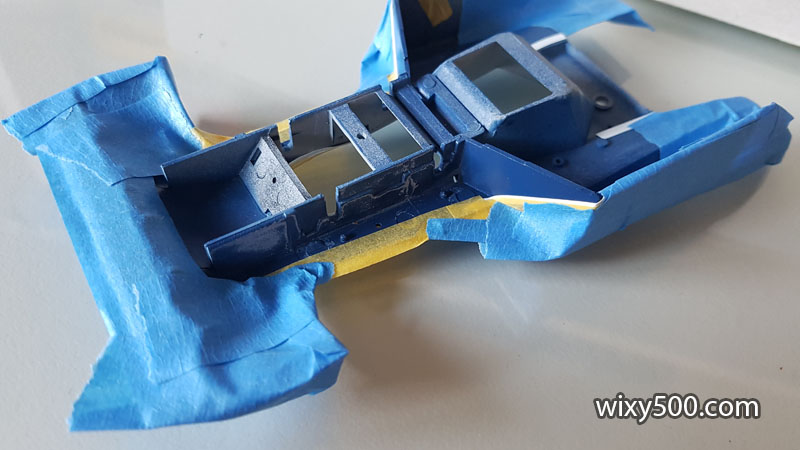
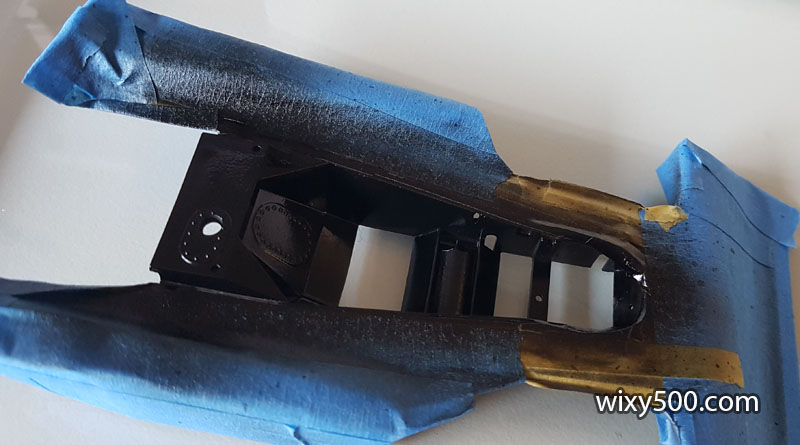
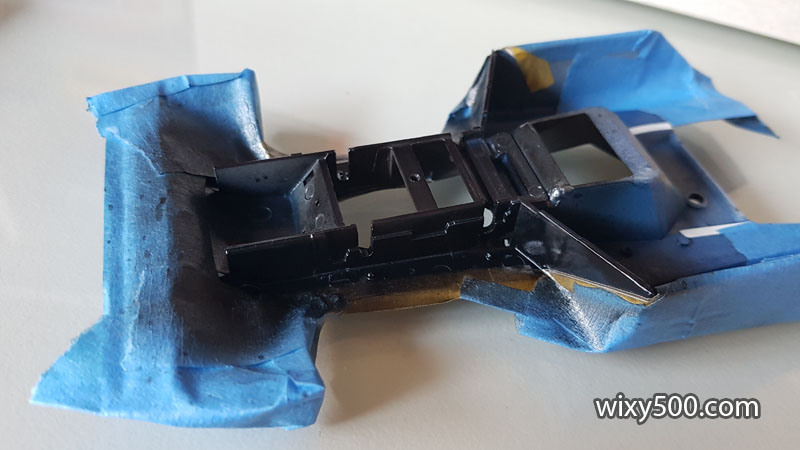
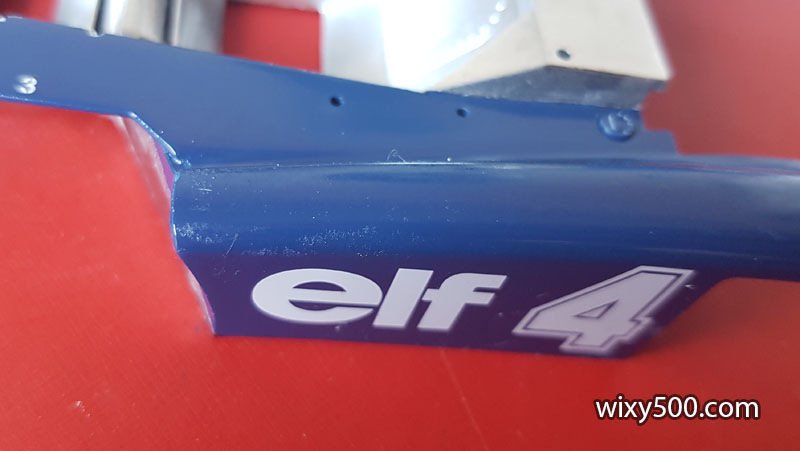
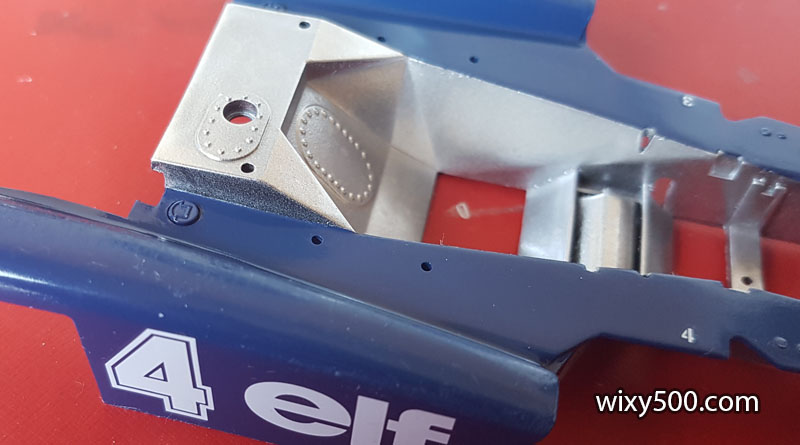
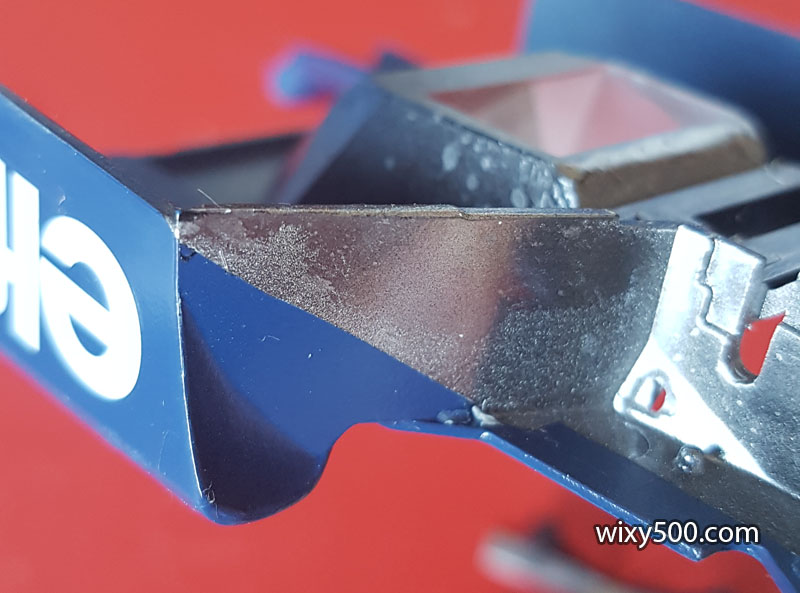
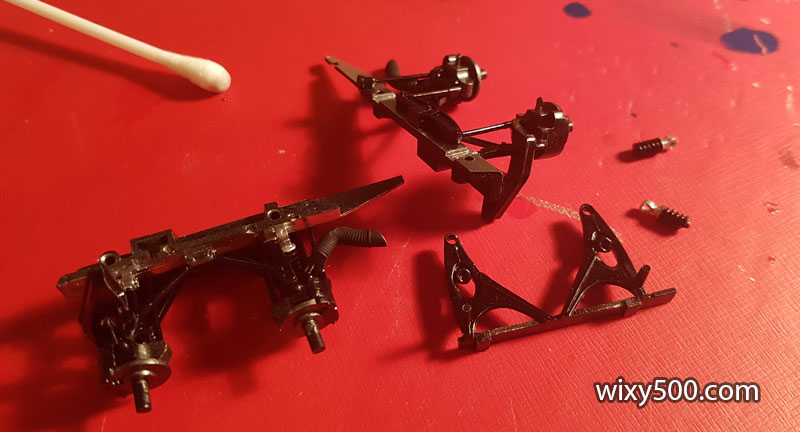
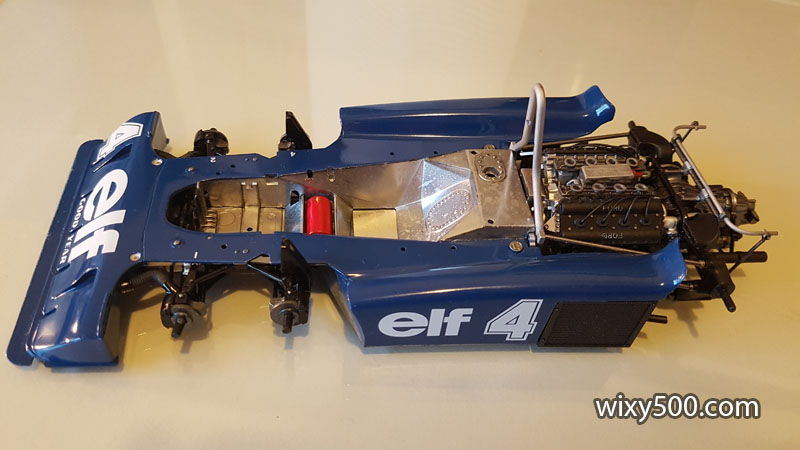
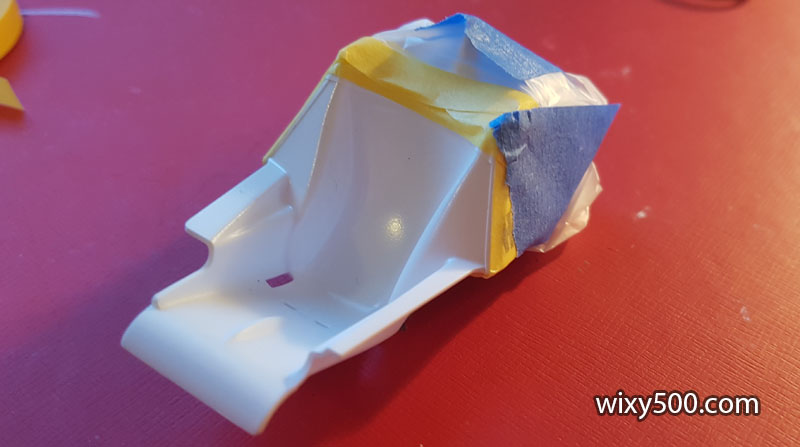
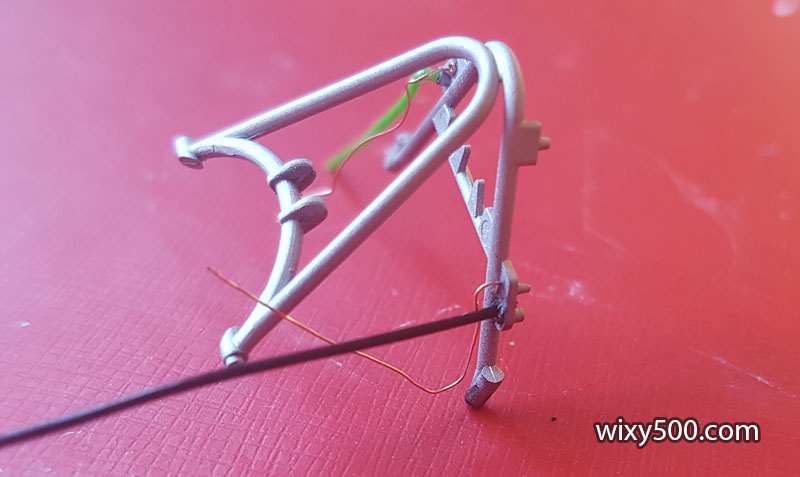
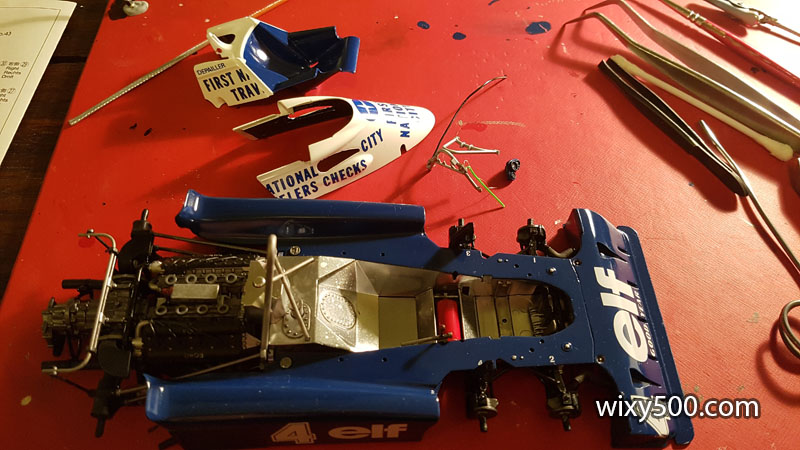
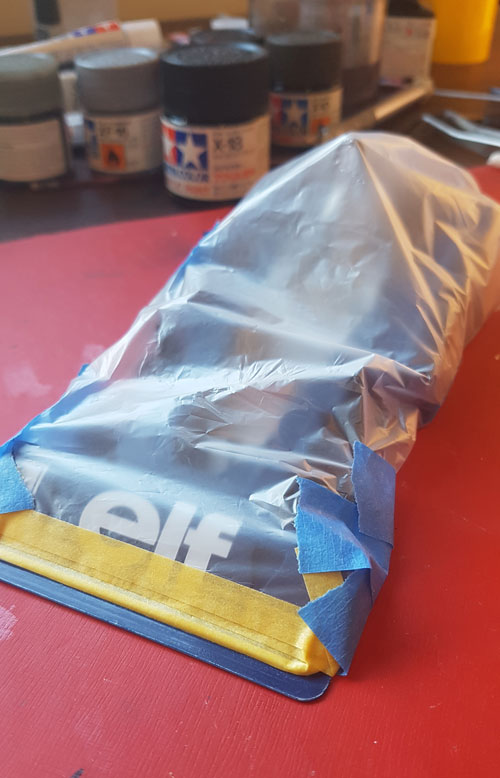
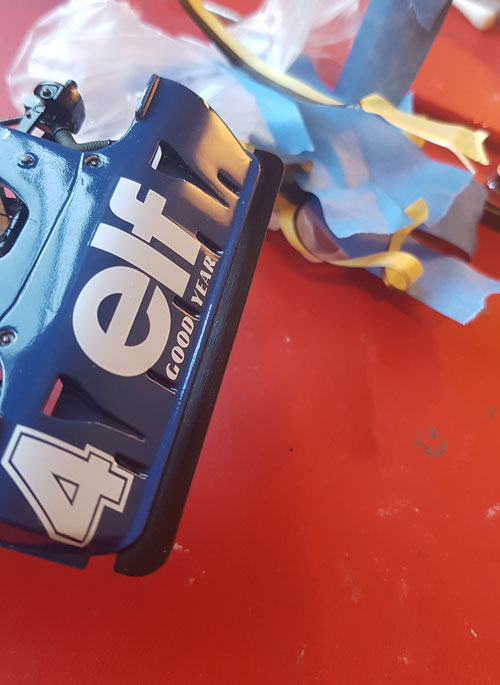
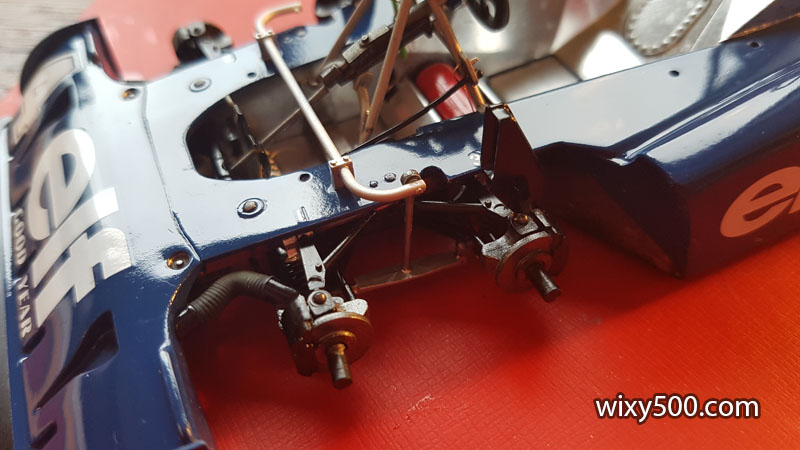
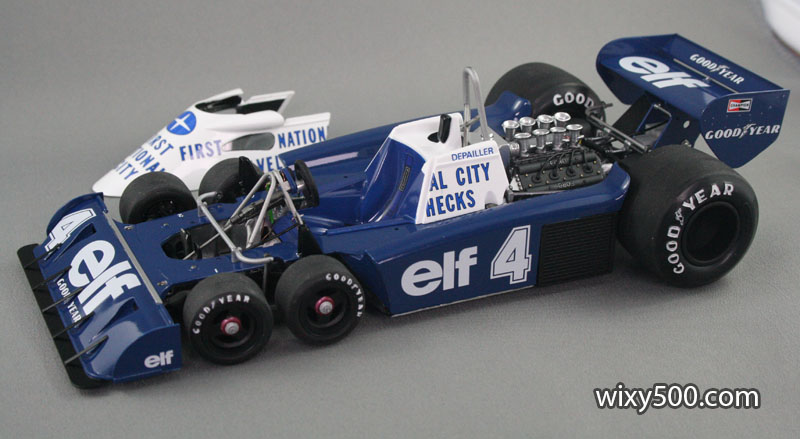
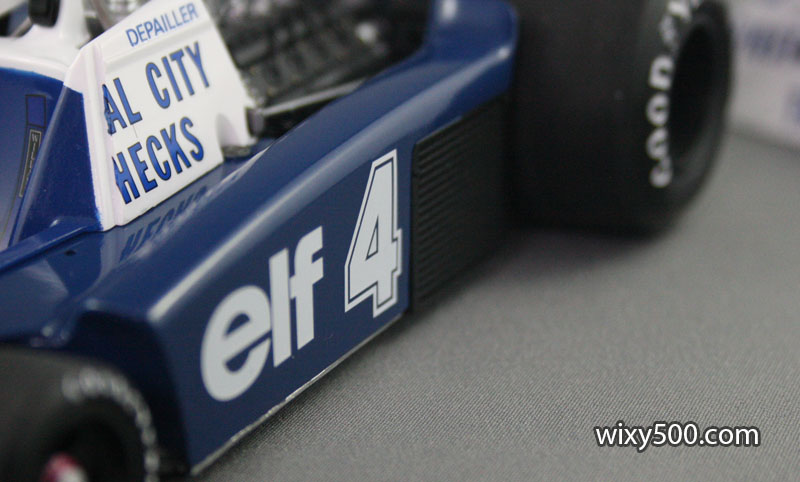
I start off by test fitting some of the main parts. The cockpit surround is molded in two pieces. Rather than use the part supplied by Tamiya (the blue bar in the pic) to set the spacing, I just used the chassis and seat insert as it’s those parts the cockpit has to fit against.Box of parts – all components cut, trimmed and (where needed) filled with putty, ready for paint. To prevent losing small parts and getting left and right side suspension mixed up, the zip-lock bag contains parts numbers as indicated.Aluminium colour for the tub and engine block. Looks very bland straight out of the airbrush.Body parts are in Tamiya’s white and grey primers.For some reason the cockpit surround was not a perfect fit against the chassis.Part way through the build, things got moved around in my office/study/studio resulting in the model work area being relocated. Needs some re-organisation…When most Aussies spent the day watching the AFL Grand Final, I got these components done!Ford Cosworth DFV block, awaiting exhausts and injection trumpets. There’s still some work to be done on the cam covers before the plug wires get inserted.Hewland transaxle/gearbox with inboard brakes and some of the suspension attachedVarious parts ready to be hit with a batch of blackAfter another light coat of primer, the cockpit is masked off ready for the first coats of blue on the main body.Rear-end done. The missing suspension links are fitted at the same time the engine gets attached to the chassis.I was not happy with the finish of the blue (Tamiya TS-15, decanted and run through an airbrush) which dried a bit dull and with some orange peel,I considered stripping and starting again, however the use of Polishing compounds somewhat saved it. Since I planned to clear coat over the decals anyway, I pressed on.Decal application. The ‘National’ and ‘Travelers’ decals span two pieces of bodywork and require the decal to be cut (after applying) so the cockpit surround can be removed.Decals drying for a couple of days before clear coat.Once the clear coat (Tamiya TS-13) had hardened, it was time to polish. The rear wing main element was the highlight. Masking the bodywork to spray the mononcoque aluminium. It was first time I’d used Alclad’s polished aluminum, which requires a gloss black base. When I mask, I use three types of tape: Firstly, Tamiya 2mm “tape for curves” for the actual edge of the mask (the white tape, which is barely visible, above), then Tamiya 6mm Masking Tape (yellow) for the general mask), and finally low-tac general purpose masking tape (blue) to cover off the rest.Parts of the underside also needed to be aluminium.Gloss black down, ready to polish.Gloss black down, ready to polish.Masked suspension parts after they’d been hit with Alclad.Masking removed from suspension components. A little touch-up/clean-up was required in a few places, but overall these parts came up well.I had planned to spray the Alclad aluminium 24 hours after the black. However, work commitments popped up and all the masking tape ended up being left on the model for a couple of weeks. After spraying the Alclad and peeling the tape off, there was virtually no bleed under the masking – but the “low-tac” tape had stuck down pretty heavily and left sticky goo all over bodywork! Thankfully I had positioned plain paper between the decals and the tape, otherwise I’m sure the tape would have pulled the decals off. Back out with the polishing compounds to clean it all up…After spraying Alclad, the surface takes on a matte-frosty appearance. I used a cotton bud to wipe the residue off. It’s easy to see how wiping away the residue reveals the final finish. The quality of this finish is directly related to the quality of the gloss black underneath. Unfortunately, it also revealed what look like spatter marks in a few places. Not sure if it’s from the airbrush, or a contamination on the surface.The engine/gearbox assembly fits to the rear chassis bulkhead. The kit uses a metal screw to ensure a strong join. It’s quite fiddly getting the engine block plus the four trailing arms for the suspension all lined up with their locators at the same time. Front suspension sub-assemblies are fiddly and frustrating, but ended up coming together ok. It’s a bit hard to see in the photo, but the Alclad on these parts came up better than anywhere else on the model. Shame most of it gets hidden when fully assembled.The two main parts of Tamiya’s 1:20 Tyrrell chassis, ready to come together. The adhesive residue from the masking tape came off ok during polishing. Unfortunately, the final finish is not as good as how the rear wing main element came up. If I’d polished more, it could be better – but I was afraid of cutting through the clear and into the decals.Fitting the engine to the chassis/body is always a significant step in an F1 build. It indicates you’re finally getting somewhere! It only took a year to reach this point… (note the sarcasm)
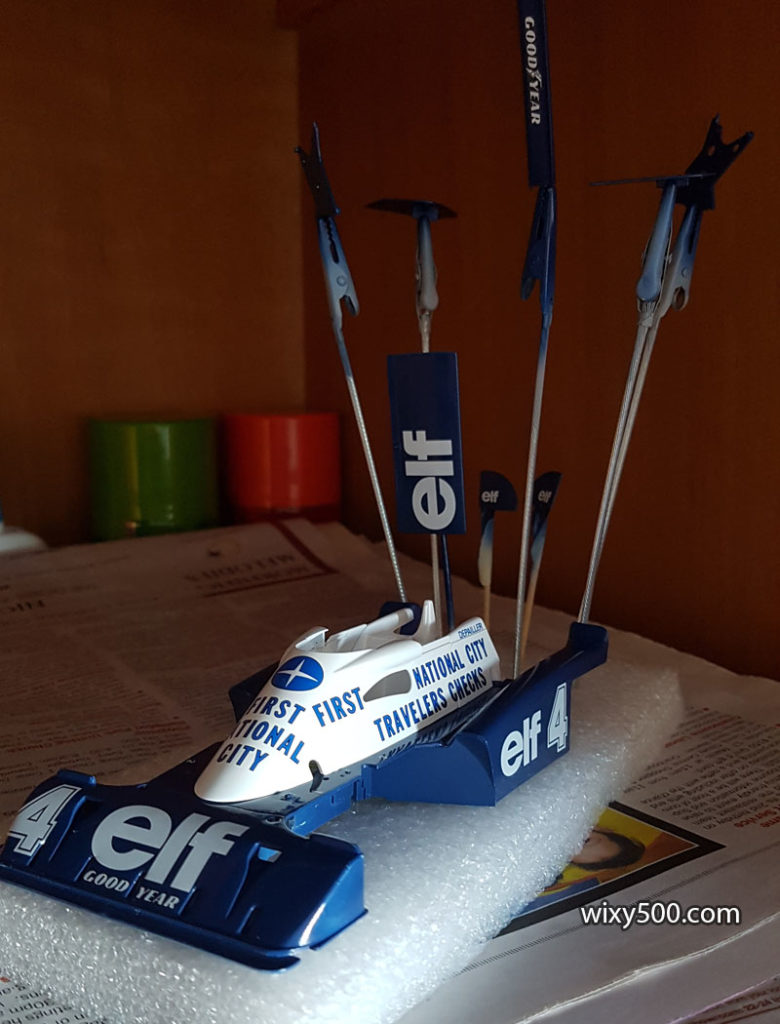
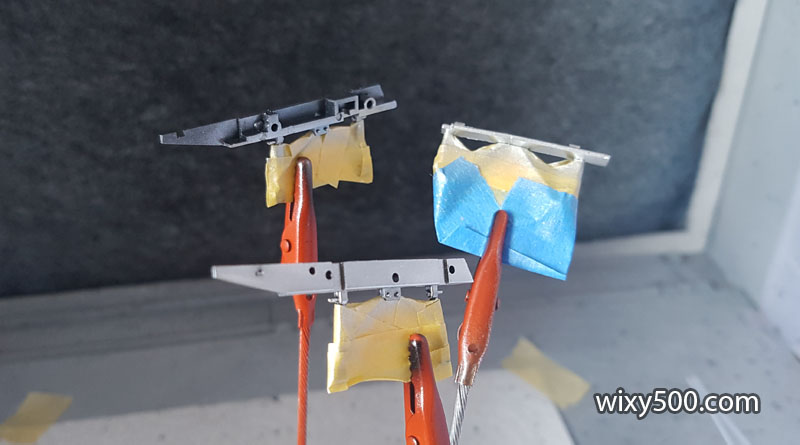
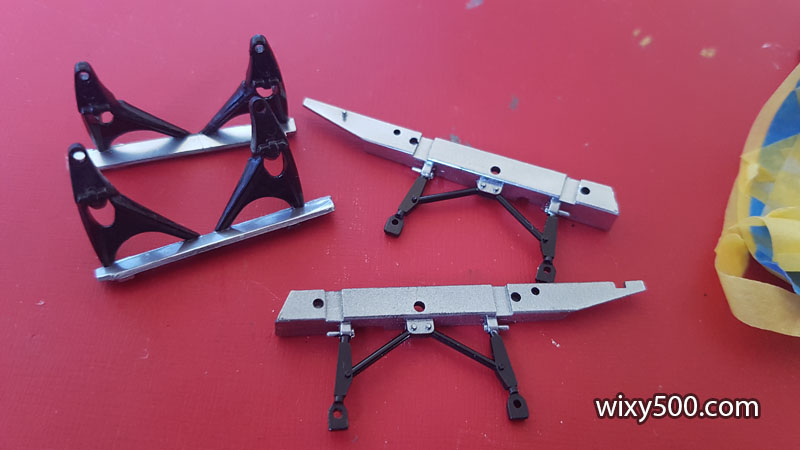
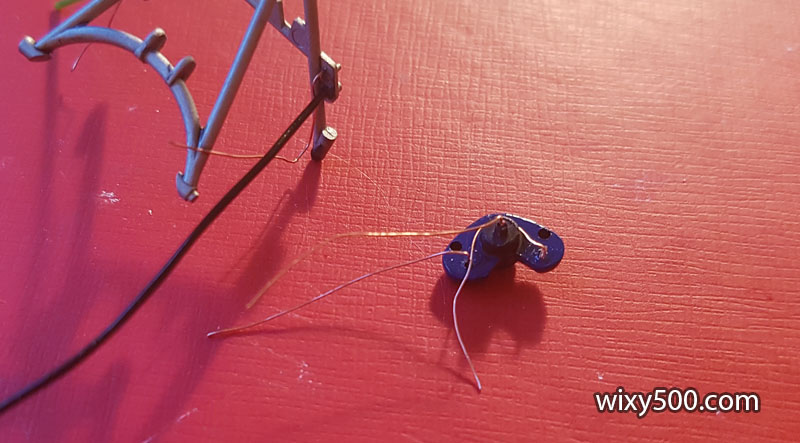
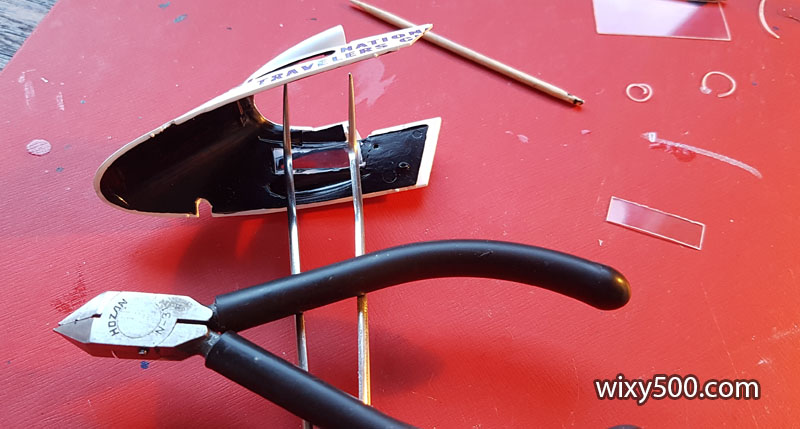
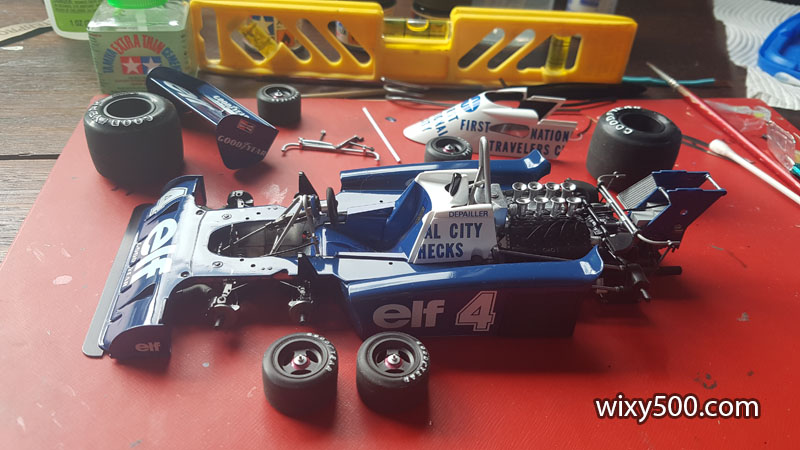
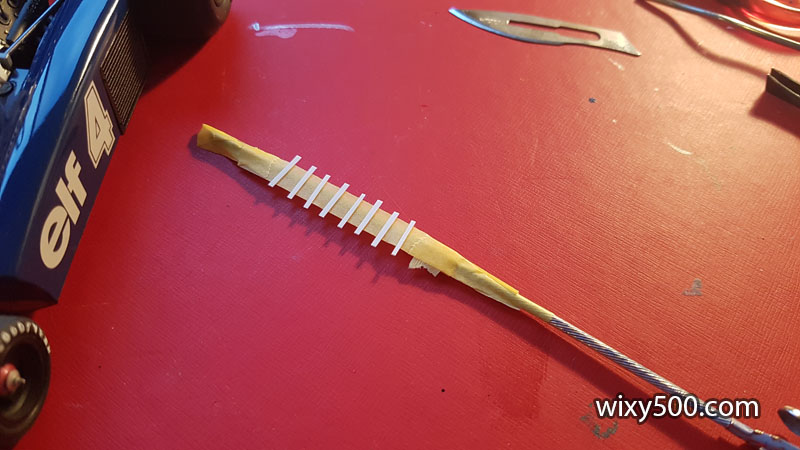
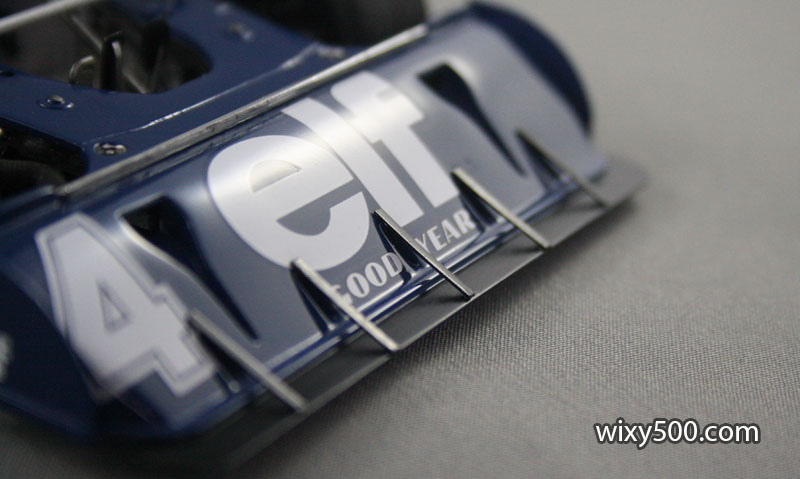
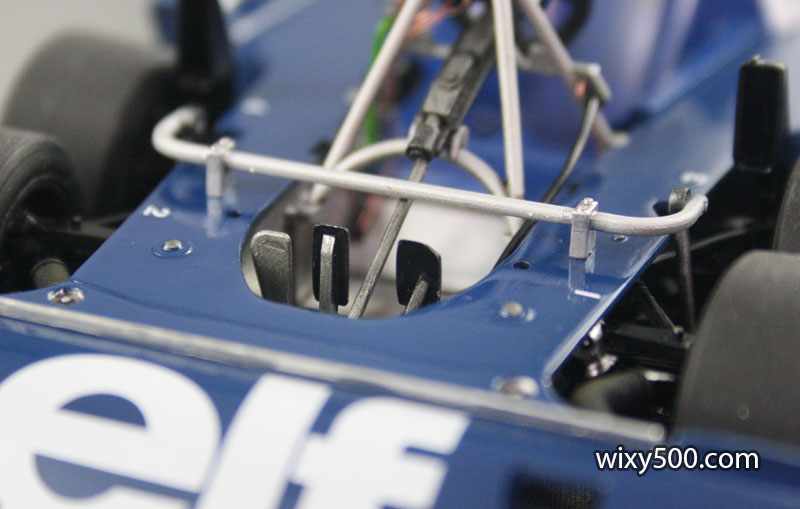
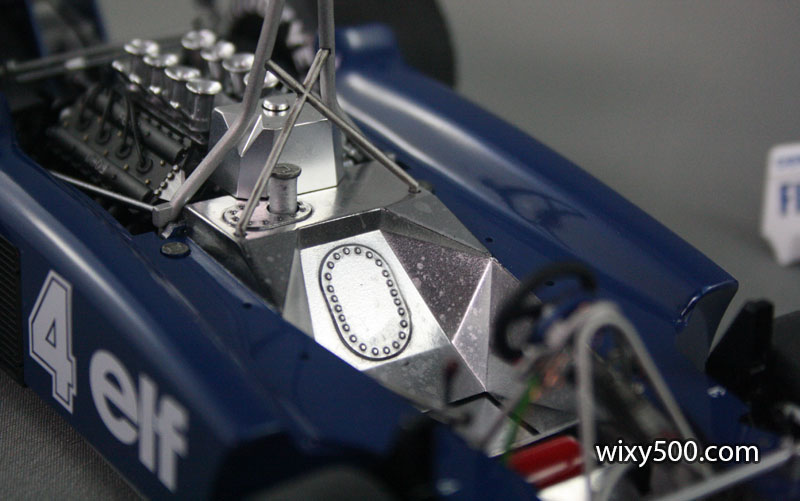
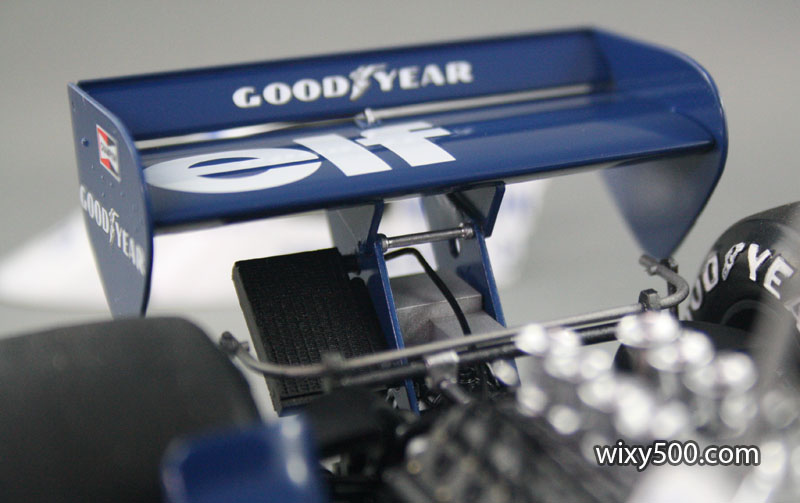
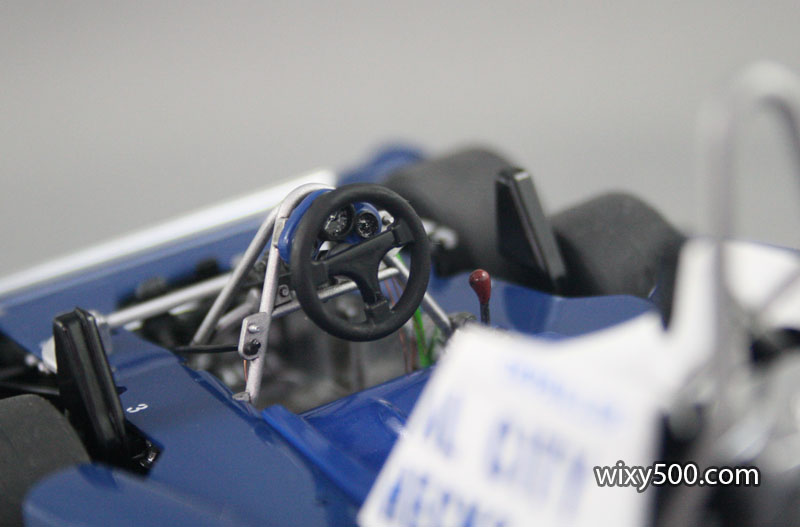
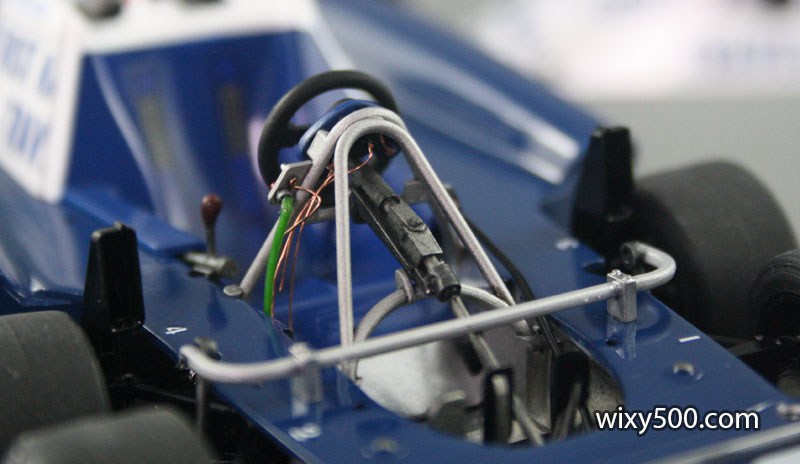
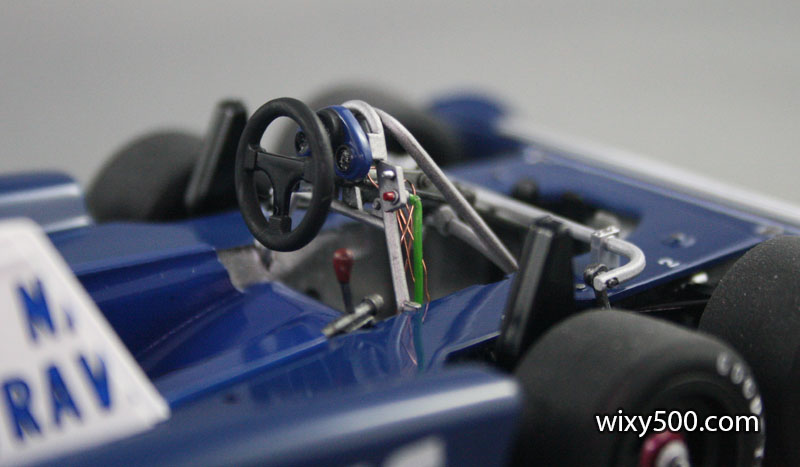
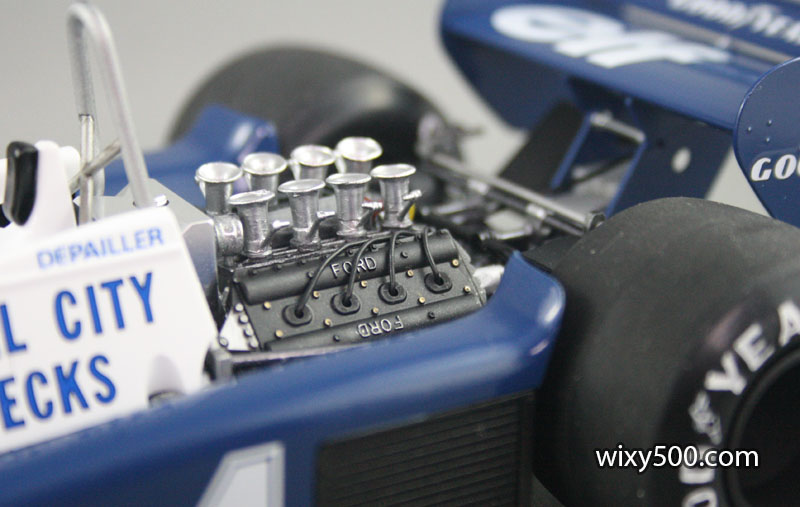
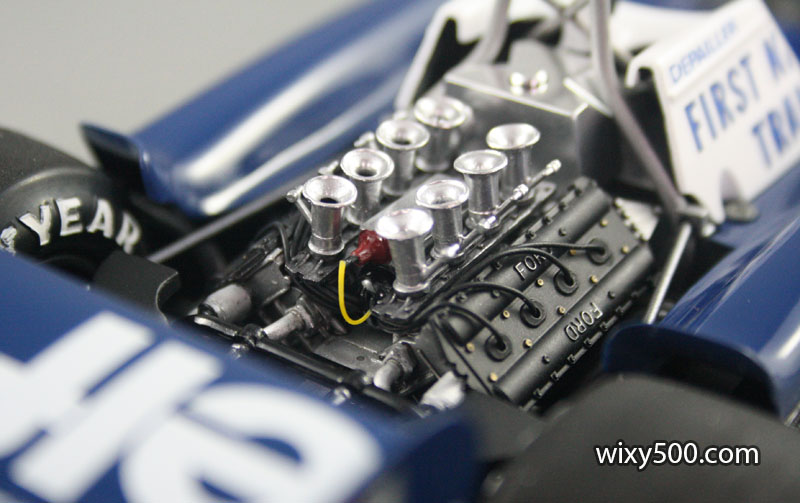
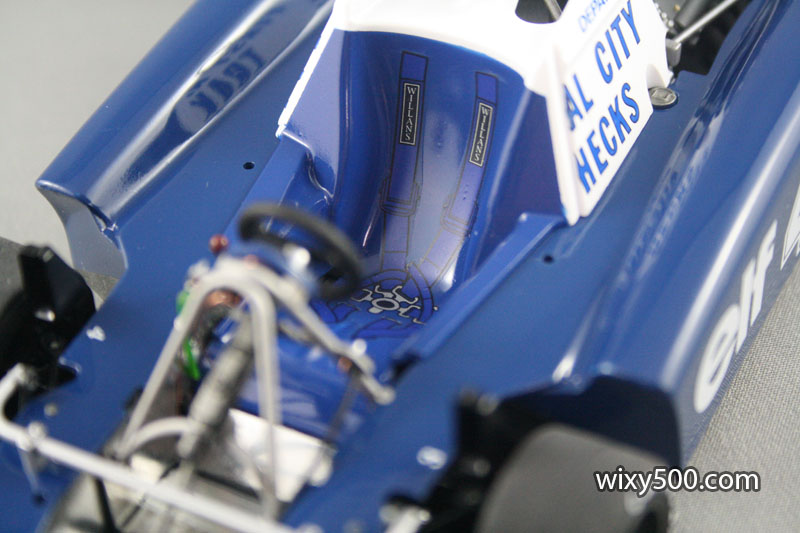
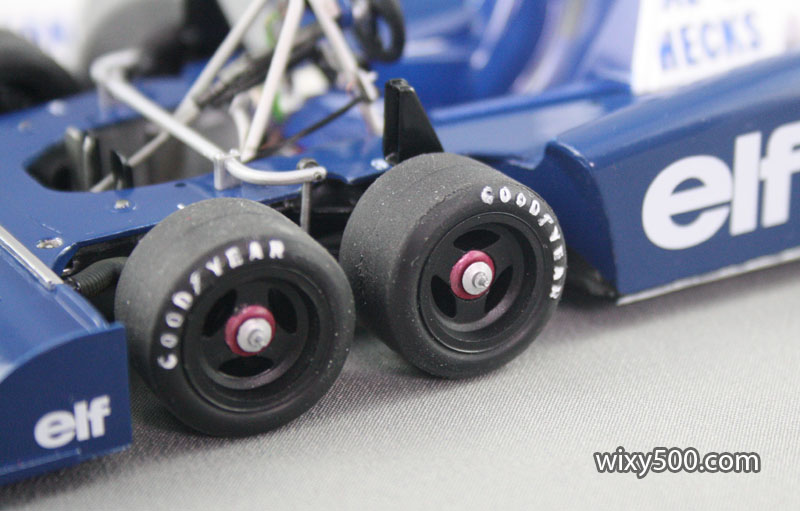
Seat masked using my “3-tape” technique, ready for a hit of blue. The yellow tape has a freezer bag attached so that I don’t have to use heaps of the blue stuff to mask off the area not to be painted. This was the first time I’ve added further wiring detail on a model. Pieces of scrap wire – and the copper strands from within – were CA glued to the back of the controls and switches on the roll hoop structure. The black wire replicates the brake bias cable that runs from the dash knob down to the brake pedal.Wires added to the back of each gauge on the dashboard.Ready to fit the dash and steering column. Finished seat is in the background.I decided to mask and spray the front splitter rather than hand paint it. Three-tape method with a freezer bag to seal the rest of the model from overspray.Perfect mask – no leakage!The clear plastic supplied in the kit for the cockpit windows is flat. However, the aperture it’s to fill is curved, and the measurements in the instructions for cutting the pieces square is incorrect. After trimming and bending to fit, I used side-cutters as weight to hold the pieces in place until the glue dried.Wheels and tyres were done early in the build and are a simple push-fit. Rear wing assembled and ready to attach.Fitting the front anti-roll bar revealed a problem – the steering column got in the way. This is one of the additional parts on this ’77 version of the kit. Not sure if I fitted the column incorrectly, or if it’s a fault with the kit. I cut the bottom shaft off the steering column and re-fitted it an angle. Not perfect, but you probably would not have noticed if I didn’t tell you. Once the bar was in place, fitting the links that connect it to the suspension was also rather fiddly. I was able to get them into position with a dry fit, then dabbed a little CA glue to fix in place.Tamiya’s 1:20 kit does not include the 5 small support struts for the front splitter (I believe they are included in the 1:12 scale version). I cut some plastic to size, stuck the pieces to the sticky side of some tape and painted them a mix of semi-gloss black and gun metal.Done!Model can be displayed with or without the cockpit surround fitted.The homemade support struts came up ok. Three-pedal arrangement in these old F1s. One of the changes on the P34 for 1977 was the front anti-roll bar. On the ’76 car, the bar went through the monocoque and required a bend to clear the driver’s legs, but for ’77 it was fitted across the top of the chassis. The seat is removable revealing the aluminium monocoque and red fire extinguisher.It’s often nerve wracking assembling a rear wing as there are multiple parts (four in this case) that need to be glued and positioned all at once. It’s real easy to mess up., but this one came out clean and square. I added a hose to the oil cooler with a piece of black wire.Cockpit detail. Brake bias on the left, gearshift on the right. Tach and oil pressure gauges are decals.The kit included no dash wiring. My effort is a bit untidy, but I think helps the realismFord Cosworth DFV V8 engine powered most of the F1 field in the 1970sThe kit included plug leads but not the high-tension lead from the coil (yellow) which I added from a scrap offcut. Kit’s fuel injection trumpets were chrome plated, but they’re aluminium on the real car. Exit Mould easily strips the chrome off so they can be painted a more realistic metal finish.I used a black marker for the window edges, which were done before the clear perspex windows were fitted. Inside is hand painted semi-gloss black.Seat belts are replicated by decal. It’s better than nothing (Tamiya’s early kits did not have seat belts) but in future maybe I need to buy some aftermarket belts because these ones get lost on the blue seat.Tyre lettering is molded into the sidewall but needs to be painted by hand. One word: fiddly!
4 thoughts on “1977 Tyrrell P34, Monaco GP (Tamiya, 1:20)”
Great detail, obviously done by an expert. I did the 1976 model some years ago and didn’t do a great job. I have just purchased the 1977 one as you have above. I think i will bookmark this page to return to it for inspiration when I start to do mine. I won’t come close to your attention to detail but I’ll give it a crack. Best wishes, Michael. AFL GF day 2020.
Excellent guidance for a amateur kit builder, attention to detail and large scale pictures very useful when your eyesight isn’t as good as it was and made my effort a more pleasurable experience.
A very nice build you have there. I have built two of these but will read your blog again for some tip to use on my next one.
about your note of the change of the 1977 front anti-roll bar. if I remember right what Ronnie wrote in a Swedish motor magazine that was one of the things they had to change for him to fit in the car.
Thank you 🙂
Interesting info about getting Ronnie Peterson to fit – I didn’t know that! Yeah, the 1976 version had the front anti-roll bar run through the monocoque and required a hoop bend in the middle to clear the drivers legs/knees.


Great detail, obviously done by an expert. I did the 1976 model some years ago and didn’t do a great job. I have just purchased the 1977 one as you have above. I think i will bookmark this page to return to it for inspiration when I start to do mine. I won’t come close to your attention to detail but I’ll give it a crack. Best wishes, Michael. AFL GF day 2020.
Excellent guidance for a amateur kit builder, attention to detail and large scale pictures very useful when your eyesight isn’t as good as it was and made my effort a more pleasurable experience.
Thankyou
A very nice build you have there. I have built two of these but will read your blog again for some tip to use on my next one.
about your note of the change of the 1977 front anti-roll bar. if I remember right what Ronnie wrote in a Swedish motor magazine that was one of the things they had to change for him to fit in the car.
Thank you 🙂
Interesting info about getting Ronnie Peterson to fit – I didn’t know that! Yeah, the 1976 version had the front anti-roll bar run through the monocoque and required a hoop bend in the middle to clear the drivers legs/knees.