The Australian V8 Supercars Championship moved to a new technical package in 2013, termed “Car of the Future” (COTF), a rather silly name if you ask me.
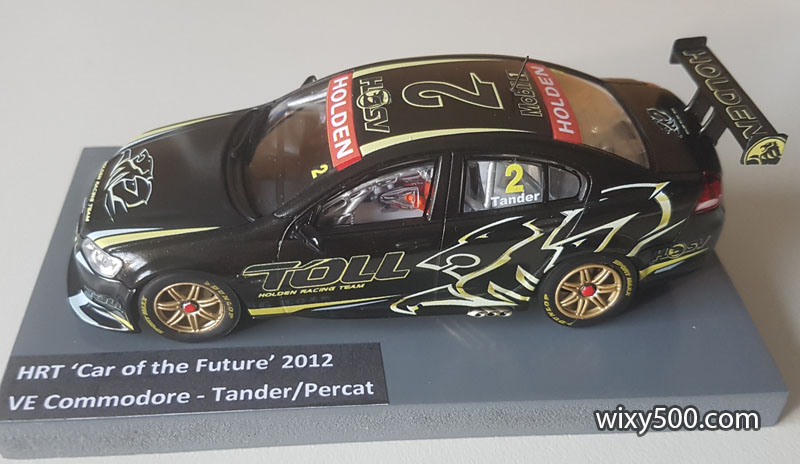
HRT built it’s first race car to the COTF specification in 2012 and presented it at Calder Park Raceway and the Walkinshaw workshop in the dark carbon fibre and gold livery with gold wheels as shown below.
HRT’s spectacular ‘Car of the Future’ was run at various race tracks in preparation for the 2013 season, but was never raced in this livery.
None of the commercial manufacturers produced a model of this car, but after market decals became available.
Now, COTF started in 2013, as did the VF Commodore as Holden’s race car. However, built in 2012 in preparation for COTF, this racey looking test/launch version was built with a VE body, as the VF had not yet been made public by Holden. I did not pay enough attention to this fact…
The Conversion
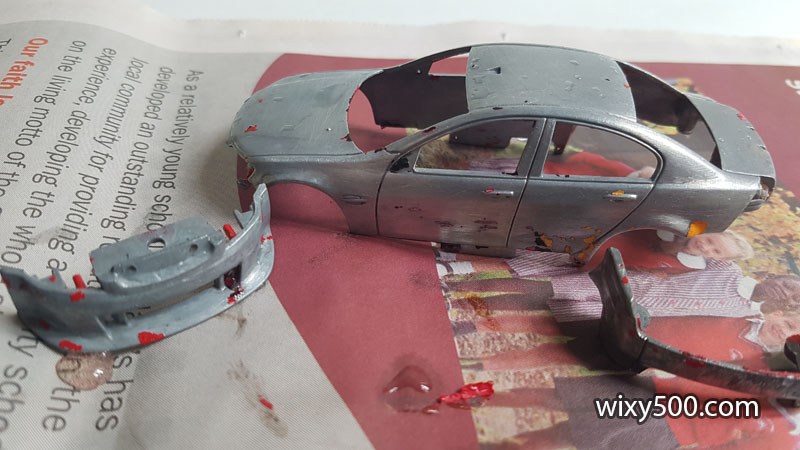
Armed with a Classic Carlectables 2013 HRT race car and after market decals, I thought I was set for a quick and easy Code-3 conversion.
CC’s item #102-12, Garth Tander’s HRT race car (with the correct gold wheels) from 2013, plus after market decals from Pattos Place.
The model was disassembled, paint and decoration stripped, body sanded and primed. These casting marks were quite noticeable in the front mudguards.
Tamiya surface primer was painted into the imperfections, ready for sanding smooth again.
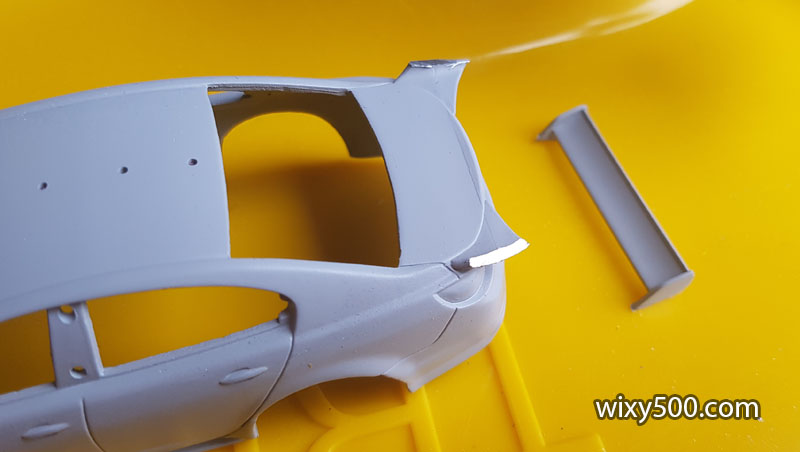
I then noticed the rear wing on the HRT test car was mounted with central supports, not the wing endplates that were raced in 2013. I still hadn’t realised I was working on the wrong model Commodore… Anyway, the Dremel had this off in flash. Then, while filing the rear of the car, I notice the tail lights do not match the photos. Ohhhh shiiiit…
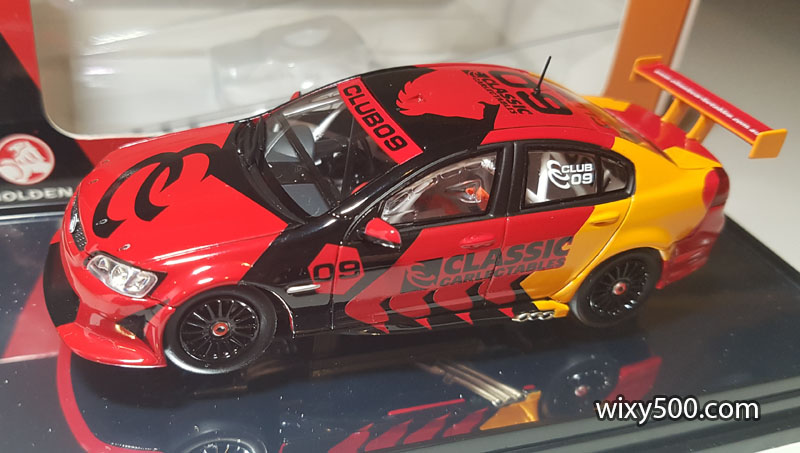
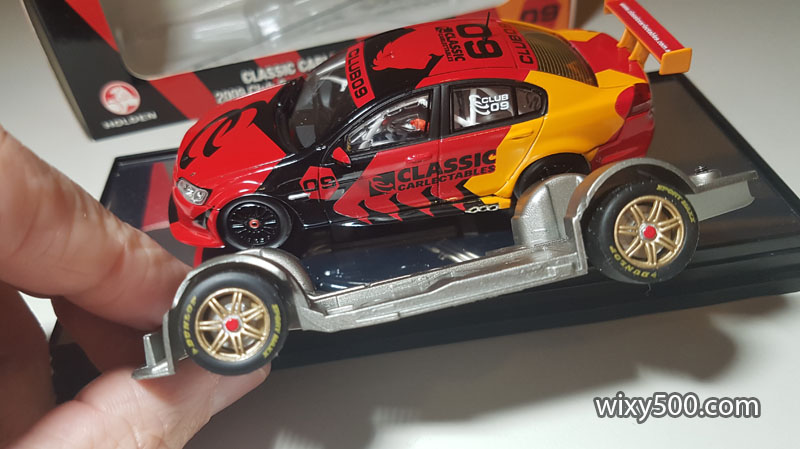
So, into the box of donors for a VE Commodore. This is Classic Carlectables’ Holden “Club” model for 2009, but the rims are incorrect for this conversion.
Unfortunately, the floor and wheels off the VF won’t bolt into the shell of the VE. The wheelbase is about the same, but the engineering of the two models is chalk and cheese.
Bit of work is involved to split the VE Commodore. These models have far more detail, parts and complexity compared to Classic’s VF, including interior and underbody detail. All these windows need to be removed (by drilling out the metals pin heads) before the paint can be stripped.
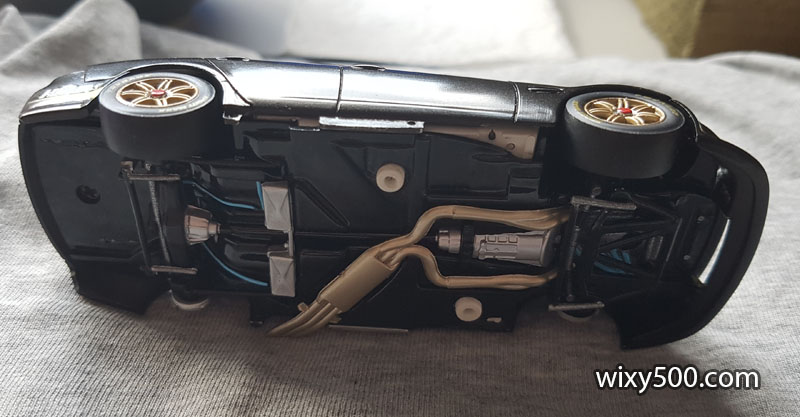
The wheels basically had to be broken off to remove from the base plate. These wheels are actually screwed into the axle, but I was not able to remove the locking nuts to access the screw. I’ll hang on to all these parts in the event they can be used on a future project.
Next job is to get the gold wheels from the VF to mount to these brake discs on the VE – and do it with the correct offset.
Pins drilled, windows out.
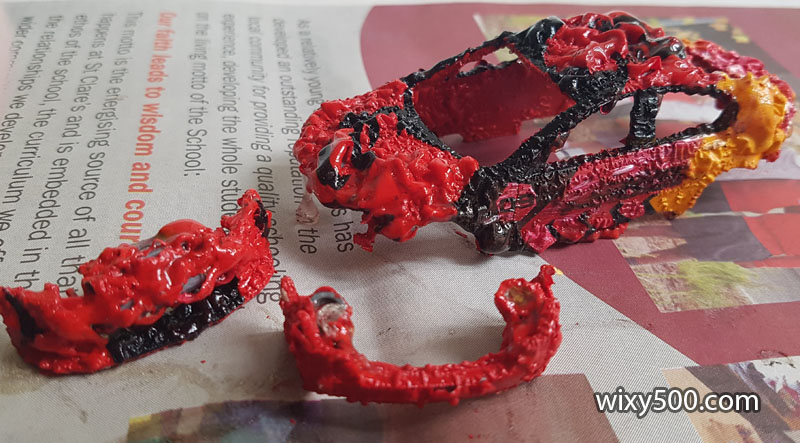
The tools for stripping the paint off a diecast ( + running water and rubber gloves)
Paint bubbles up within a minute.
Scrubbing with a wire brush under water gets almost everything off. A re-application of stripper on the missed bits pretty much does the job. A sharp screwdriver edge is used to scrape out tiny amounts of paint in door latches or glue in tail light crevices etc.
The metal bits ready for sanding and primer.
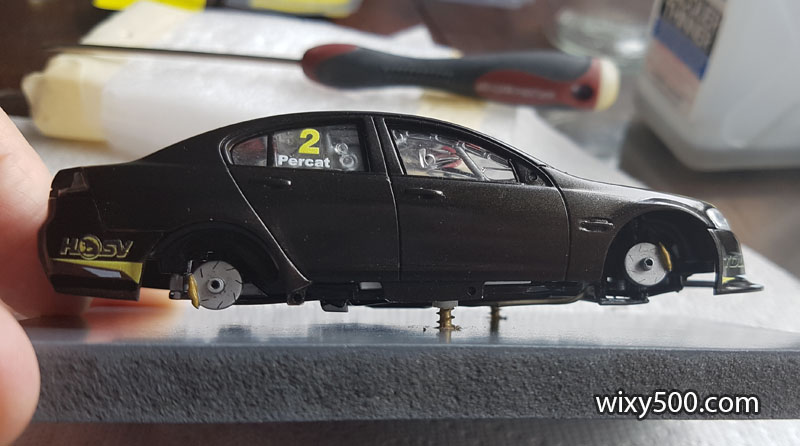
The chassis base is screwed to the main body so the new wheels can be located with realistic offset and clearance.
This is the reverse side of the gold wheels off the Tander Toll VF – stock rim on the left, modified version on the right. The centre has to be drilled out and cut down to fit over the VE’s axle locators, otherwise the wheels stick way out past the bodywork.
That’s a screw-up; went a bit hard drilling out the cowl mounting from underneath. Luckily the drill didn’t break through and these two pimples on the bonnet were easily fixed with a file.
I thinned the casting by removing material from inside the upper wheel wells just to buy a little more adjustment clearance for the tyres.
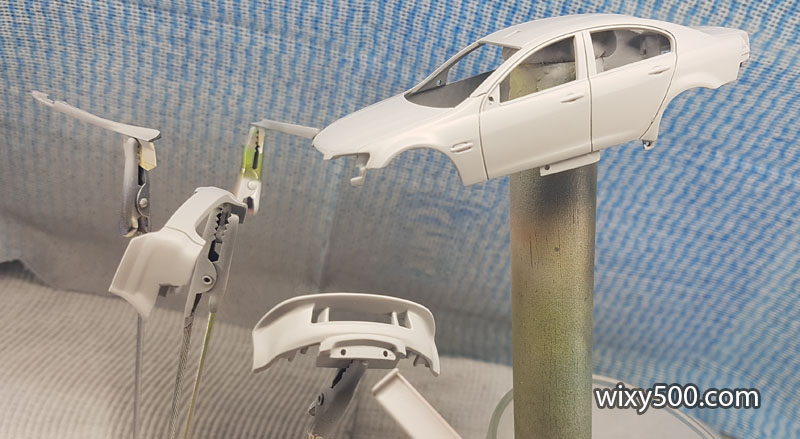
All the body parts prepped for primer. The two side-skirts and rear wing are plastic and have been sanded.
Primer on, Tamiya grey via airbrush.
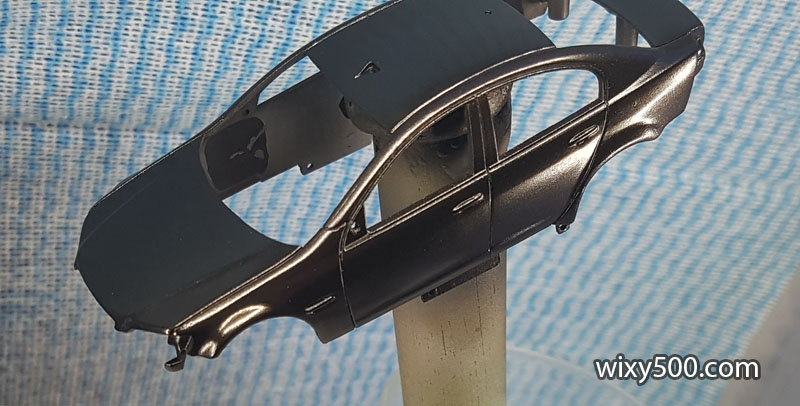
Here’s the first coat of an experiment. From what I can tell, the real car was not painted black, but had a carbon-graphite/carbon-fibre patterned wrap over the entire body. The carbon pattern was hardly noticeable in photographs of the full size car, so I thought a 43rd scale model covered in carbon decal would be a bit overkill (besides, I’m yet to see lifelike carbon decal in this scale – to me, the weave always looks too coarse). To try and recreate the overall tint without pattern, I mixed Tamiya dark copper (XF-28) into gloss black (X-1) at about 1-to-4 ratio (plus thinner) and shot it through the airbrush.
The metallic flake in the copper shows up in the light. It’s not carbon fibre pattern, but it’s a pattern of sort! Like the real car, the colour changes dramatically based on light direction.
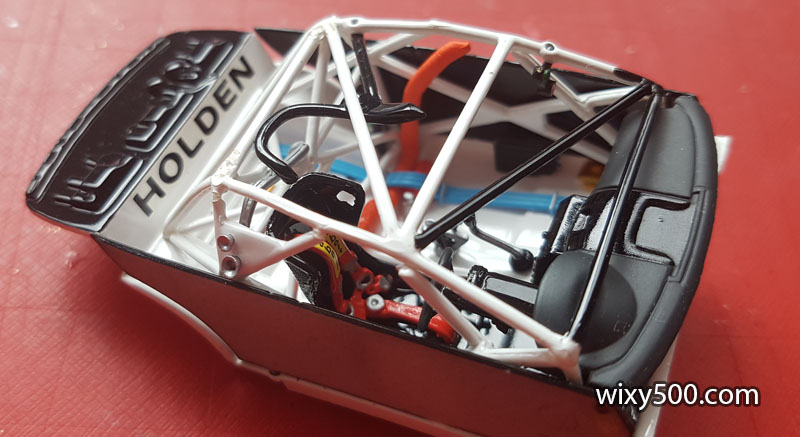
The interior insert includes quite a bit of cockpit detail. The COTF did not use the diagonal ‘Larry Bar’ across the front, so that was cut out. Also, the interior of the HRT COTF was silver. I wasn’t going to pull all this part to re-paint when it’s hard to see inside the model anyway, so hand painted the visible bars and rear parcel shelf (and forgot to take a pic before it was assembled).
After paint, it’s decal application. Micro Set and Mico Sol work ok on Patto’s decals.
Window inserts as they came out of the donor.
Window inserts after polishing off several of the markings. The decal sheet included new windscreen banners; I just wanted to take the black writing off in case that bled through.
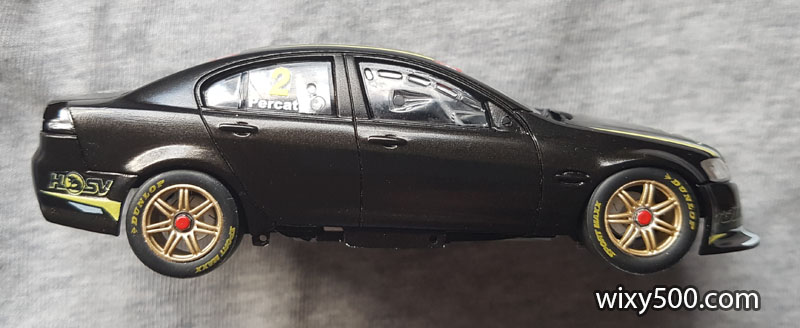
Windows done and decaled. I did not fit the regulation Supercars decal set for the rear side windows because the ones supplied were way too big and would not fit. Conversely, these red Holden banners were too short… Both Garth Tander and Nick Percat drove this car on test days. I decided to give them each a dedicated side. Some panel wash was put around the wheel nuts to give them some depth.
I don’t like the original Classic Carlectables mirrored plinth or the fact they mounted the model ‘off the ground’, so decided to put this onto one of my MDF bases. A couple of self-tappers are screwed into the model’s original mounting holes. The depth of the screw head is adjusted to obtain suitable ride-height and security to the base.
The wheels are mounted and glued one by one (no jig). The Classics’ Supercars of the era had far more detail than what they do now.
Rear wheels hang out a little far, but major surgery would be required to fix, so this is how it will be. Looks a bit weird here because the lower side skirts are yet to be fitted.
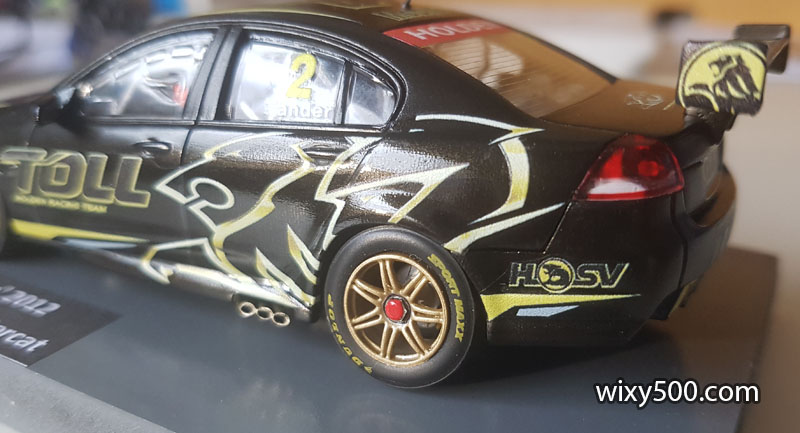
Job done! Once the side skirts were fitted and the model fixed to the base, the big one-piece side decals were added, plus grill, mirrors, rear wing etc. I was happy with the colour and gloss level (or lack thereof) of the paint, so decided not to clear coat this one.
It’s got camber 🙂 Decoration should be gold and silver, but the decal colour is more biscuit and grey. The headlight cover decals were the wrong shape and size, so I left them off.
Overall, the decoration for the main body is not too far off regarding fit on Classic’s VE casting. Unfortunately, no fuel filler decal was supplied.
Conclusion
While I initially screwed up by starting work on a VF shell, that model had to be sacrificed anyway in order to get the right wheels to do the conversion. So, if you’re looking at doing this one yourself, you will need two donors, plus the decals and paint. Patto’s decals are not perfect, but as you can see here, it’s possible to build a pretty decent representation of HRT’s COTF test & development car.