I’d been wanting to build a Salvinos JR stock car kit for some time. After stumbling across a few YouTubers giving Salvinos glowing reports of “fantastic detail”, “excellent fit” and “no issues”, I was looking forward to the experience.
I’ve since concluded they were a little over the top with their recommendations, or simply didn’t know better. Which leads me to add the following disclaimer – “Opinions expressed in this post are based on my current level of knowledge and ignorance. Don’t tear me apart if they’re different to yours.”
This is not a bad kit, but there are some fundamental problems that are handy to know about if you’re ever going to build it.
The Car
Richard Petty won the 1979 Daytona 500 in this Oldsmobile Cutlass 442, though I believe the body shape is the 1977 version of the 442. It was The King’s sixth Daytona 500 victory, but the race was more famous for the fist fight that broke out between Donnie Allison and Cale Yarborough after they collided and crashed out of the lead on the final lap! Petty inherited the win ahead of Darrell Waltrip and AJ Foyt.
It was a landmark event for NASCAR, for reasons best explained in the video below:
Petty’s car carried a lot more blue at the ‘500 than it usually did. He was reportedly still in negotiation with STP over the year’s budget and wanted more money. Seems he got it, as after winning Daytona his cars ran bold red stripes over the top and huge STP branding across the bonnet.
Petty running the high line at the 1979 Daytona 500
In fact, when the team returned to Daytona for the July race, this car looked quite different and the July version of the livery is often (mistakenly) used to represent the Daytona 500 winner. But this version as modelled by Salvinos is correct.
The Kit
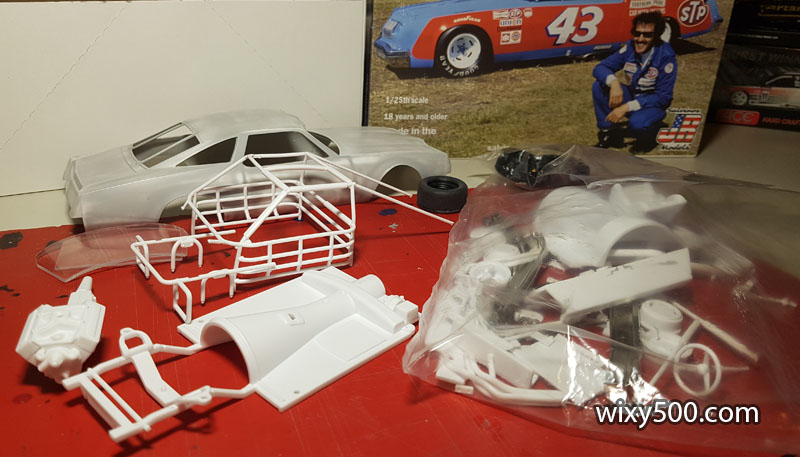
Salvinos JR Models, kit # RPO1979D, 1/25 scale plastic, 120+ parts (including chrome plated) with waterslide decals and rubber tyres.
Kit content, 4 January 2022 – lots of parts on lots of sprues. The chromed sprue is surprisingly heavy. Even though this is an Oldsmobile, the kit includes multiple noses and tails for other models and manufacturers, eg Chev Monte Carlo. Be careful when selecting parts as there are multiple pieces that carry the same part part number ????, so choose wisely (ie, test fit first!). Also, the instructions are rather poor compared to, say, Tamiya. Arrows pointing to fitment positions were inaccurate, some of the smaller parts are poorly illustrated and there are no colour references.
The chrome plating is very good. However, that quality is worth nothing when there are mould seam lines in the parts.
Turns out the Salvinos chrome is tough stuff! My attempts at stripping it failed (using bathroom mould remover which usually takes plating off plastic in a matter of seconds). I was not going to be able to strip, fix and re-spray the plated parts. (EDIT – I’ve since learned how to strip the Salvinos chrome – see HERE!)
The Build
I started the build being very particular with parts clean-up and preparation with the aim of creating a high-detail model. But as the build progressed I soon realised this is not a particularly accurate kit. Many of the parts are simply generic ‘stock car’, designed to be cost effective across a wide range of kits.
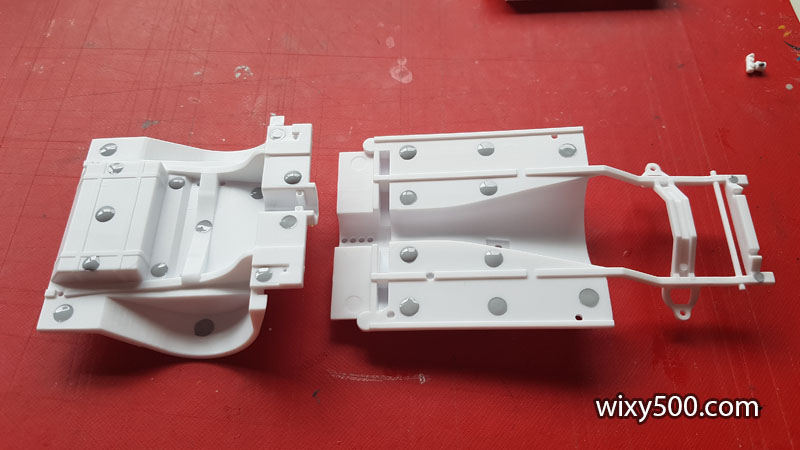
There are a LOT of ejection pin markings in the floor, which is in two parts. This is a generic floor that can be set at various lengths to suit a range of NASCAR models via the 5 locating holes visible in the tailshaft tunnel.
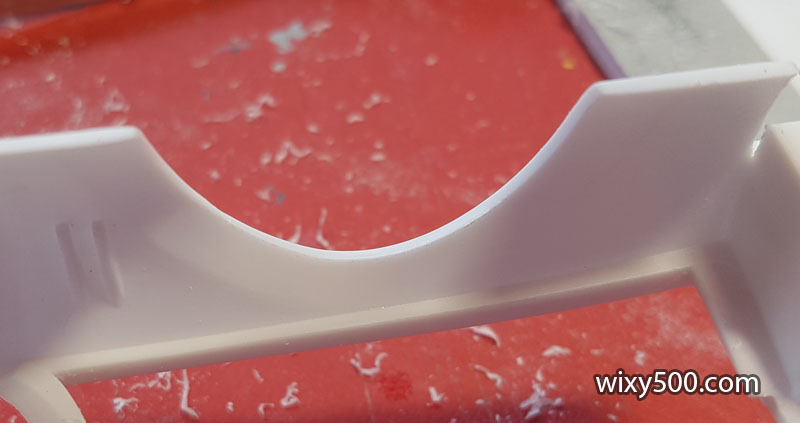
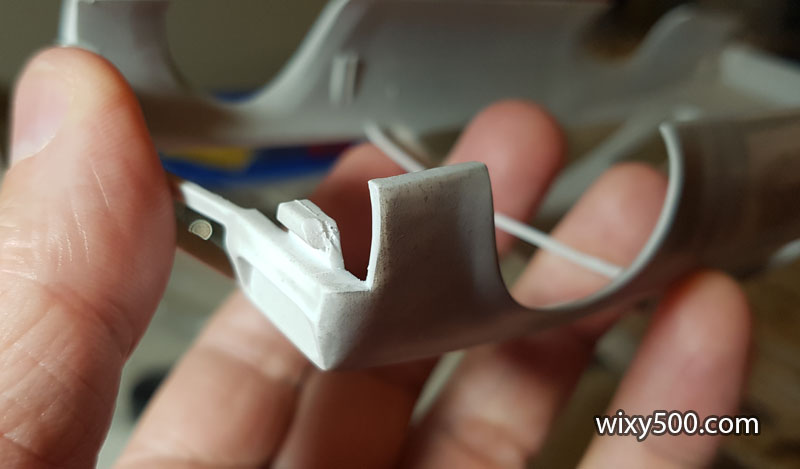
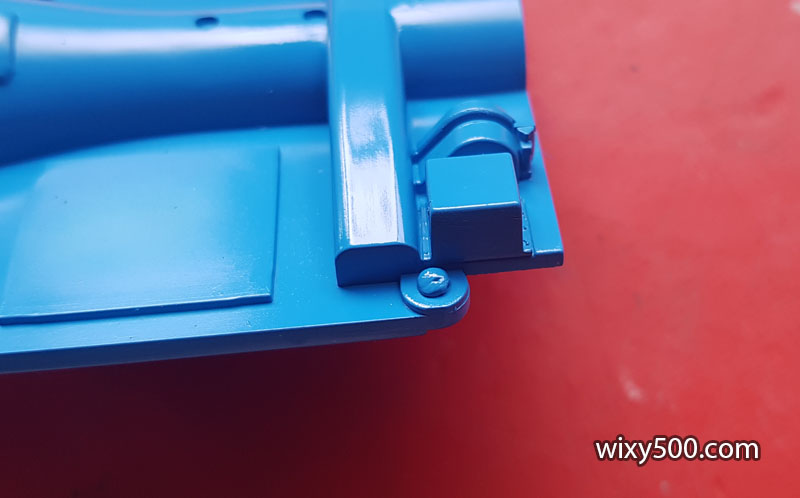
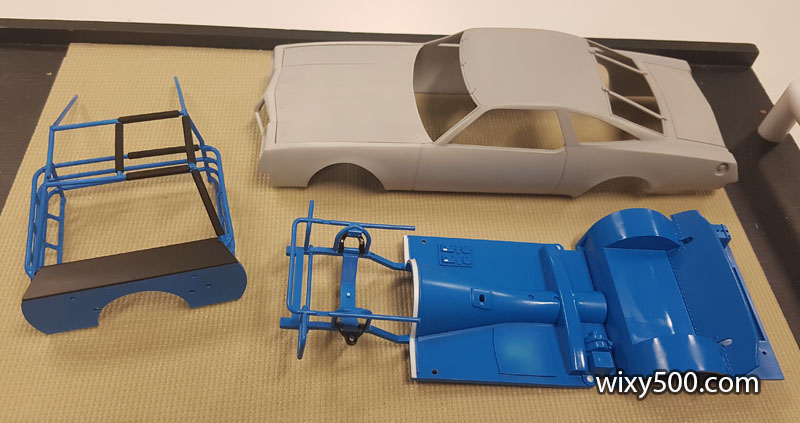
No mention in the instructions that this square tab at the base of the roll cage must be removed.
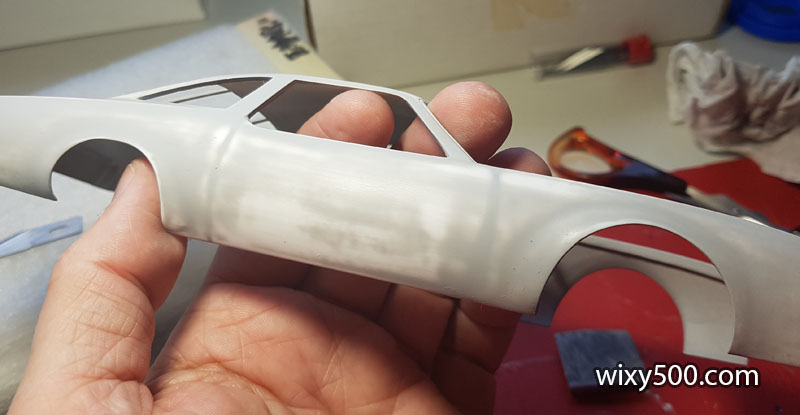
The bodyshell is cast very thick. This panel thickness prevents the tyres from having a realistic proximity to the fender.
So all four wheel arches are trimmed down from the inside to be much thinner.
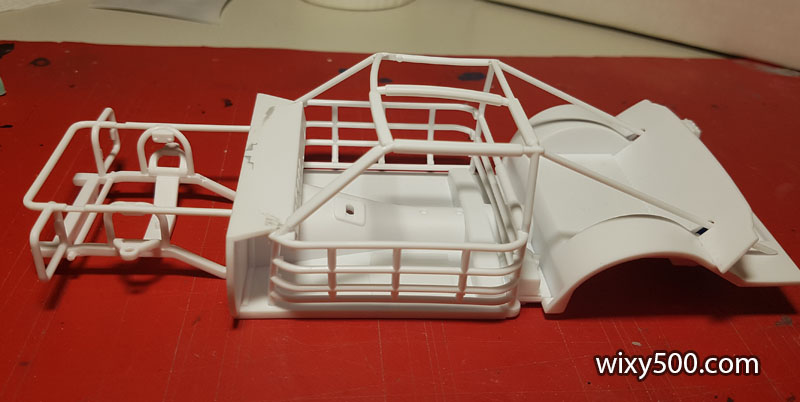
Scraping and sanding down molding seams and thinning the wheel arches produces a lot of plastic debris. Basic roll cage is assembled (top left).
I filled the excessively large panel lines for the righthand door and left the other side as it came in the kit to see which looks more realistic once painted and decaled.
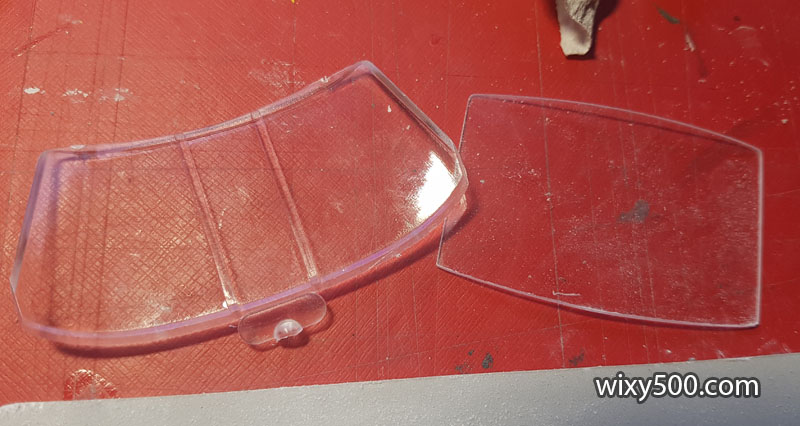
There are only two ‘glass’ pieces for this model, the front and rear windscreens. It’s disappointing that neither would fit in their respective window opening in the main body and required much cutting and filing, especially the front windscreen.
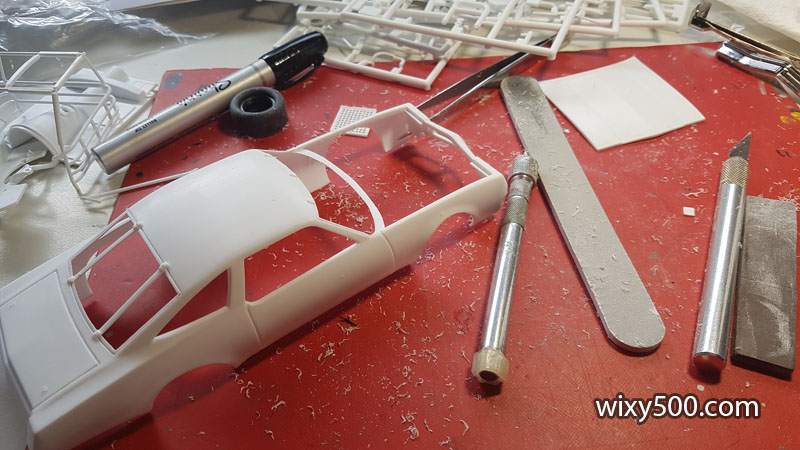
More fitment issues…. Once the front windscreen was ‘dry-fit’ in place, the bonnet could not seat properly and stuck up out of position! A lot of material had to be removed from the lower rear edge of the bonnet (note the taper – and all the shavings on the bench!). Oh well, it least the rear edge is now a more realistic thickness.
Roll cage is dry fit to the floor while the glue sets on the long rear bars.
Pin marks from the moulding process are annoying, but common in all plastic kits. This is bar work for where the front suspension mounts.
A little work with the hobby knife and sand paper largely removes the marks, even without filler.
Firewall is held in place with tape while the glue sets on the multi-piece front bar work.
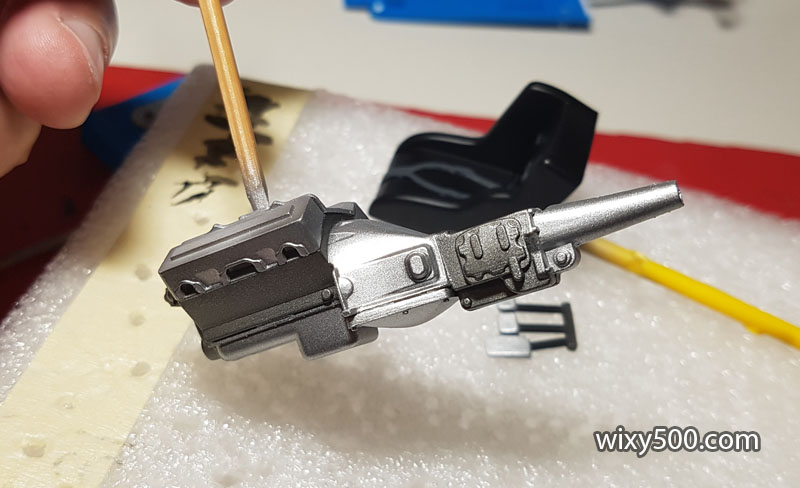
The ‘carburettor’ block is plated (that’s it sitting next to the gearbox) and does not fit into the manifold properly, so I scraped the manifold hole larger and with a tapered edge so the carby can sit down flush.
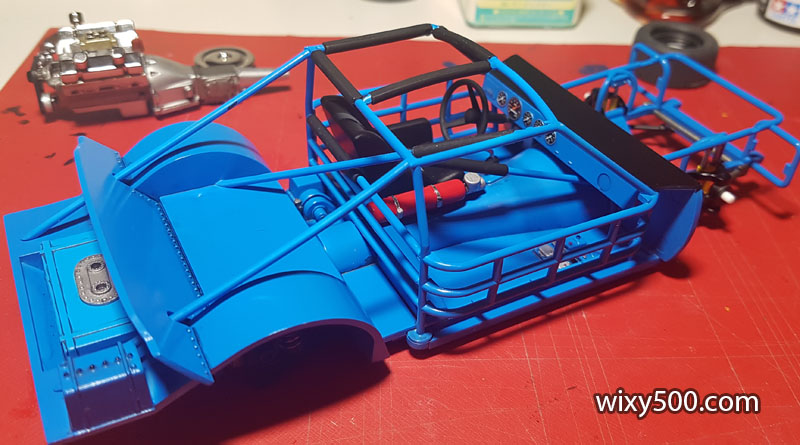
A mock-up of some of the main chassis parts, just to check how it’s going. I’d like to glue all of this in place then hit it all with paint, however that will prevent me from fitting and detail painting a number of the interior parts.
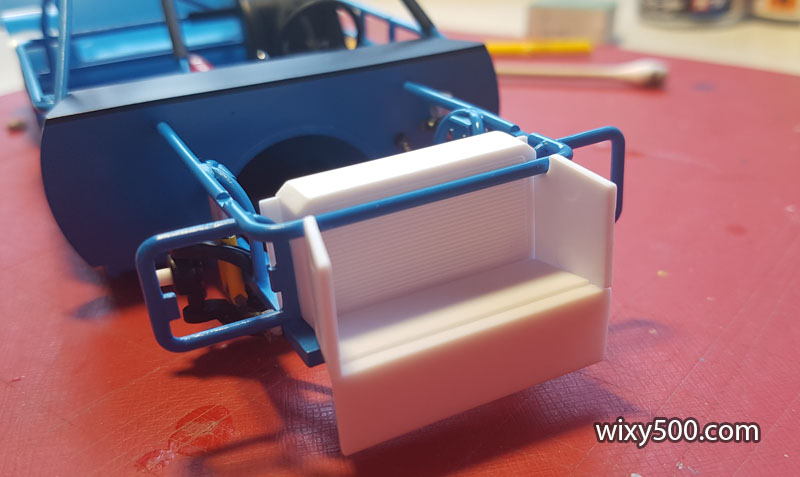
It’s a very basic seat and I would say very very wrong. These cars ran anti-clockwise on ovals, therefore had the righthand side of the seats built up to provide extra support for the driver. But the seat in this kit has the LEFT side built up… Also, the rear panel on the seat was too wide and had to be sanded back.
The front bumper was not even close to fitting. A chunk of plastic had to be cut out from under each headlight to enable the bumper to sit in place.
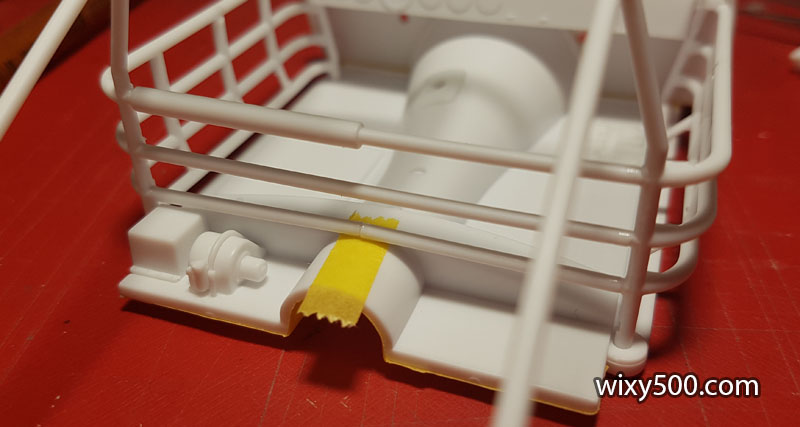
The bottom horizontal bar at the rear of the roll cage is too long and had to be cut, otherwise it pushes the roll cage out too wide to the point it won’t locate in the floor. The tape is to prevent the glue sticking to the tunnel while it sets.
Dry fitting components so they’re correctly positioned for glue. I’ve gone “off order” from the instructions and glued the firewall to the roll cage. Front bar work around the engine bay is glued in place, as is the rear firewall.
After lots of seam line removal, test fitting, scraping and gluing of sub-assemblies etc, the prepped parts are ready to mount on sticks ready for primer.
The cage module is separate to the front floor and rear floor sections, all ready for primer.
Gettin’ shit done! A late night primer session while watching the F1s on TV.
The Salvinos instructions call for “Petty Blue” as the main body colour, but includes no paint codes or examples of what that might be. I’ve read that some builders use Tamiya TS-23 Light Blue (which I’ve decanted into the jar on the right). However, the SMS Bright Blue PL37 (left bottle, also a lacquer paint) looks a pretty good match to some old photos I have in magazines. The lighting in this photo is deceptive as the blue on the model (a Petty car from Spark) is about half way between the Tamiya and the SMS. Methinks a mix is on the cards…
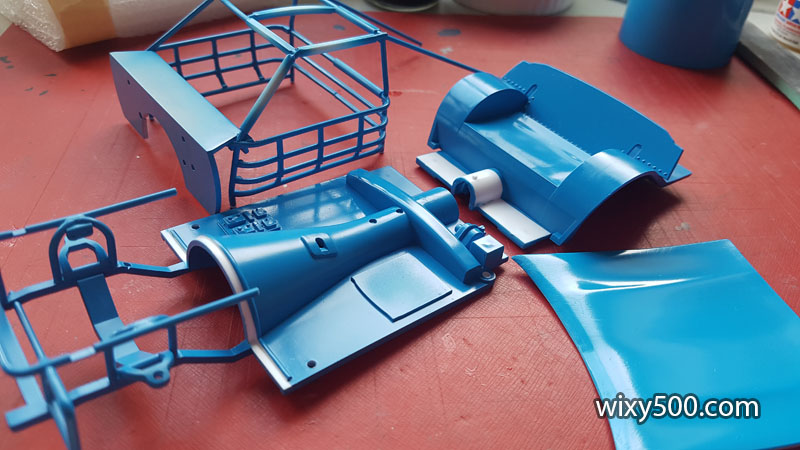
For the chassis, however, I went with the SMS. A small ball of blu-tac in the roll cage mounting hole keeps the paint out…
…so when the small ball is removed, it’s ready for assembly.
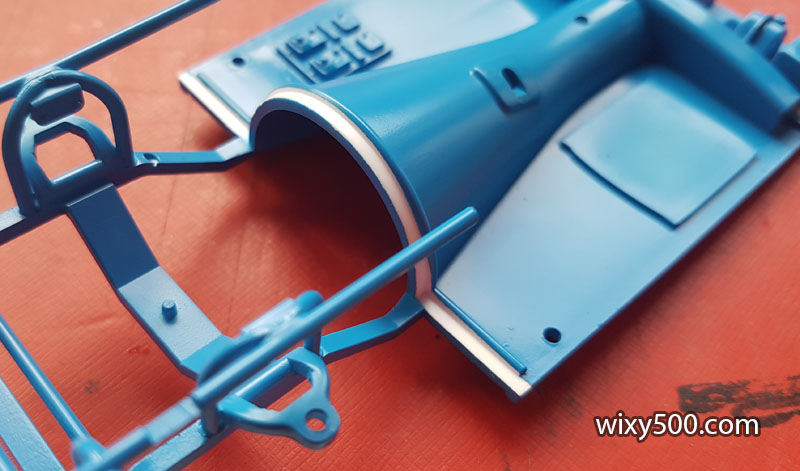
The white strip here is raw plastic as a result of masking before spaying. This will allow the plastic cement to bond properly when the firewall goes in.
Main chassis sections showing masked areas that will take glue on assembly. I painted the underside of the bonnet in Tamiya TS-23 to compare it to the SMS Bright Blue. Definitely quite different.
Masking the dash for satin black. Roll-bar padding is hand painted in Matt Black.
Grey primed body and chassis components on show at my local model club meeting. Top arms in the front suspension are painted semi-gloss black.
Fine strips of bare metal foil were cut up and applied to the fire extinguisher to replicate the mounting straps.
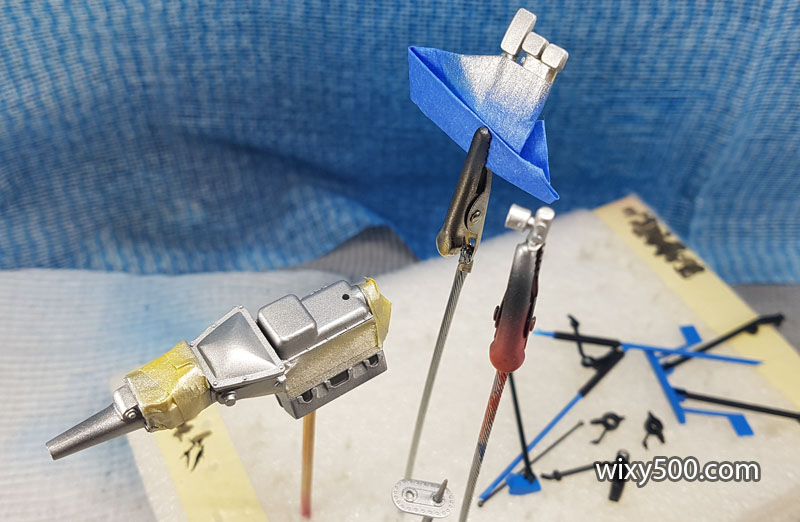
Masked and sprayed flat aluminium on the engine assembly, pedals and a few other parts. The engine and gearbox had previously been sprayed Metallic Grey.
Once the tape is removed, the contrast between the parts is evident. I’m not sure how realistic this is to the real thing as I’ve not been able to find a reference photo of the engine in this car to see what colour it is, and the kit instructions provide no guide whatsoever.
Engine block and gearbox colour is to represent cast iron, whereas the bell housing, cylinder heads, intake manifold and gearbox extension housing are aluminium.
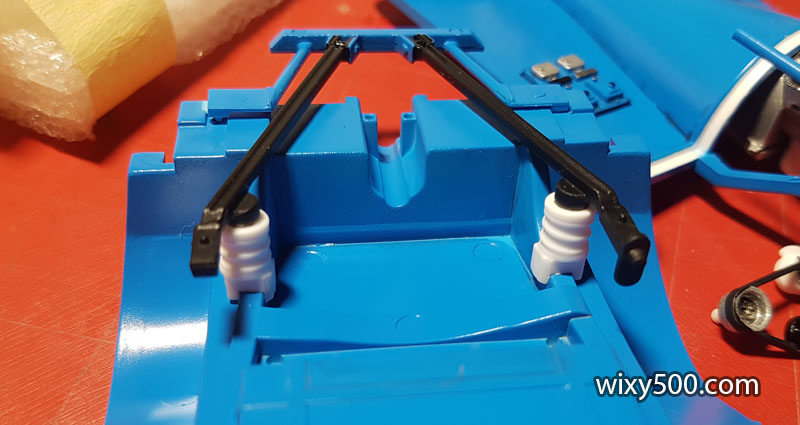
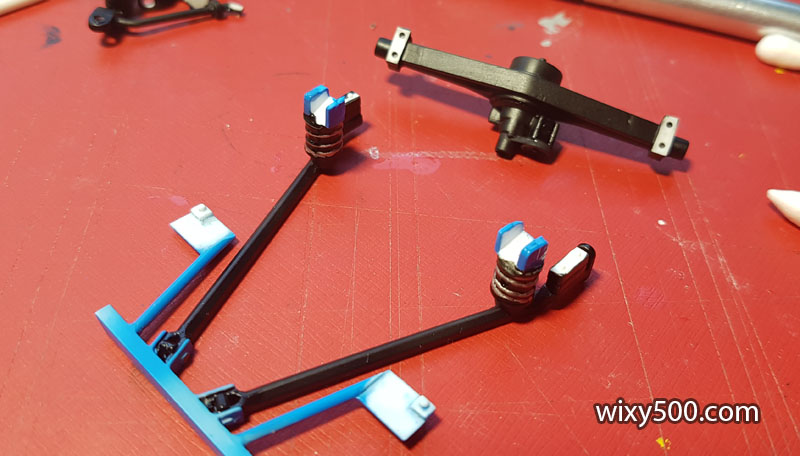
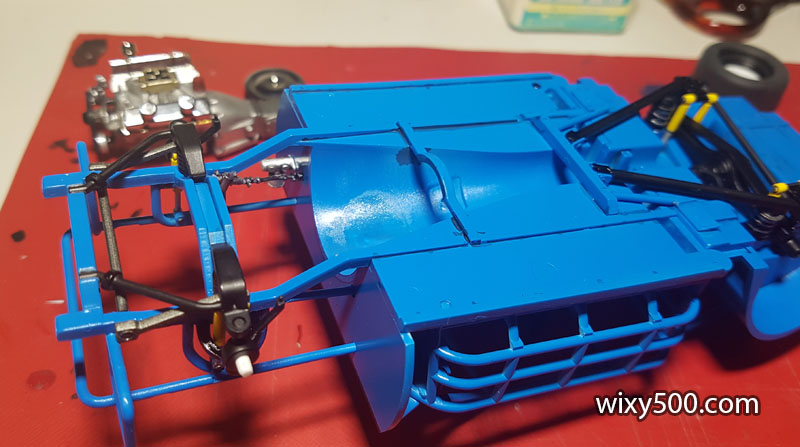
Test fitting the rear trailing arms and springs.
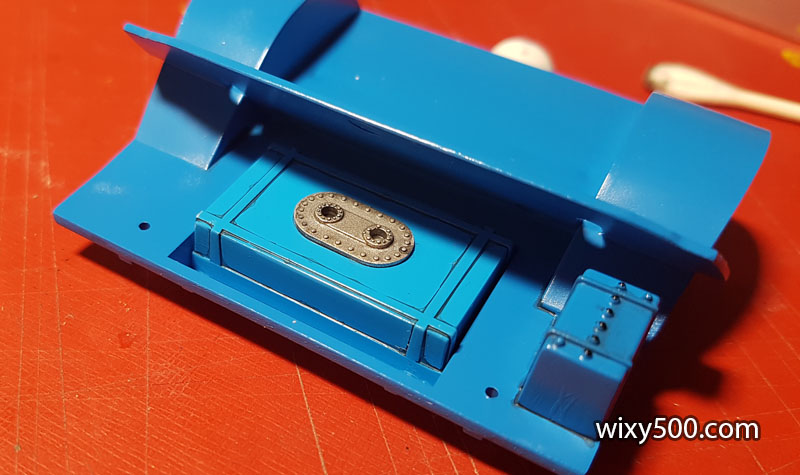
Seat, shifter and extinguisher added to the floor. Seat belts were hand painted in German Grey with buckles highlighted in silver; bare metal foil for the extinguisher straps & chrome silver paint for the fittings; some wash and detail added to what I assume is an electronics box in the passenger side.
I started adding some wash and detail to the boot area, then remembered – none of this will be visible once the body is fitted… so I stopped and moved on.
The mounting stubs on the rocker cover breathers (bottom of photo) are way too fat to fit in their mounting holes (did Salvinos not account for the thickness of the plating??) so the holes had to be drilled out further. Two breathers on the left bank, one on the right.
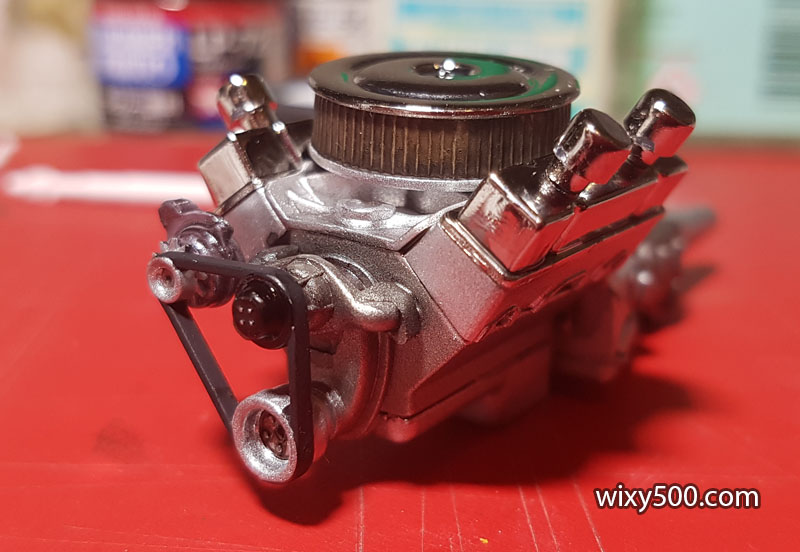
The air cleaner has to be mounted as low as possible so that it does not foul on the bonnet, an issue that the instructions do address. The internal cut-out allows it to slip over the carburettor, but it then sat up on the rocker covers, so shaving the edge a little on each side allows it to sit deeper in the V of the engine…
…like this.
This is a way to hold small parts that are to be painted – stick them on a piece of tape. This is the distributor, which has already had the mounting pin from underneath removed, because it was too big. It also required a couple of the plug lead fittings to be cut off to allow clearance for the air cleaner.
I initially planned to add plug leads to this build, but can see this will be difficult for three of the 8 cylinders! Distributor is painted a mix of gloss red and flat brown.
Pulleys and pumps are painted a mixture of metallic colours with Tamiya’s Black Rubber used for the belt. Air cleaner assembly is not glued, just in case it needs modifying for clearance when the body goes on.
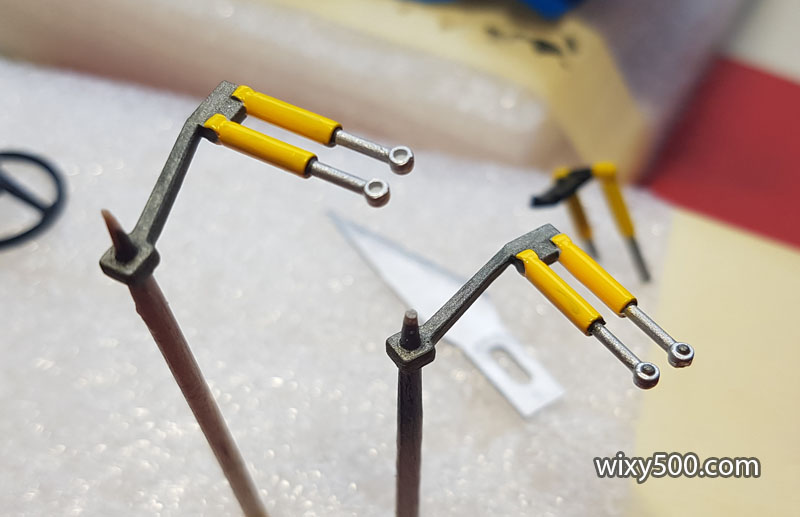
Front shocks and sway bar arms, brush painted.
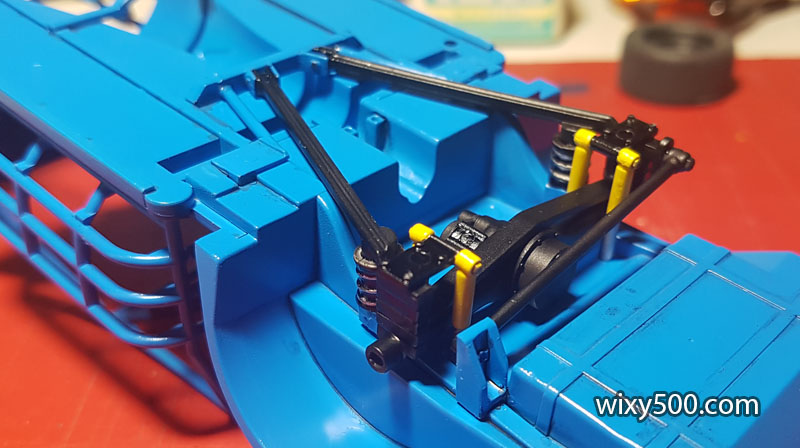
Paint removed from gluing surfaces to finish off the rear-end build up. I’m putting blind faith with the instructions that the number of spacers for the diff location is correct for a realistic ride height and clearance.
Mounting channel for the Panhard rod had to be cut and re-profiled to fit the chassis.
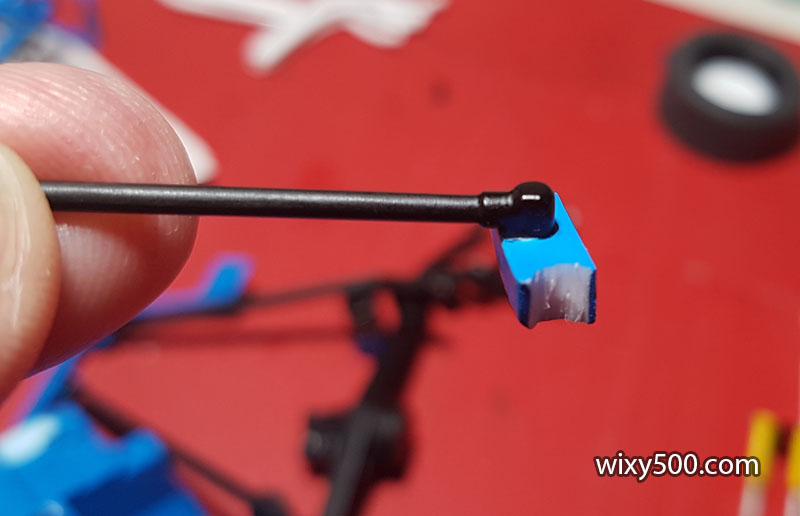
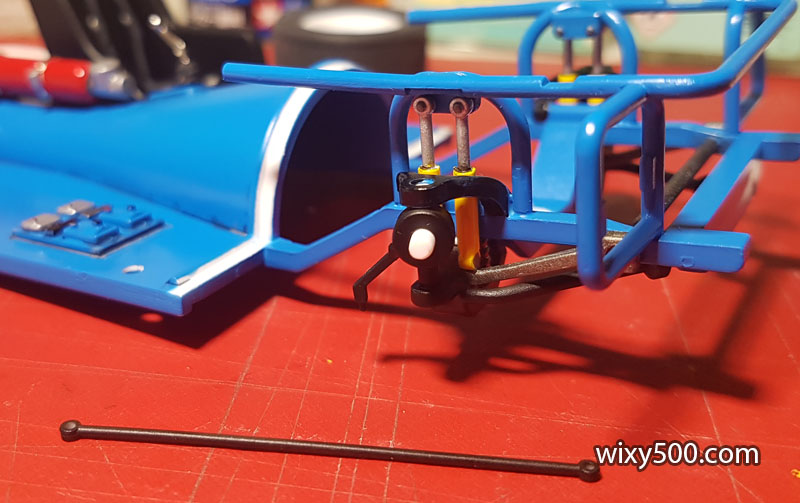
Front suspension assembled. I won’t permanently fit the wheels until the body is on in the event the stub axles need modifying to adjust ride height. The black rod at the bottom is a full-width (ie, not realistic) steering arm that connects the two spindles together, meaning the front wheels will be posable if the spindles can turn – and mine can 🙂
Main sub-assemblies ready to start coming together.
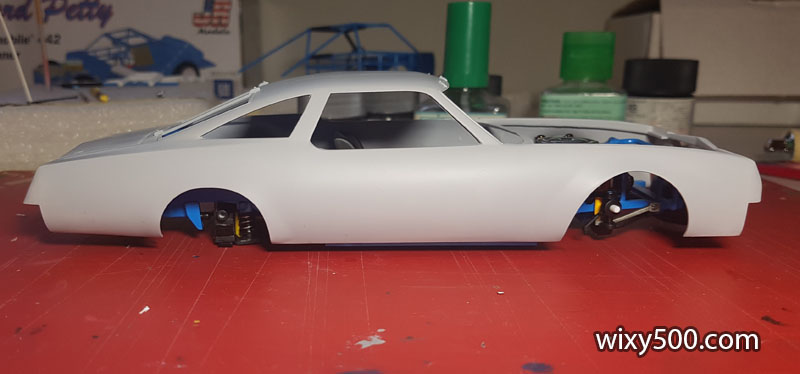
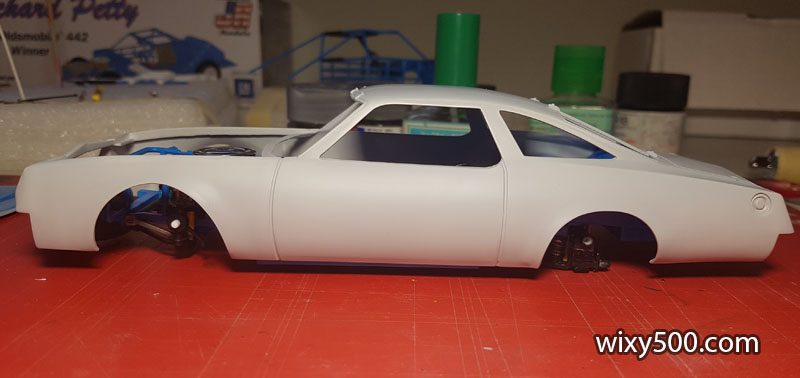
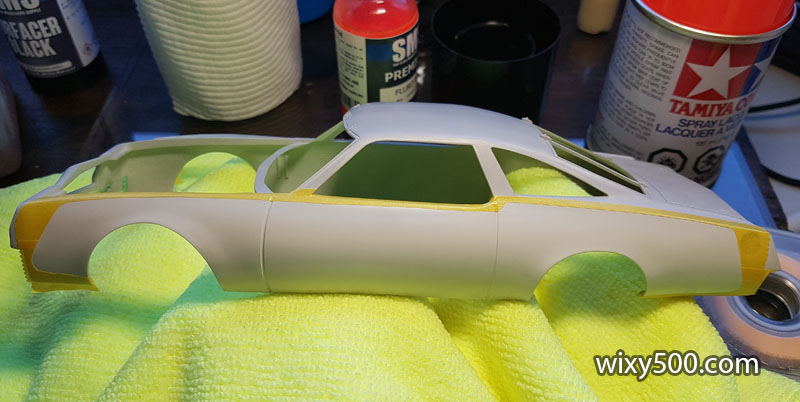
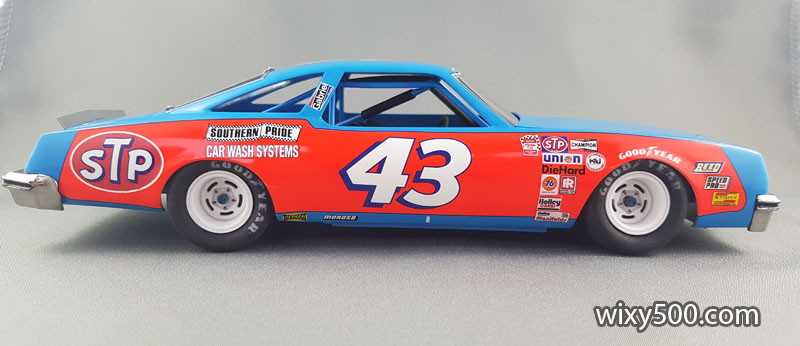
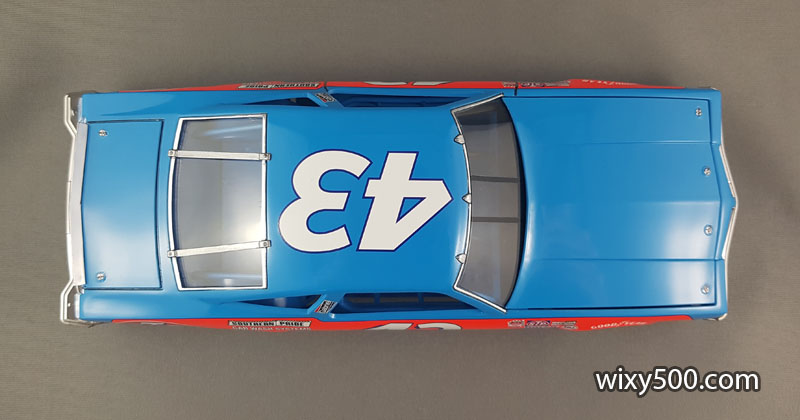
Before gluing the two floor halves, I double check the wheelbase is going to be ok. Looks like the axles line up with about the centre of each wheel-well, so we’ll go with the recommended setting as per instructions. This is the side of the body with the door lines filled in.
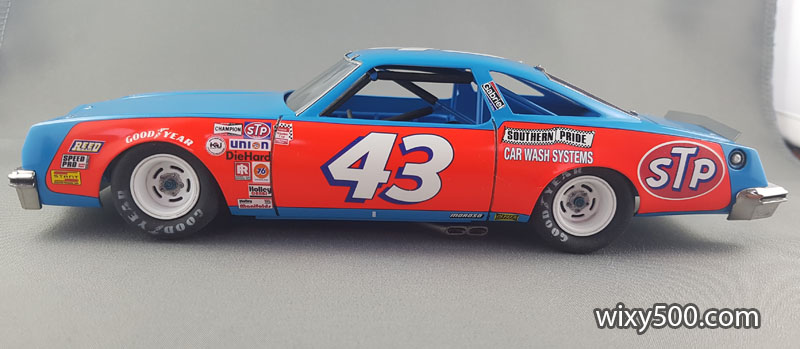
Whereas the left side is stock Salvinos JR panel lines.
Engine test-fit before the firewall and roll cage go on.
The two chassis halves and roll cage finally come together.
Despite everything lining up ok in the dry-fit stage, once things went together for the final time the driver’s side upper front chassis bar does not reach (or line up with) the the hole in the firewall…
Underside (front).
Underside (rear) with diff and suspension fitted. Again, no idea if the colours are correct as I could not find reference material and there’s absolutely nothing in the kit instructions. (EDIT – I’ve since discovered a lot of the Petty cars had suspension arms etc painted dark blue. Too late for this build, but handy to know for the future.)
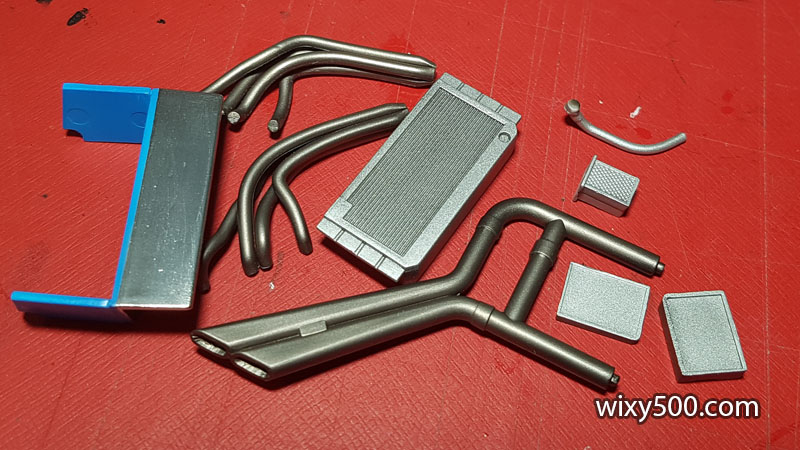
Testing the fit of the radiator and intake ducting before paint. All this slots in well.
Unfortunately, the exhaust outlet was solid plastic, so I drilled and carved out the twin openings.
Interior detail is rather sparse. Dash dials are all decal.
Various metallic paints on parts, including Alclad Polished Aluminum on the front lip of the blue intake ducting, Alclad Semi-Matte Aluminum on the coolers and Testors Burnt Metal on the exhausts. The coolers that had mesh detail received a light wash before fitting. Top radiator hose was too long and had to be cut.
Once the engine and tailshaft are fitted, the exhaust can go on. I believe tailshaft colour in NASCAR is (by regulation) white, but not sure if that was the case in 1979.
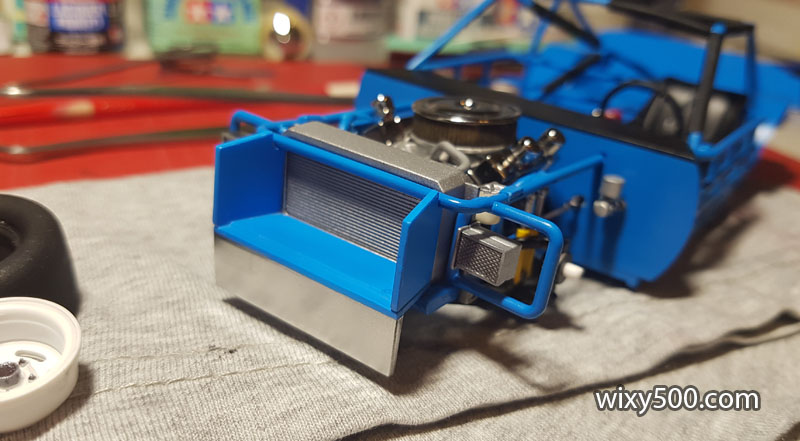
Ducting and coolers in place. Despite an easy dry-fit earlier, I had some trouble getting the main radiator in position as the mounting flange was fouling on the edge of the smaller coolers (which were not in position when I was testing the fit earlier)
Instructions call for the wheels to be fitted now, however I want to fit the wheels relative to the bodywork once it goes on.
Chassis done!
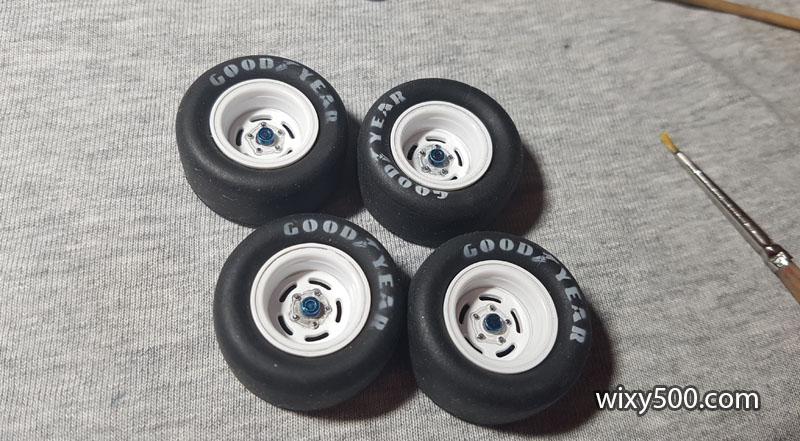
Preparing the wheels and tyres. Rims are in two parts, a front face and a back face. I painted the inner surfaces of the back of the rims in black as this will be visible through the slots on the front face of the rim. Tyres are rubber. Moulding seam on the inner edge and also the inner sidewall is easily removed with a sanding board.
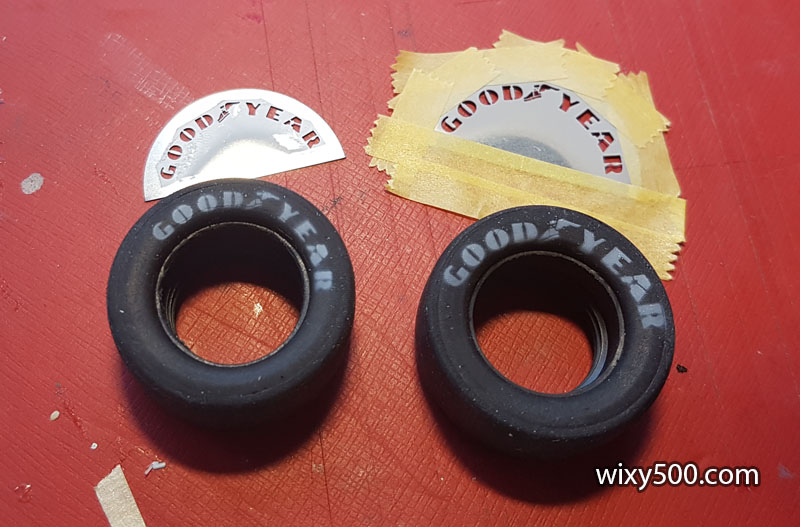
So, I go to get the tyre decals out and… no f*cking decals! I can’t see this being a licencing issue (there are Goodyear decals included for on the body) and the instructions show Goodyear markings on the tyres (though no decal numbers) so no idea what’s gone wrong here. Anyway, I recalled there were Goodyear stencils in my 1:20 scale Hasegawa Lotus 79 kit, so I tested each stencil on the back face of the 1:25 scale NASCAR tyre. The Lotus’ rear tyre stencil (right) is too big and the front stencil (left) is a little too small, but it’s just going to have to be close enough.
Tamiya white Primer was airbrushed through the stencil. The NASCAR tyres are very ‘baggy’ with quite a rounded sidewall, so it was difficult to get the stencil aligned for a clear mask spray. Rims are Tamiya TS-26 white with some wash.
The wheel hubs then received a dab of clear blue over the metallic colour
There are several solutions to create the red & blue livery on this race car:
(A) paint the body white, then spray fluro red down the sides, then mask over the red and hit the rest of the body with blue (B) paint the entire body blue, then mask off everything other than the area that is to be red, then paint that white, followed by the red, or (C) mask and spray the red, then mask again to paint the blue, or (D) some other sequence I do not know of!
Even though it required a “double masking”, I went with option C.
In preparation for the fluro red, the sides of the model got a quick hit of white primer then white gloss (Tamiya TS-26).
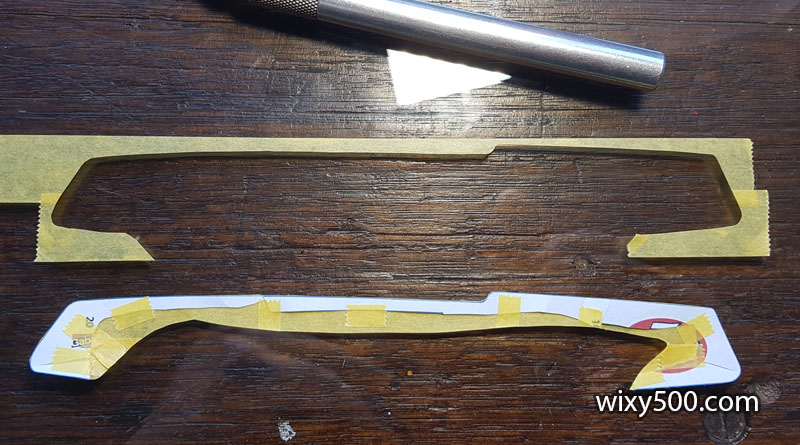
Decal sheet was scanned into a PDF version, then printed. The thin blue pinstripes are used to create the masking templates.
After very carefully cutting along the centre of the pinstripes, small pieces of tape are used to hold the paper cut-outs in place. The paper does not stretch and conform like a decal, so small cuts have to be made to adjust the curvature to fit the body properly (seen here on the rear; the front had not been sliced at this stage).
Once the paper template was a suitable shape and braced with tape, it is transferred onto masking tape (two overlapping pieces applied to a glass pane)
Hobby knife is used to cut the masking template out. The upper piece becomes the outer mask, used for spraying the fluro red. The lower piece becomes the inner mask, used to cover the red for when blue body colour goes down.
Applying the preliminary outer mask.
Followed by more tape over the rest of the body, ready for red.
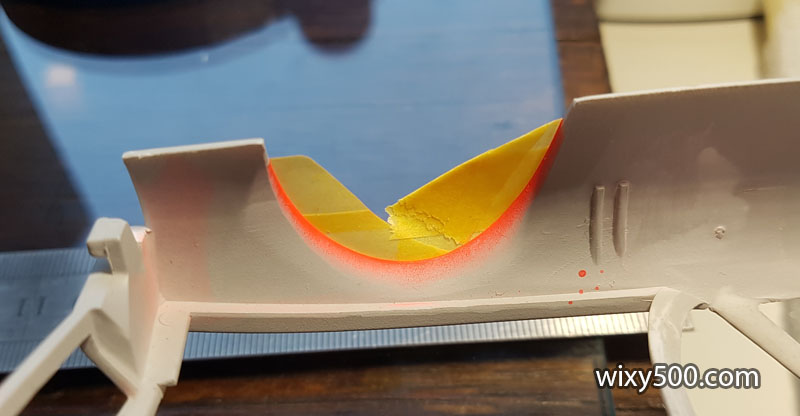
SMS’s Fluro Red (PL47) is BRIGHT! Unlike Tamiya’s fluro red, the SMS product is a flat finish.
First colour done! No mask bleeds, though the edges have a ridge that needs sanding down.
Second masking requires the inner template to cover the red. This was difficult to get lined up exactly on the edge and I had to make a couple of minor alterations to the mask to make it comply.
I wanted to retain this red overspray that’s visible on the inner edges of the wheel arches.
Small pieces of tape are laid over the edge, then trimmed.
Instead of using the new rotating paint stand, I reverted to my trusty “blu-tac on a stick” as I wanted to spray body colour on the inside as well, and the stick allows better access.
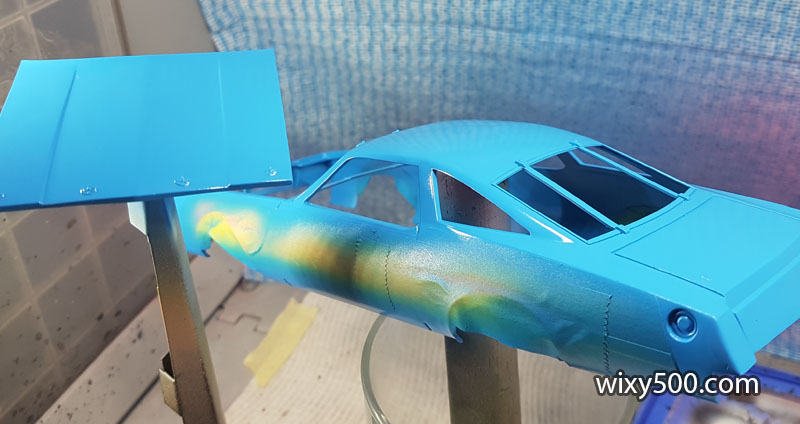
Blue is down! The mix is mostly Tamiya TS-23 Light Blue with a dash of SMS Bright Blue (the paint that was used on the chassis).
Masking removed, and again, luckily no bleeds in the mask! I think the brightness of the red is messing with my phone’s camera as the blue looks darker here than it really is.
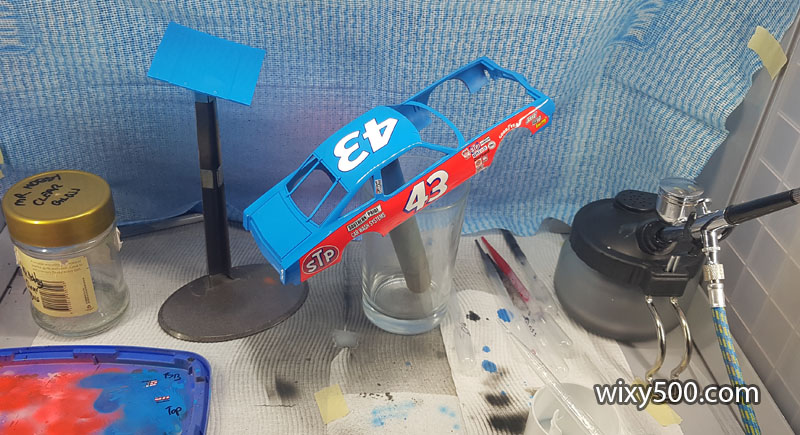
Next step is to throw some clear over the red so the decals can be applied (some decals don’t like matt surfaces, and I’m not sure how well the Salvinos decals adhere, so better to be safe).
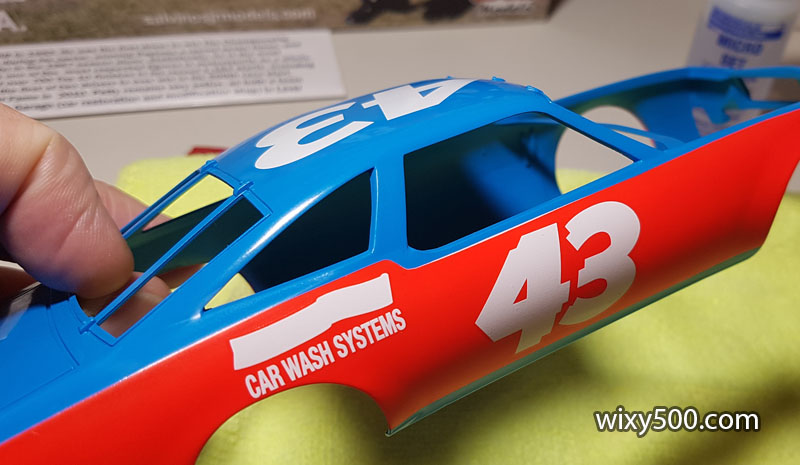
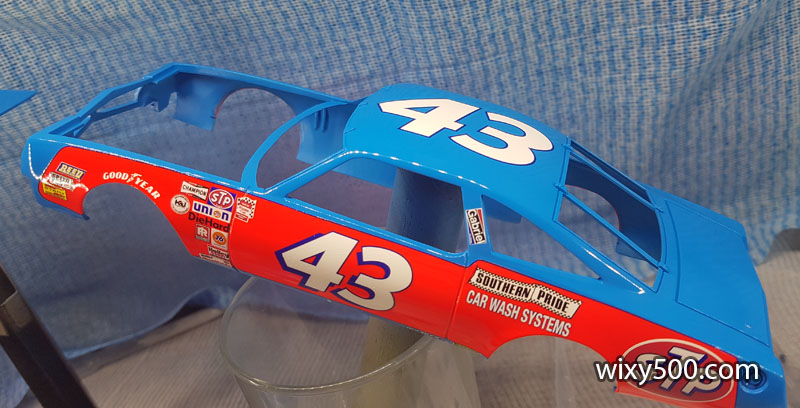
A quick coat of clear gloss (Tamiya TS13), a day of drying, then first of the decals. Salvinos include white-backing decals for the numbers and a couple of sponsor logos to help prevent the body colour from bleeding through. Having said that, the decal ink is quite opaque to begin with, but these extra decals are a nice touch.
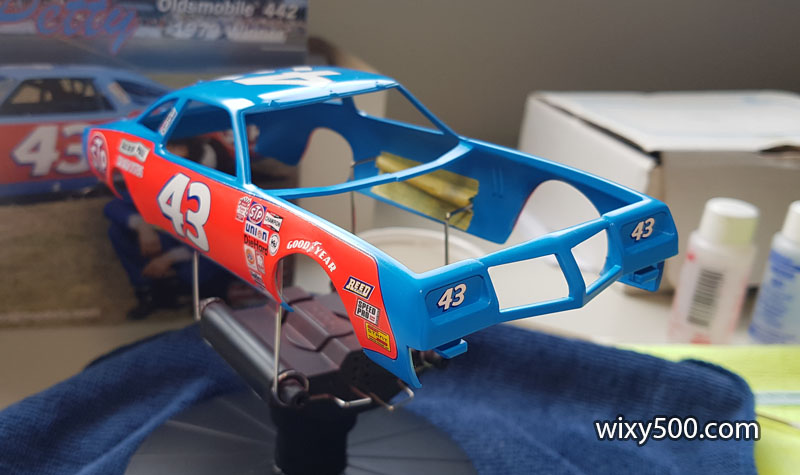
A few days later and the decals are done. They went down ok but it seems the adhesive is not that strong; some of the smaller ones in particular did not want to stick down. The decoration got to dry for almost a week before I got around to starting the clear coat.
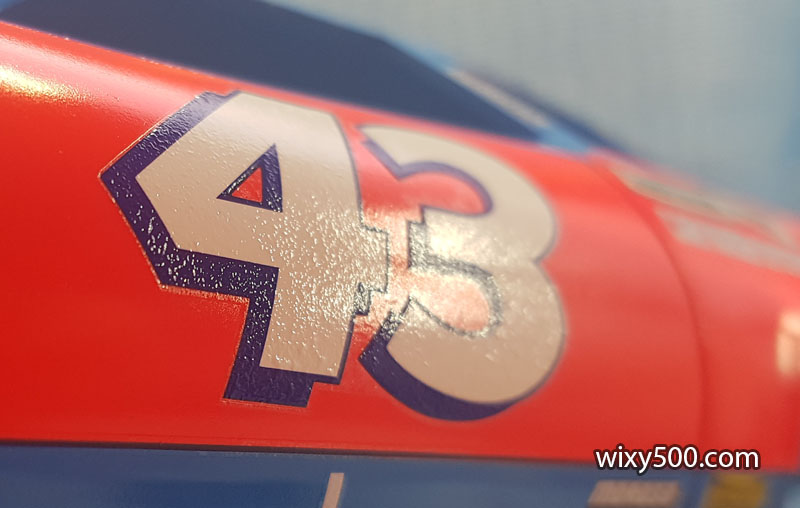
Before putting clear over the decoration, I tested one of the kit’s superfluous decals (which are made for Salvinos by Power Slide) by applying it to a test painted surface, then brushing Tamiya TS13 over one piece and Mr Hobby Clear Coat on the other. The Tamiya clear crinkled and ruined the decal in seconds, whereas the Mr Hobby seemed fine. So, I hit the Petty car with a couple of very light mist coats of Mr Hobby. Everything seemed ok, but when I returned about 5-10 minutes later to put on a bit of a wetter coat, many (but not all) of the decals had bubbled and partially lifted!
The large numbers were badly affected. Strangely, I could rub my fingers over the decal and burnish down to partly smoothen the roughness, but after a few seconds the wrinkles would pop back up.
Not happy with this, but I wasn’t going to start over (no spare decals and I wanted to get on with other builds)
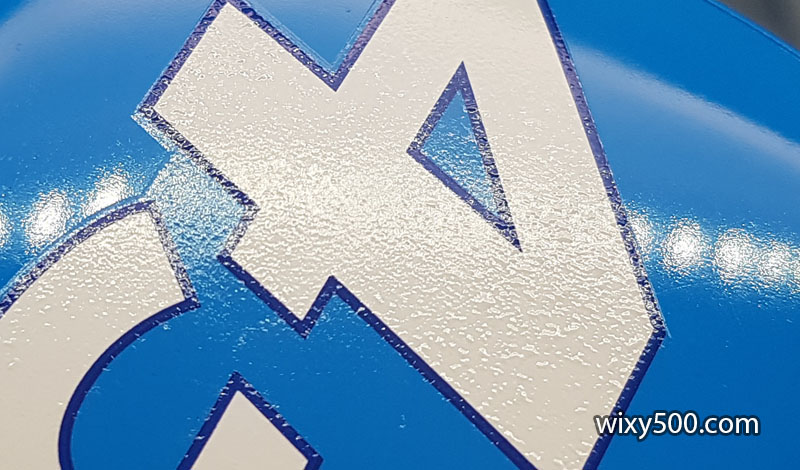
These ‘pimples’ popped up in the white areas shortly after the second sitting of clear coating. 24-hours later they had reduced a little.
Final coats of clear done and drying in the booth. All up there’s about six to seven coats, applied over three separate days.
That’s about as good as the finish is going to get on this one. I was not game to wet sand or polish the body for fear of lifting or tearing a decal!
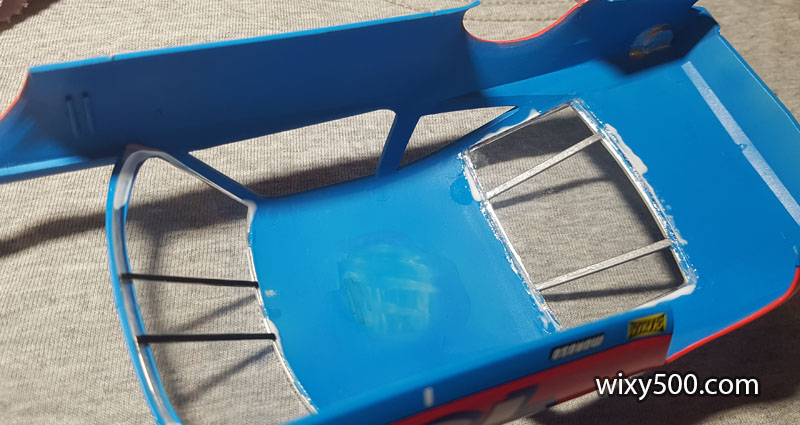
The clear parts had some scratches that needed to be polished out. I used the Micromesh polishing cloths 4000-6000-8000-12000 then Tamiya polishing compound. Top piece is the front windscreen after 4000 grit. The bottom part is the rear window after polishing.
Applying Bare-Metal foil to the rear window trim. The recess between the trim and the body was so deep that part of the left side trim broke away while applying the foil. This damage had to be glued back in place and re-foiled.
Underside of the interior is ugly while the window glue dries, but cannot really be seen once assembled.
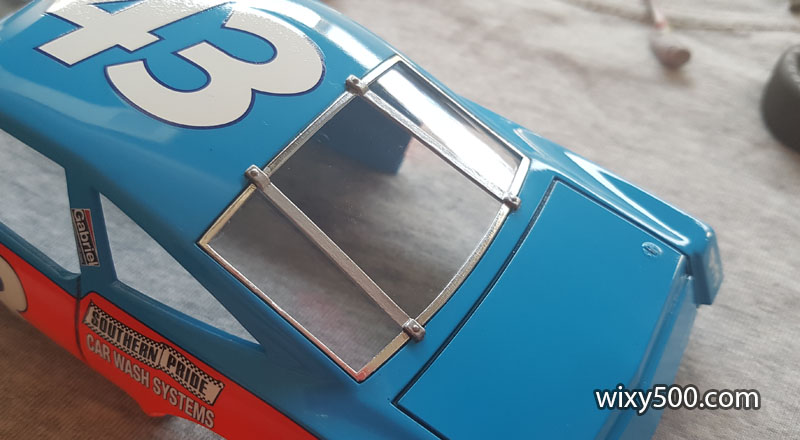
Front window done. The two braces moulded into the clear plastic (there should be four, not two) were masked and hand painted black. After applying and burnishing the Bare-Metal foil, the top mounting brackets were hand painted in chrome silver with a little wash to pick out the detail. I am not sure if the windscreen is mounted correctly as the instructions gave no reference. I suspect it should be resting on top of the lower cross brace, but I found the fit was really bad there, so glued it under the brace instead.
Rear window. The repaired left-side window trim and foil has come up ok. The two exterior retention straps were hand painted. They are cast into the body and are way too thick. On reflection, I should have ground them off and replaced with something more to scale.
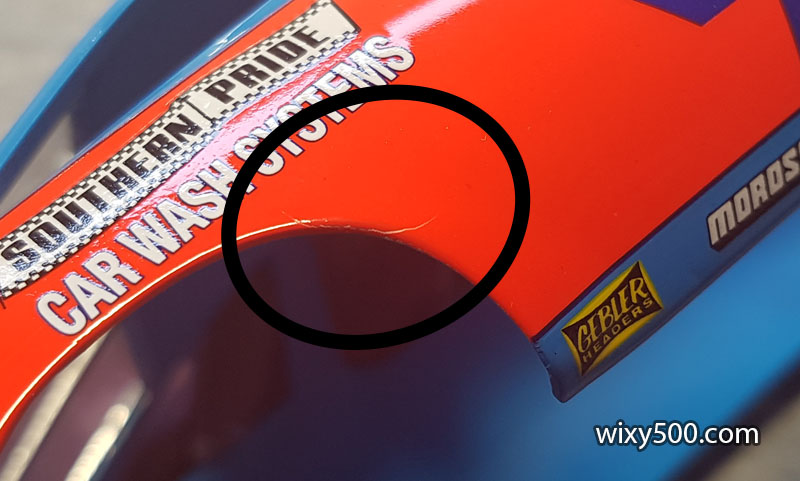
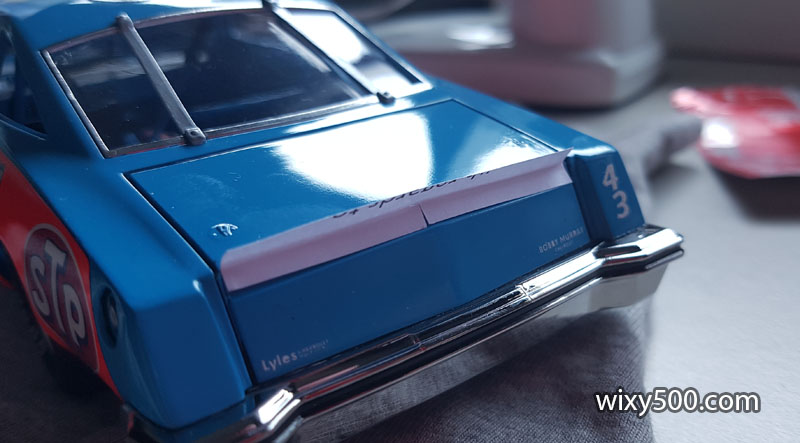
A couple of weeks after the clear had been applied, I noticed this curved crack had appeared in the paint. I initially thought “shit, I’ve screwed up the paint here”, but the same shaped crack appears in the very same location on the other side of the body! (see below). There is no filler here, just primer, the fluro red then clear, all lacquer paint run through the airbrush. Has the paint shrunk or the body starting to distort???
The instructions call for the one-piece grill section to be cut in two. Not sure why as it seemed to fit ok as one piece, but I cut it up anyway.
Body finally placed on the chassis. There is no set fixing point – it can be located too far forward like this…
…or pushed right back like this.
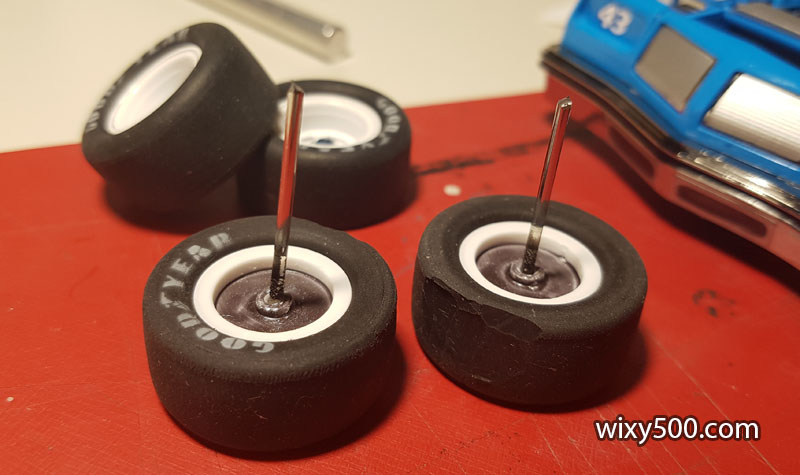
Built as per the instructions, the rear wheels do not fit under the wheel wells of the chassis pan. Rather than grinding and repainting the inner wells, I decided to shave off the top edge of the two rear tyres to get them to fit under the model. It looks rough (and it is!), but won’t be visible once assembled.
The supplied rear axle in the kit is not long enough to space the wheels out wide enough to fill the rear fenders (if the axle was used as supplied, the wheels would look too ‘tucked under’ due to the narrow track). I cut the axle in half and CA glued each piece into the back side of a wheel. These were then slipped into the diff using 5-minute epoxy to allow time to adjust final location. As you should have determined by now, the wheels on this model do not rotate.
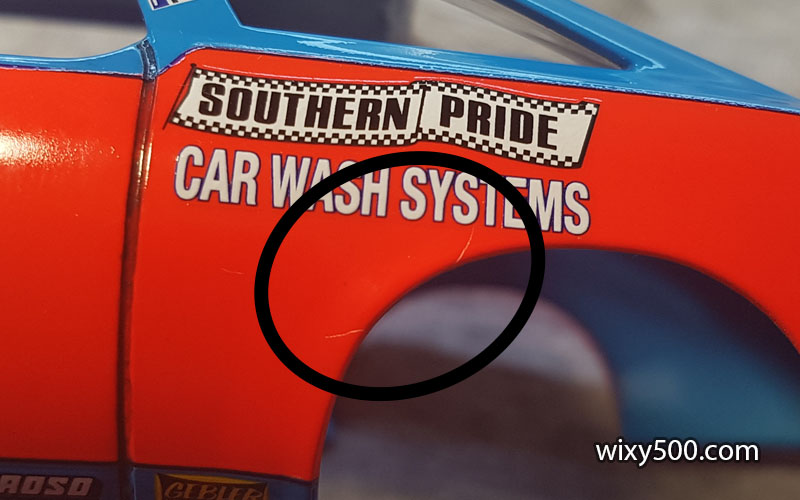
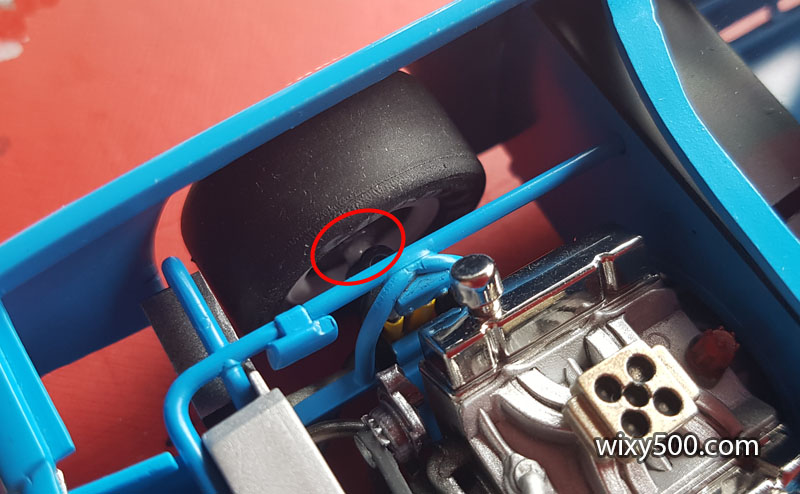
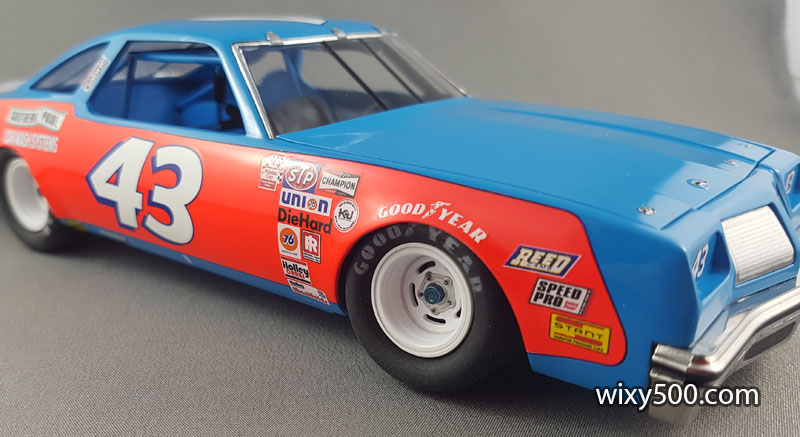
By thinning the wheel arches earlier in the build I was able to get the tyres up closer to the inner guards, but this meant every wheel had to be mounted a couple of millimetres wider than how the kit was designed. For the front wheels, they barely reached the spindles! (The white bit inside the red circle is the exposed axle the wheel would normally have mounted over).
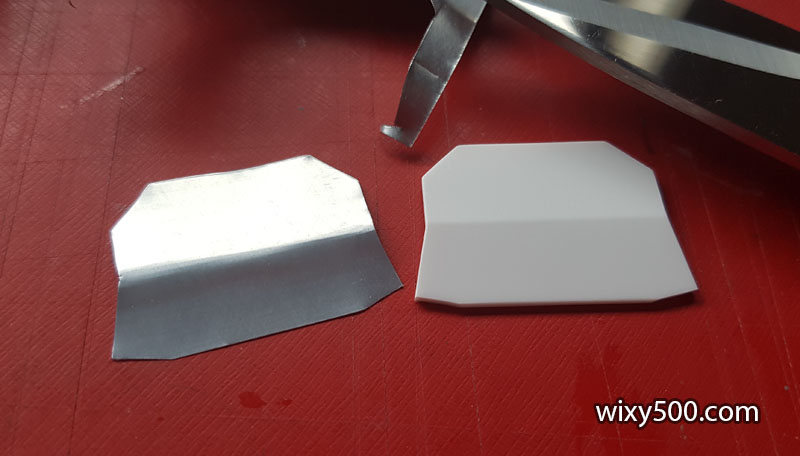
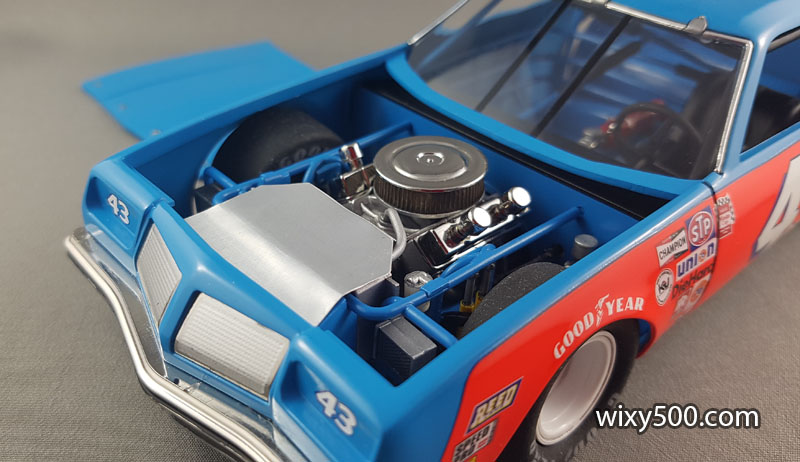
The kit’s top panel for the radiator ducting (right) is very thick. I used it as a template to cut a similar shape from an aluminium Coke can. Sure, it’s a little wrinkled, but the metallic colour is spot on!
All the wheels on and entering the final stage of the build.
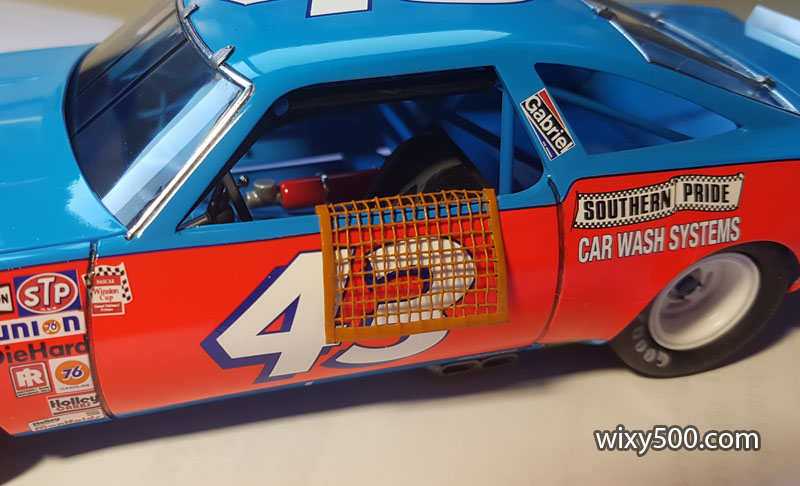
Yep, I screwed up the window net. The aim was to bend the top edge over so the net could hang off the door. Attempts to heat and adjust failed – boiling water began to work but cracks started to appear in the material; then I miss-judged a flame source and melted it 🙁 (EDIT: I scratch-built a new one.)
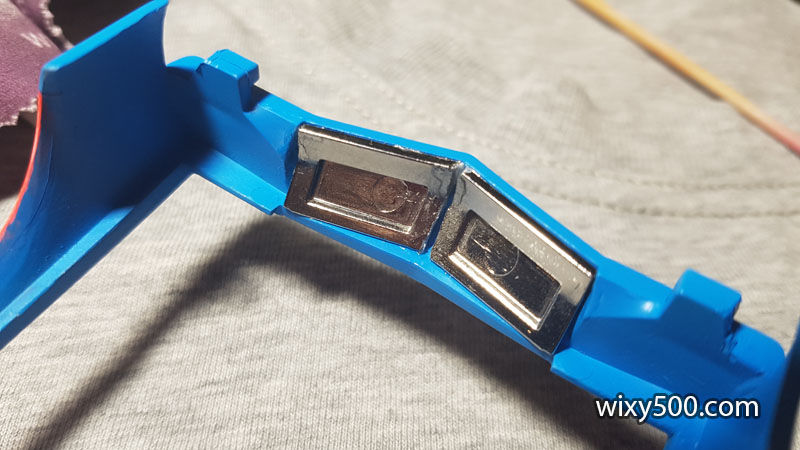
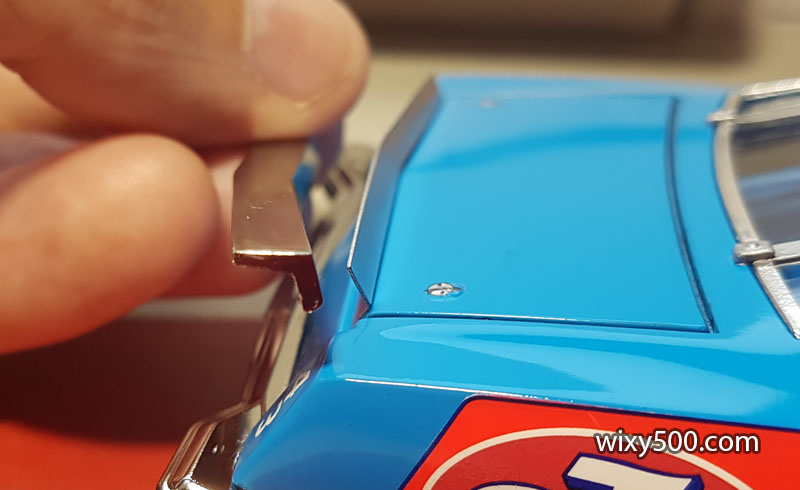
There’s not much holding the body in place. It’s resting (with a touch of CA glue) on the metal shield…
…plus another spot of CA where the firewall touches the body
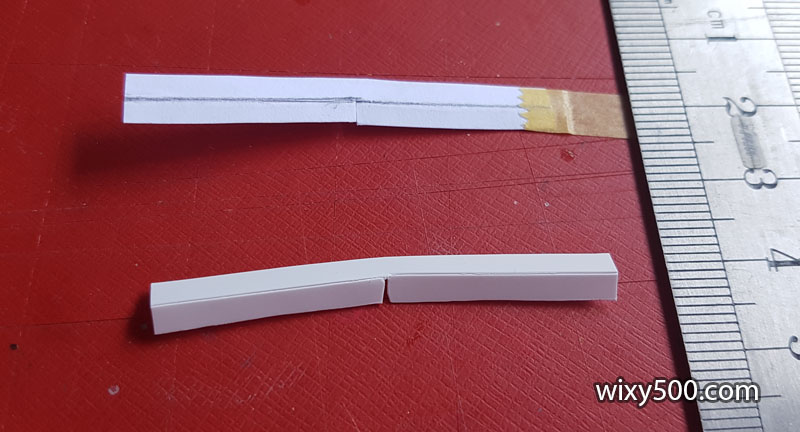
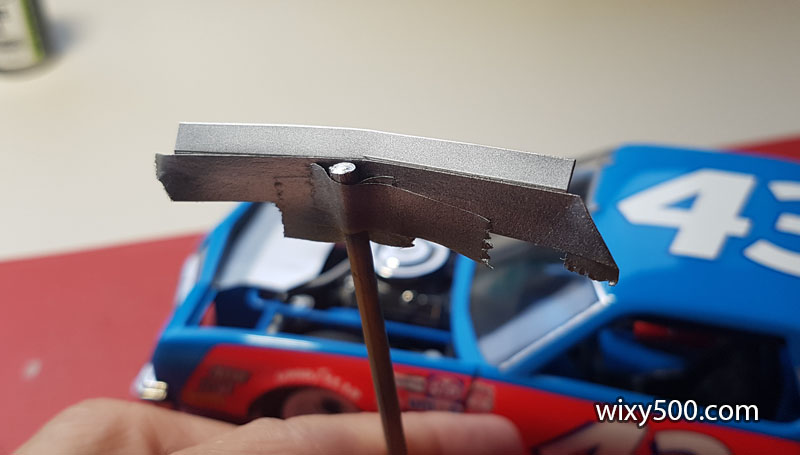
The rear spoiler supplied in the kit is too high, too thick and chrome plated, so I decided to make my own. First step, make a template from paper.
Then use the template to create the part. I used plain 0.25mm plastic card from Evergreen
After priming and painting black, it was hit with Alclad Polished Aluminium. This has a frosted look out of the airbrush, but a quick rub with a cotton bud makes it appear as a polished alloy.
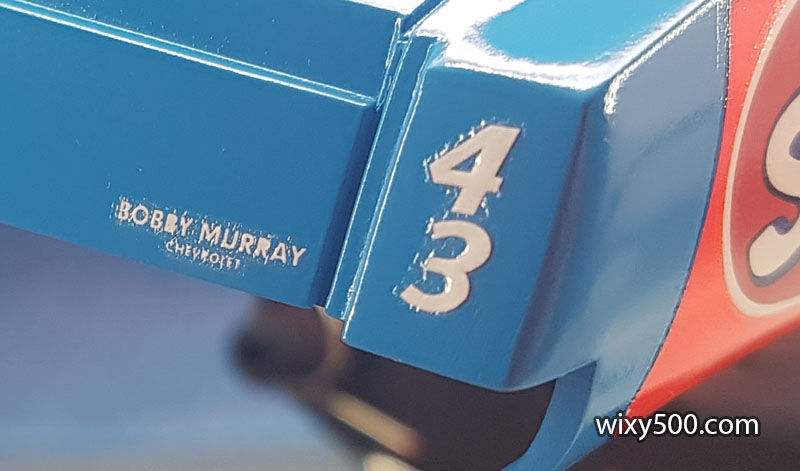
Mine (attached to the model) versus the Salvinos behemoth. Can also see here I used the decals for the securing pins on the boot (and also the bonnet)
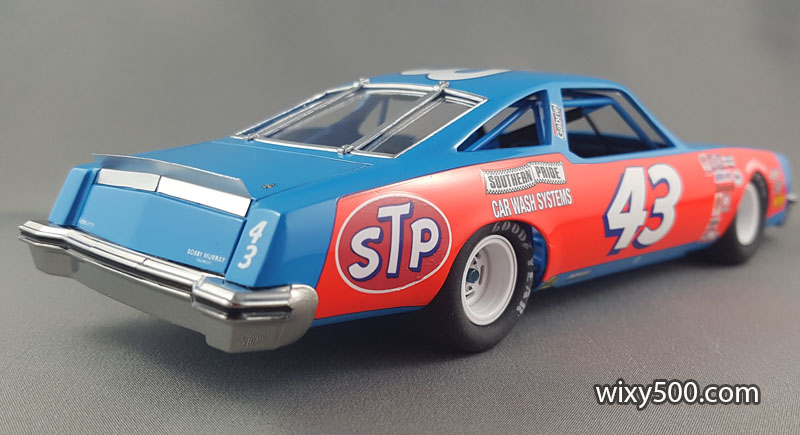
Done – so it’s into the photo booth!
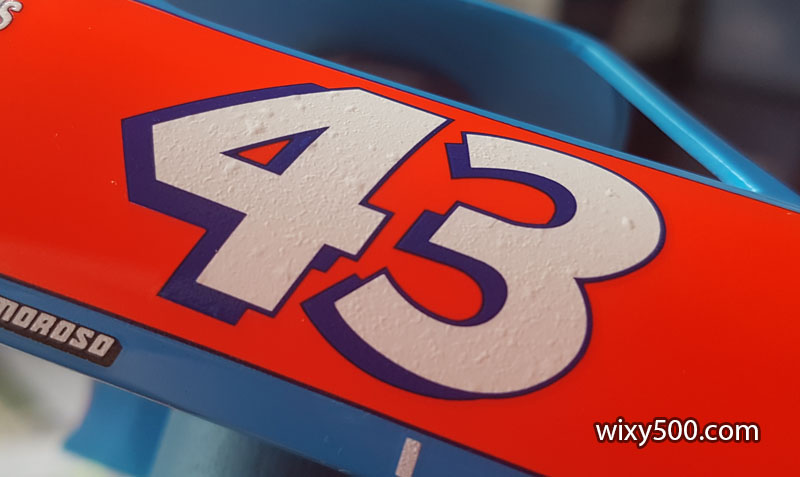
Some of the decal bubbling mentioned earlier settled somewhat over time, but this big STP logo is permanently scarred 🙁
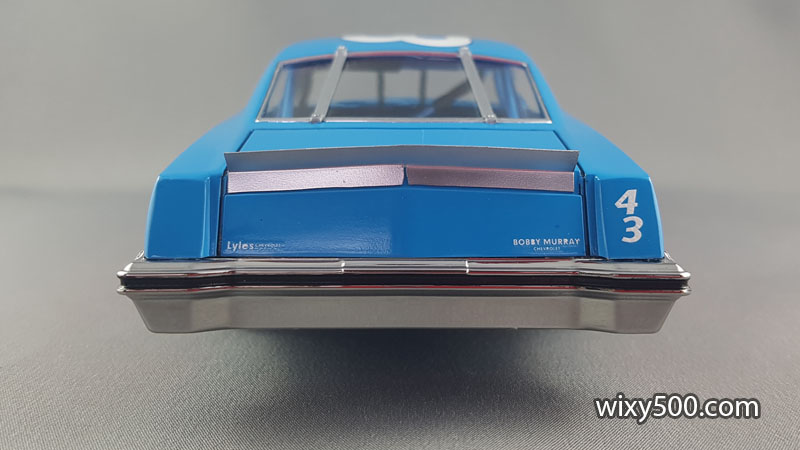
Front bumper stripe and vents were hand painted. The main grill is supplied chrome plated (why Salvinos, WHY? It’s not a chrome part!). Prior to fitting I sprayed it flat clear to dull it down. I then went around the edges with lacquer thinner to remove the clear and try to simulate some trim.
Interior through the window
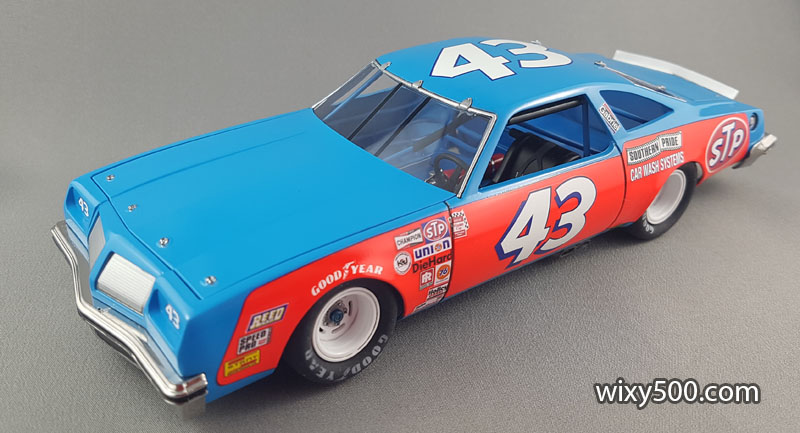
For a first time build of an unfamiliar kit with issues, I was quite happy with the stance and sit of the model. However, judging by the amount of roll cage visible at the top of the windows, it would appear the kit was designed to have the body sit much lower on the chassis.
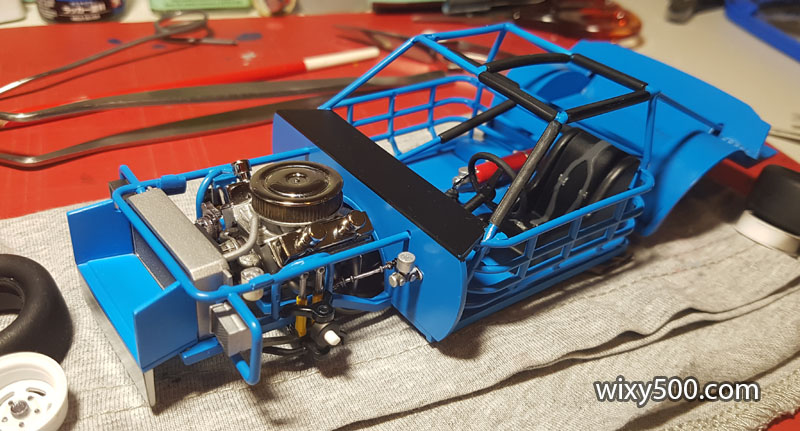
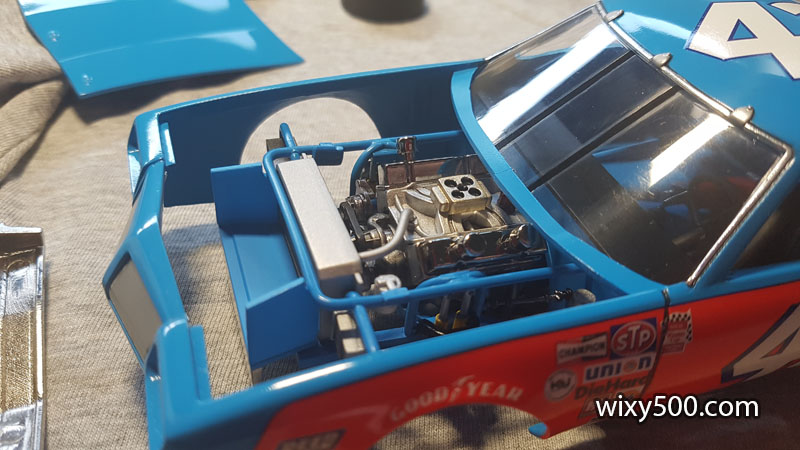
Completed engine bay. Looks ok but could do with some wires and plumbing to liven it up.
Right Vs Left. Having the panel lines for the door filled in (top pic) is much more realistic in my opinion. What do you reckon?
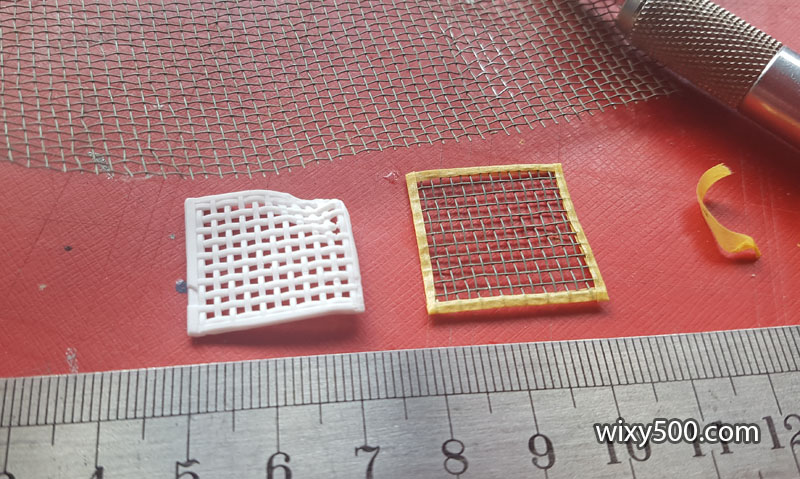
After I’d taken the photo booth shots, I came across some wire screening off an old door, so used a cut-off and some small strips of tape to create a window net to replace the kit’s item I ruined.
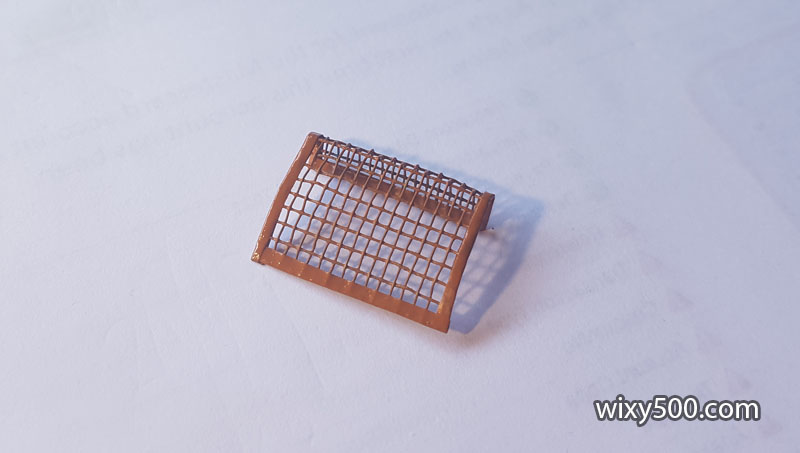
This was easily bent by hand to hook over the door and loosely follow the contour of the side of the car. It was then painted with a mix of Tamiya acrylics – Orange and Flat Earth.
No glue required, the net simply hangs off the door allowing the model to be displayed with or without it. I’m not sure what the lifespan will be for the tape; let’s wait and see.
Summary
So, my first Salvinos kit. Love the subject matter, but the detail and fit did not meet expectation – mostly because my expectations were pretty high after hearing patriotic Americans pumping these kits up.
It’s a welcome and very colourful addition to my collection; the red is much brighter than photographs and computer screens can represent.
If I was to build it again I would:
fill the door gaps on both sides
possibly add some wires and plumbing to the engine bay
make the rear bumper narrower and cut the taper off the leading edges (assuming a method can be found to strip the chrome plating)
remove the rear window straps and replace with scratch built items
sand the hood & trunk pins off prior to painting (they are molded oversize in comparison to the supplied decals. Another option would be photo etch items, if they exist?)
not screw up the window net (or just make my own again?)
Lots learned and I reckon I could do a better Oldsmobile now after the experience of this build. Despite the issues and inaccuracies, I look forward to one day adding a Salvinos Chev Monte Carlo and Dodge Charger to the built list.
Customary closing shot – the completed kit and the box (21 Dec 2022)
I’m staring on my first JR Salvinos kit: the 1979 Oldsmobile 442 AJ Foyt drove.
I was disappointed on there was not any reference to painting the kit. Also not happy with the chrome parts and not able to strip the chrome.
Race cars don’t have chrome. I tried spraying the chrome with Dullcote, did knock down chrome finish. I guess the only way to glue the chrome parts is scraping it back to plastic or use something like Canopy Glue. I found the instructions leave off a lot of steps you have to adapt to.
This should be interesting, I enjoyed your build and it has helped…wish me luck.
From what I’ve read, the original molds for this kit were from Monogram from 1979/80. Probably one of the reasons why it has the issues with fit and part thickness.


I’m staring on my first JR Salvinos kit: the 1979 Oldsmobile 442 AJ Foyt drove.
I was disappointed on there was not any reference to painting the kit. Also not happy with the chrome parts and not able to strip the chrome.
Race cars don’t have chrome. I tried spraying the chrome with Dullcote, did knock down chrome finish. I guess the only way to glue the chrome parts is scraping it back to plastic or use something like Canopy Glue. I found the instructions leave off a lot of steps you have to adapt to.
This should be interesting, I enjoyed your build and it has helped…wish me luck.
Yep, they can be a bit frustrating. I used CA glue (super glue) for the chrome bumpers.
Good luck with your build! The AJ Foyt car is one I’d like to get some day.
From what I’ve read, the original molds for this kit were from Monogram from 1979/80. Probably one of the reasons why it has the issues with fit and part thickness.
Hi Deano, where did you read that? Salvinos say they did this one from scratch, in 1/25 scale.