First time with race grime! Here’s how I built Tamiya’s 1989 Le Mans winner as it finished the 24-hour race, complete with bug smears, rubber debris, brake dust – and damage!
The Car
Having withdrawn from the event due to tyre issues the year prior, Sauber-Mercedes entered three cars for the 1989 race. This was the last year the cars ran the full 6km Mulsanne straight – for 1990 the circuit was neutered with two chicanes, breaking up this glorious full-noise stretch. During qualifying, the #62 Sauber team car hit 400 km/h (248 mph) on the Mulsanne…
The C9 utilised a primarily aluminium monocoque powered by a 5-litre turbocharged V8 running through a 5-speed Hewland gearbox. The car even has its own Wikipedia page – see HERE to read more about this iconic racer.
The Model
The kit is the original release of Tamiya’s 1:24 scale C9, item 24091. I obtained it from a fellow model club member, but within 12 months of getting my hands on it, Tamiya re-issued the kit and the new version included extra parts (photo etch, window masks) and better decals (Cartograph). Oh well, can’t help bad timing…
Being well second hand, the box was a bit damaged but all the parts were there and still sealed in their bags. The decals had yellowed a little, but with plans to build it “dirty”, that wasn’t too much of a problem.
It’s a second-hand kit but all the parts bags were still sealed. It’s moulded in black (floor, suspension, wheels), clear (windows) and silver/grey (body parts and everything else).
I was able to pick up Zero Paints’ special “Mica Silver” mix that has been produced specifically for this car, plus a set of Scale Motorsport decals that includes two sheets of carbon fibre plus templates for cutting the decal stock to fit the parts in the kit.
The Build
The kit has decals to build any of the three versions from the 1989 race. I wanted to do the winning #63 car (driven by Jochen Mass, Manuel Reuter and Stanley Dickens) presented in post-race condition, ie “race dirty” (the first time I have tackled such a task).
Actual work started 22/12/22. Here, all the parts (other than the tyres and clear sprue) are drying after a quick wash in a weak solution of white vinegar and detergent in warm water.
95% of the parts come off the sprue, the mould gates removed and seamlines scraped/sanded off. A few pieces need some filler before priming, but there are a few pieces that can be glued now, such as the rear wheel uprights and engine halves.
I noticed when test fitting the body that there’s a big gap for light to shine right through the wheel wells at the front of the car
So I cut and trimmed some Evergreen sheet and glued it in place to create these “light blockers’.
It’s not a perfect fit to the upper body and is not reflective of what the real car has in this area, but once painted it will be fine for this build as the front bodywork is not removable.
Scuffing the ejector pin marks on the top of the ground effect tunnels, ready for filler.
The kit instructions call for the brake cooling ducts to be fitted to the floor piece. However, this then leaves a gap between the outer circumference of the duct and the main body, an issue that’s clearly evident in Tamiya’s official photos of this kit. I’ve elected to glue the ducts into the body, which now require the gaps under the intakes to be filled with small pieces of plastic to match up with the floor
I’ve also decided to glue the top panel on the nose before painting as I want it to be a more integrated part of the nose piece (the instructions call for it to be added late in the build).
The gap around the edge was then filled with two-part Milliput. Filler around the front brake ducts is Tamiya’s brush-on surface primer.
Trying out the SMS black surface primer on a few parts for the first time
Sanding down the filler on the top of the tunnels, initially with 240 and 400-grit block and water.
Same deal with the pin marks that are visible in the air inlet at the front of the car.
Levelling the plastic, Milliput and filler to get the body ready for primer.
Once the injector pin marks in the floor were smoothed, the entire part was hit with SMS Black Primer, as was the inside surfaces of the main body and engine cover. The floor was then masked and sprayed with Tamiya Gloss Aluminium (TS-17) for the sides of the monocoque in the front wheel wells and as a base for the heat shielding in the engine bay.
I purchased the carbon fibre detail up set that Scale Motorsport make for this very kit. The two sheets of carbon decal include all the part numbers and shapes marked on the back, ready to cut out and apply. However, this amount of carbon is an overkill as a number of the parts indicated here for the chassis are NOT carbon fibre – this car had an aluminium monocoque!
I did not apply the full-width carbon decal for inside the nose (much of it will not be visible once assembled), just this lower section of the radiator intake.
Carbon fibre decal went down fine on the flat surfaces, but the ground effect tunnels required a lot of work. I ended up with some crinkles I could not get out but most of them will be hidden once the wheels are on.
Tamiya Flat Aluminium on the engine block, radiator and front springs. This acrylic paint has too much of a ‘crystalised’ frosty finish for my liking
Radiator glued in place with a black wash on the finned area.
Gearbox and bellhousing was brush painted a mix of Gun Metal and Semi-gloss Black
Holes were drilled in the cam covers so I can add spark plug leads to the engine (not included in kit). I’ve also scratched off the paint where the exhausts will mount later in the build.
Engine dry-fit in the floor. Main body has a light coat of Tamiya grey primer on the nose so I can see where to fix any panel misalignment.
The engine includes pullies and belts at the front, which are basically hidden once assembled.
Dry-fitting the cockpit tub, firewall/rollover structure and engine cage. Accidentally broke a couple of the supporting struts…
Adding the eight spark plug leads (after market wire by MFH)
I wasn’t going to bother doing any significant underbody work (as I don’t display my models upside down :p ) but then decided to add carbon fibre decal to the extraction tunnels. This main centre piece was already marked on the sheet and went down well. For the other areas, masking tape was applied to where the carbon decal is required, cut and trimmed to create a template, then placed on the decal material.
Once cut out, each piece fits where it’s supposed to go.
So, if someone looks up the Sauber’s rear end, they’ll see carbon.
Oops! The vertical “light blocker” panels I applied earlier in the build covered up where the steering rod was to go! I drilled a hole in each panel large enough for the diametre of the steering rod, then sliced each piece so the rod could slip down into the hole.
Not perfect, but it won’t be visible once assembled. Front suspension is a very basic representation, but as the front bodywork is not removable, it doesn’t really matter.
Tamiya grey primer on all the body parts (plus a few other pieces) to check and correct blemishes.
In addition to the aluminium colour sprayed onto the floor, I added further heat shields using Bare Metal Foil. Method was similar to the carbon decals, using masking tape placed on the model to create templates the correct shape and size.
To simulate tyre debris build-up, graphite was sanded off a pencil…
Some Tamiya X-19 Smoke was brush painted onto the model to act as glue for the graphite which was sprinkled and dabbed to build up the ‘debris’. It was then hit with the smoke colour through the airbrush to seal the graphite dust in place.
Compare the “rubber debris” on the left with the clean carbon on the right. I’ve never weathered or race-worn a model before, so while most of this effect will be out of view once complete, it (hopefully!) serves as good practice for when it comes to the bodywork.
The graphite/smoke trick was also used on the leading edge of the radiator and splitter.
Brake discs have Tamiya Panel Line Accent as a wash to give them a worn dirty appearance. We’ll see how this looks when the wheels go on; perhaps they need to be dirtier?
Clear smoke followed by a little clear yellow was lightly sprayed on the heat shields and around where the exhausts and turbos will sit to give a bit of a stained burnt effect.
SMS Surfacer Black on some more parts. I was considering using this for the main body as well, but I don’t think it’s as good as the Tamiya Grey Primer which I find gives a smoother finish.
While getting ready to think about some proper body colour, I discovered the car finished the race with significant body damage, namely, a huge hole in the righthand side! So, out with the pliers and file…
The floor and engine well on their way with most of the other parts primed.
Above & Below: Checking the left and right suspension arms are at equal height as the glue sets on the tap arms. There is a fair bit of slop on the engine mounting, plus between the top arms and the gearbox (can rock side to side). This same method was used when the lower arms were fitted to the floor earlier in the build. If the finished model does not sit square, at least this step is not the problem!
With the top arms now properly in place, it was then time to fit the uprights which snap into place between the suspension arms. Oil lines to the rear cooler are just scrap electrical wire with the wire pulled out.
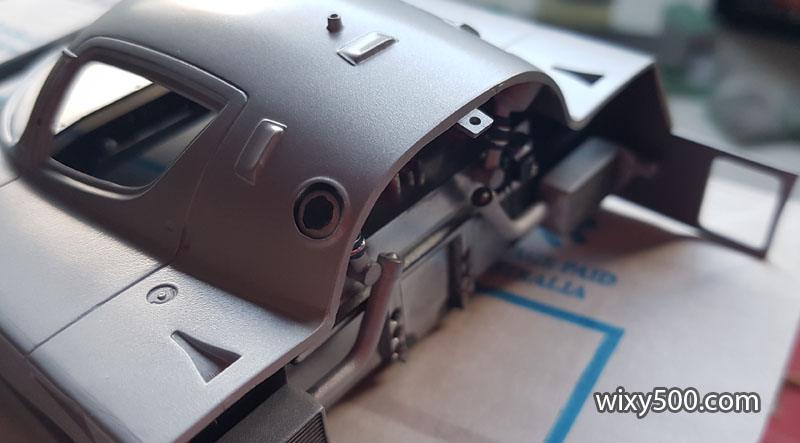
Engine and rear-end fitted to the floor. Red/blue is hand painted to represent the hydraulic fittings. All wiring and plumbing in this build is my work as this kit does not include any. Exhausts, turbos, intake chamber etc can’t be fitted until the rear bulkhead and sub-frame are in place.
Each of the three team cars in the race had different colour mirrors. The #63 race winner had bright yellow. I’ve used SMS PL05 Yellow.
First two coats of colour, Zero Paints “Sauber C9 Mica Silver”.
After priming with SMS Black Primer, the cockpit was then hit with gloss black, which revealed the SMS primer finish was quite rough. Masking here is in preparation for Alclad Polished Aluminum.
Masking the dashboard/bulkhead for the same metal colour.
Masking removed. Due to the roughish primer, the finish is rather grainy.
The raised oval surface on each side of the cockpit (fuel cell access hatches??) was polished before masking for the Alclad. Kelvar decal was then applied to this surface (see below) and carefully cut around the edge of the oval to reveal it once more. After a light polish, the moulded rivet detail down the sides has generally come up well.
Cockpit mostly done. Seatbelts are very basic and disappointing in this kit (though it must be recognised, this was the standard for Tamiya kits of the era). In fact, I intended to drill out the top mounting holes and extend two red straps to the rear firewall. It was only when I was ready to fit the body I’d realised I had forgotten to do this. Didn’t’ want to risk damaging the work I’d already done, so just left it, but there’s certainly scope to improve here with not too much effort if you were building this model. The seat is sprayed with Tamiya XF63 German Grey. Fire extinguisher has come up well, sprayed with Tamiya LP72 Mica Silver then fine strips of Bare Metal Foil on the straps.
I’d been warned about how ‘hot’ Zero Paints can be. After the first two coats, everything was looking really good. So, about three days later I hit it with two more coats – and this happened. Not sure if that’s orange peel, or wrinkled/melted plastic :/
The seam line that ran along the outer top edge of the doors was removed prior to primer. After priming (Tamiya Grey) there was no evidence of the seam. After the initial two coats of Zero, again, no evidence of the seam. But after the second two coats of colour, it has magically reappeared. I don’t understand why.
Same deal with the top nose panel – after the second two coats of Zero, the filler in the gap (Milliput) has become visible.
There is a bit of free-play when adding the fuel filler tubes, so I placed the cockpit insert inside the body to align the tubes with the apertures in the body mould.
Once the dashboard/bulkhead was in place, I decided to add the driver’s lower-leg restraint belts. They’re made from thin strips of Evergreen, bent, painted flat red, then CA-glued into place.
Leg straps as seen from the other direction.
Cockpit module done, thought the rear sub-frame bars have to be fitted before it can be fixed to the chassis.
As the Zero Paints is a matt finish, a gloss clear needs to be applied to the body so the decals have something they can adhere to. Two quick coats of Tamiya TS13 does the job.
Rear sub-frame installed. Careful painting makes the spring/damper/rocker assemblies look like a separate part to the bars, but they are not, it’s all one moulding.
It that gonna fit?
Yep!
The damage I’m adding to the right-side of the car will expose this cavity that would normally be partly filled with the fuel tank. A piece of Evergreen sheet is cut and bent to shape.
After spraying semi-gloss black (SMS PL178 Chassis Black), it is glued in place. Very difficult to hold (supported here with a toothpick!), so one end is glued in first.
Then the rest of the panel is pushed into position and glued.
Painting wings can be a real pain. Thankfully this one is thick enough to drill a small hole in the end into which a tooth pick is inserted to hold the part for painting
Getting rid of some unevenness in the top surface of the rear wing. This was initially shot with grey primer, then sanded. After this pic it received black primer, a light sand then semi-gloss black for the final colour.
Much of the exhaust system is painted with Model Masters Sable Brown Metallic over either Tamiya grey or SMS black primer. The masking here is to protect the exhaust side of the turbos from the aluminium colour that’s about to go on the compressor/intake.
After the main colour is applied, a very light application of aluminium (using an 0.2mm needle) was made to the headers to get some metallic back in the extractors, then clear yellow and clear blue to get some heat stain effect. All the outlet tips have received some flat black. The top of the pop-off valves will be painted chrome and black once installed in the car.
Cleaning up the tyres and found this printed on the inside. So, these are the same used in the Toyota 88C-V kit!
Tyre filings from removing the centre seam line and roughing up the surface to get a roaded look.
I collected this debris for later…
Tyres are fitted to the rims, then a mask placed over the rim. Quick coat of gloss clear to help the Michelin decals take to the rubber.
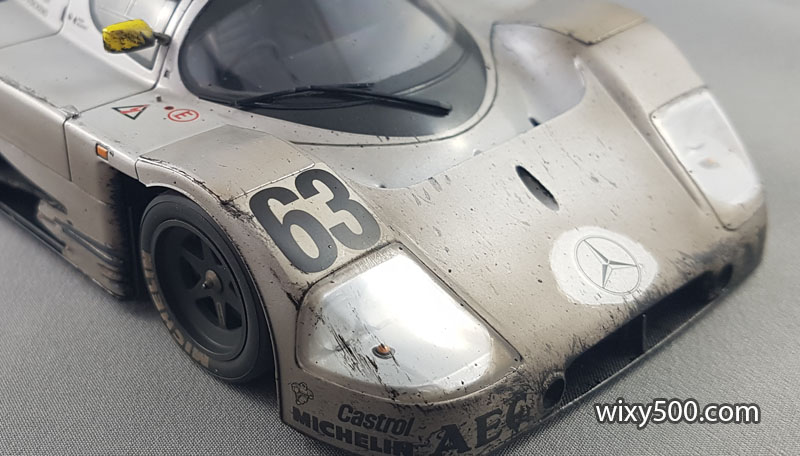
The #63 car which I’m building had a yellow identification panel around the rear taillight. I used the white panel from the #62 version as a background before placing the yellow over the top.
Despite their age, the Tamiya decals all went down well.
Both AEG logos have been damaged by me on purpose as this is how they looked by the end of the race.
Exhausts and turbochargers in place – they even matched up to the intercoolers!
Above & Below: As mentioned, all wiring and plumbing has been added by me, (very) loosely based off reference photos. Period pics of the engine bay are difficult to find – most of the images I found on the internet are of the car as it’s presented now, 30 years after it raced..
Clear smoke (Tamiya X-19) over the tyres to take the starkness off the white Michelin decals
They were then hit with flat clear to dull them down and give a rubber look. This is how they appear after the circular masks were peeled off.
To give the tyres and rims the look of brake dust (and, in the case of the rears, heat and soot from the exhausts), I thinned a mix of flat brown and flat black in the airbrush and slowly built up the discolouration.
Wheels on! The wastegates have also been added above the turbos to complete the exhaust system.
“Burned” tyre sidewall with hopefully enough brake dust and exhaust soot to look ‘as raced’
Final clear coat is on. For this model it doesn’t need to be a high quality gloss as it will be presented in as-raced grimy condition. Seems a shame to mess up that shine…
The windows have a light frosting where a semi-gloss black edge needs to be painted. I started doing this by hand (no window masks in this kit), but that was not working so well, so decided to make a mask. I drew on the glass with a pencil to mark the edge of the frosting, then placed tape over the window. The graphite from the pencil sticks to the adhesive of the tape.
So when the tape is removed, there’s a line ready to cut for the mask.
Full width tape covers the outside and the newly created mask takes care of the inside, ready for paint.
Then sprayed with semi-gloss black.
I must not have properly burnish down the edge of the tape, so it’s not a crisp mask across the bottom. The messy top edge will be covered by a windscreen banner decal.
Instead of painting the top of the dashboard, I made a mask to cut a carbon fibre decal. Tape across the dash, then use pencil to find the edge and draw a line for cutting once the tape is removed.
Carbon fibre dash decal in place.
Tamiya provide aluminium stickers to cover the air release vents over the front wheels.
One on, one to go. Seems a shame to cover the vent detail, but the #63 car had these covered over. I don’t like the look of the stickers. All the windows and headlight covers are glued in with Kristal Klear.
Panel line washes done, mirrors attached, nav lights and other fittings in place.
Do I really want to mess up this finish? There was a nice shine on the engine cover straight out of the airbrush.
The mechanics kept the Mercedes logo, light covers and windscreen clean during the pit stops. These masks will prevent these areas getting the initial weathering.
Flat black mixed with a tad of flat brown plus thinners and run very carefully through the airbrush to slowly build up dirty brake dust and race grime discolouration.
I was initially going to use shaved graphite and smoke paint to represent the race debris on the bodywork, but then I experimented with semi-gloss black on a toothbrush…
Which gave this effect of bug and rubber debris. More debris was added after the masks came off to account for the final race stint from the last pit stop to the chequered flag.
Semi gloss black and the saved tyre shavings were combined, then the rear wheels run through this mixture to create post race tyre ‘pick-up’.
Which came up like this. I didn’t do the front tyres as they’re basically covered and the tread not really visible.
Subtle but nice race grime on the engine cover.
Body now fitted to the chassis. The edge of the clean area around the Mercedes emblem was too crisp and defined, so I used a little thinner on a skinny swap to mess up the edge to look more like a mechanic’s rag swirl.
Done! So into the photo booth.
Conclusion
Firstly, pay more attention to the box. Tamiya’s box art for this model has a cutaway illustration that shows lots of valuable detail for internal parts, plumbing etc, including items that are not even in the kit. It’s a great reference for adding extra detail and I basically forgot about it (my excuse for missing the obvious is the box lid was upside down for the entire build as it was used for storing parts :p ).
An enhancement I’d consider if I ever built this again would be to cut the driver’s side door out to better expose the interior detail. Now I’ve experienced how this model builds up, I don’t think it would be too much work to achieve an acceptable result and the model could be displayed with the door shut or opened up.
A piece of rubber debris wrapped around the mirror support. I reckon the filth on the windscreen has come up really well.
Rubber marks under the rear bodywork.
Damage and race tape. That’s a piece of rubber debris caught on the intercooler intake.
The closing shot – my build with the box art, 4/6/23.