FX 48/215 Conversion, David Price (Trax 1:43)

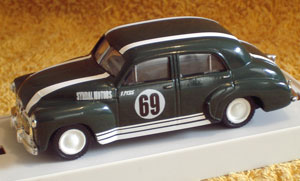
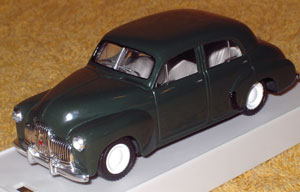
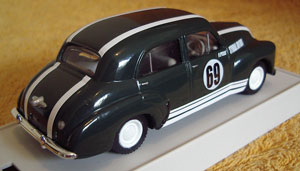
This project was to create a representation of theĀ 48/215 “FX” Holden that David Price once raced.

48/215 "FX" Holden David Price on Trax base

The donor model is Trax TR15, a Holden 48/215 "FX" in black, 1:43 scale. The project is to turn it into a representation of the car David Price once raced. Current market value of this model is AUD$125 (Ref: Trax Models book, 1986-2005 Edition) so doing a Code-3 modification is a significant undertaking.
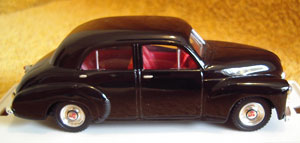
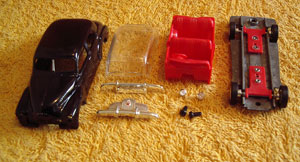
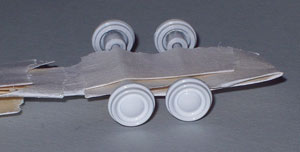
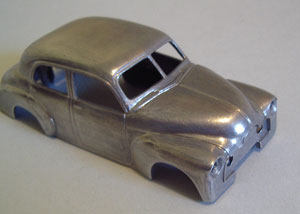
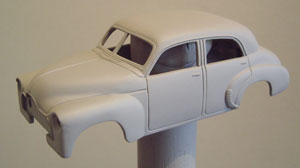
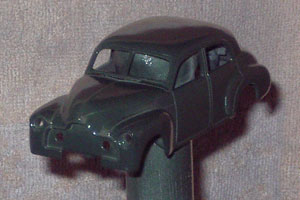
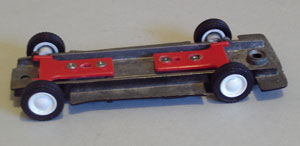
The donor model is Trax TR15, a Holden 48/215 “FX” in black, 1:43 scale. Current market value of this model was AUD$125 (Ref: Trax Models book, 1986-2005 Edition) so doing a Code-3 modification is a significant undertaking.
Two screws separate the base plate from the body and the model literally falls apart. The bumper/grill assemblies were tricky to remove as they were fixed in place with glue, as were the headlights which needed to be carefully poked out from the inside.
 The car raced with white wheels and no hubcaps. The axles were removed from the base plate and tyres taken off. Unfortunately, the wheels have the hubcap cast in, so Tamiya white is sprayed over the lot. (I have since found a source of suitable aftermarket wheels for future projects such as this)
The car raced with white wheels and no hubcaps. The axles were removed from the base plate and tyres taken off. Unfortunately, the wheels have the hubcap cast in, so Tamiya white is sprayed over the lot. (I have since found a source of suitable aftermarket wheels for future projects such as this)
Paint stripper easily removed the factory black finish. While they might have been lacking in detail, some of the earlier Trax models usually had pretty good paint, as this model did. The body was then lightly scuffed with fine wet-&-dry and polished with a soft brass brush.
The body was then hit with a metal primer undercoat.
Then a couple of coats of 'Brunswick Green' were applied. After a light sanding, a final heavier coat was applied a few days later, foillowed by a polish several days after that.
Then a couple of coats of ‘Brunswick Green’ were applied. After a light sanding, a final heavier coat was applied a few days later, followed by a polish several days after that.
Assembly starts. Axles are added to the chassis plate, as are the tyres. No other changes are made.
After the final coats were applied, detail painting was done (door handles, window edges etc) and the interior sprayed grey like the original race car. The model was then re-assembled. I had earlier given the grill a black-wash to dull it down and bring out the detail - it was too bright on the original Trax release.
After the final coats were applied, detail painting was done (door handles, window edges etc) and the interior sprayed grey like the original race car. The model was then re-assembled. I had earlier given the grill a black-wash to dull it down and bring out the detail – it was too bright on the original Trax release.
All that was left was the final decoration. The markings on this model were pretty straight forward and were all vinyl adhesive stickers. The stripes along the bottom sill were copied from those on the Ford GT40 LeMans cars! It took a bit of guess work and fine cutting with a razor blade to get the desired effect.
All that was left was the final decoration. The markings on this model were pretty straight forward and were all vinyl adhesive stickers. Price said the stripes along the bottom sill were copied from those on the Ford GT40 LeMans cars! It took a bit of guess work and fine cutting with a razor blade to get the desired effect.
The top stripes over the boot and roof were fine, but gettting them to follow the unique curve of the FX bonnet was difficult. Some fine cuts with the razor saw then settle down ok, but not perfect - another reason why I prefer wafer-thin waterslide decals... The headlight covers were painted white.
The top stripes over the boot and roof were fine, but gettting them to follow the unique curve of the FX bonnet was difficult. Some fine cuts with the razor saw then settle down ok, but not perfect – another reason why I prefer wafer-thin waterslide decals… The headlight covers were painted white.

Leave a Comment